


![]()
Azure Availability Sets help you ensure that your Virtual Machines (VMs) are highly available and resilient to planned or unplanned downtime. By distributing VMs across multiple fault domains and update domains, Azure guarantees that during maintenance or hardware failures, not all your VMs go offline simultaneously. This setup is critical for business continuity, especially for multi-tier applications requiring 99.95% uptime.
In this blog you’ll learn step-by-step how to add a Virtual Machine to an Availability Set using the Azure portal and Azure CLI.
Contents in the lab:
- What Is An Availability Set?
- Why Use Availability Sets?
- Step-by-Step Guide to Add VM to Availability Set
- What is an Azure Availability Zone?
- Deploy VMs In Availability Zones To Protect From Datacenter Level Failures
What Is An Availability Set?
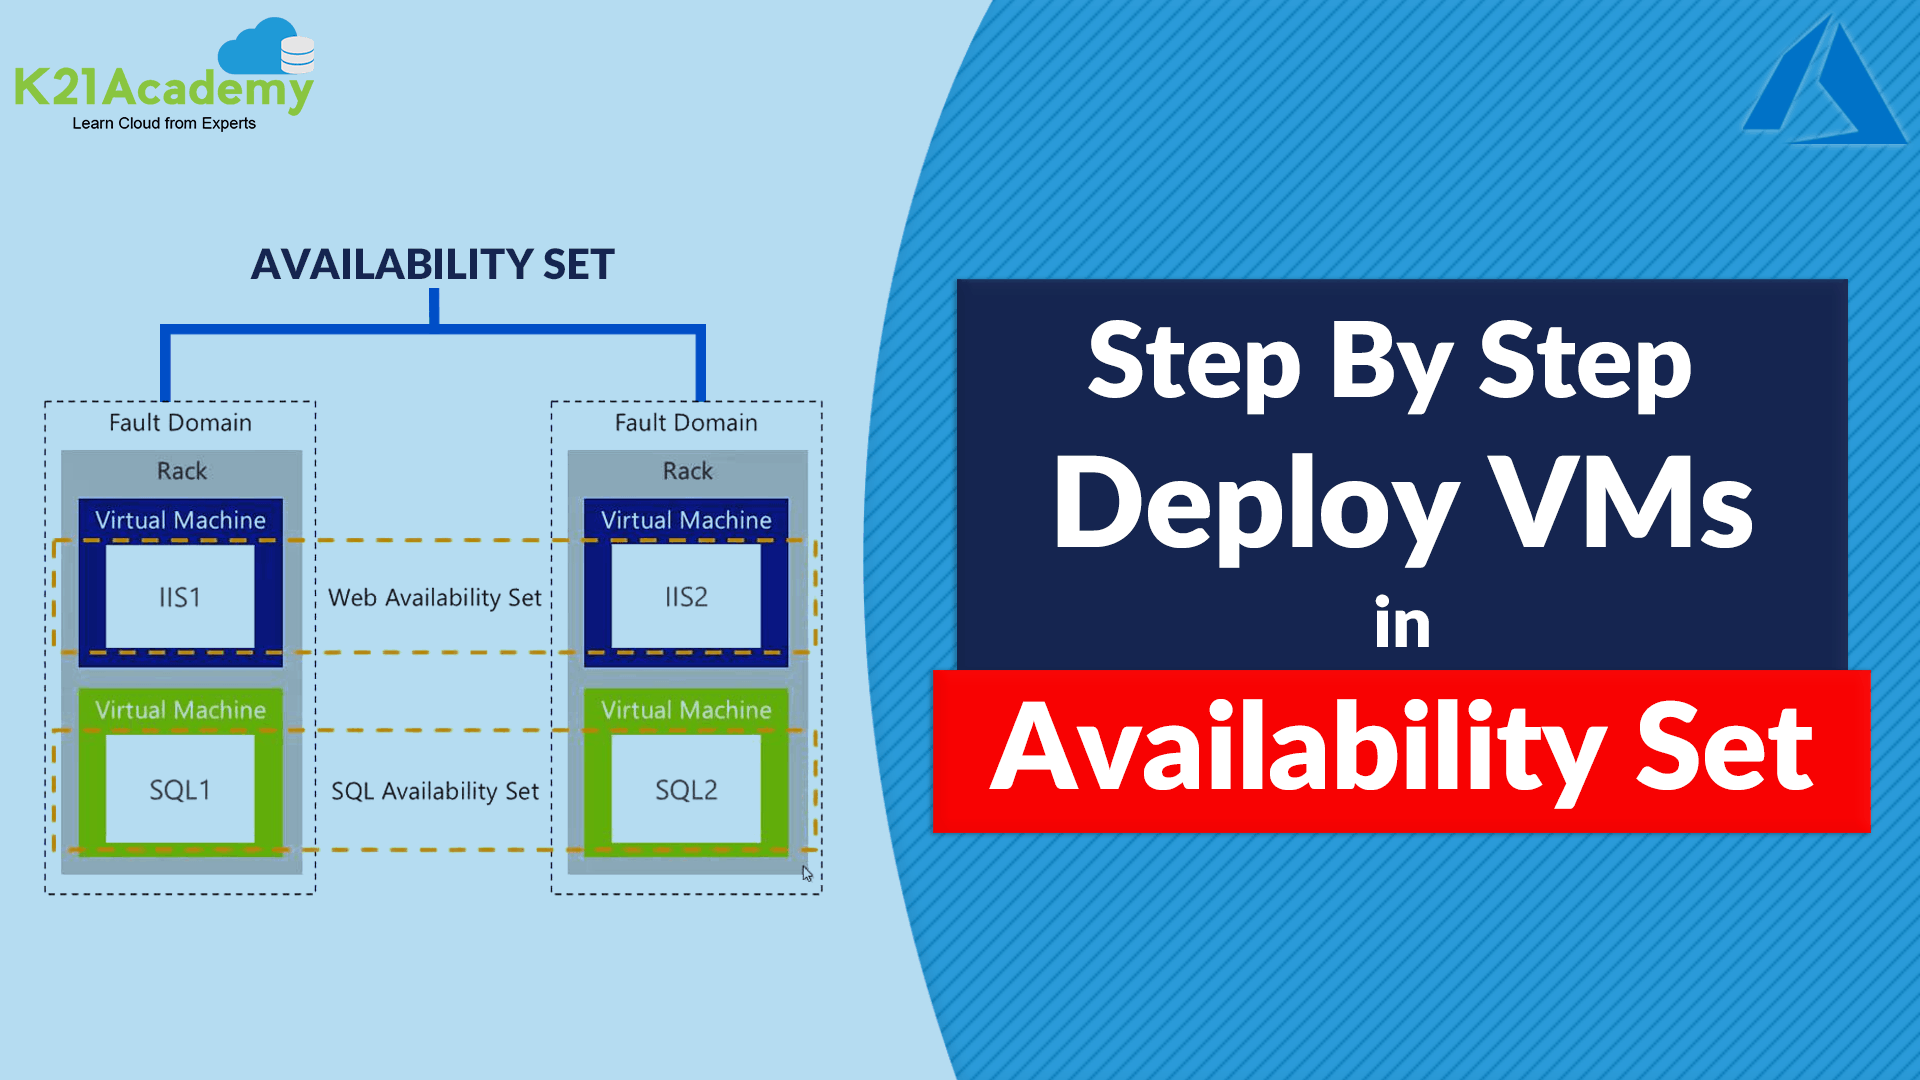
An Availability Set is a logical grouping feature in Azure that allows VMs to be distributed across multiple isolated hardware clusters. These clusters are known as:
- Fault Domains – It is a physical rack in a data center. VMs in different fault domains run on separate hardware to avoid simultaneous failures.
- Update Domains – A group of VMs that get rebooted together during planned maintenance. Distributing VMs across update domains reduces downtime during platform updates.
Availability sets place VMs in different fault domains for better reliability. This action is especially beneficial if a region doesn’t support availability zones.
Why Use Availability Sets?
Azure Availability Sets are a foundational concept for building resilient and highly available applications in the cloud. They protect your Virtual Machines (VMs) from both planned maintenance events and unplanned hardware failures. Here’s why they are critical:
1. Protection Against Hardware Failures (Fault Domains)
Physical hardware failures — such as power outages, network switches malfunctioning, or server crashes — can cause your VMs to become temporarily unavailable. Azure Availability Sets distribute your VMs across multiple fault domains, which are essentially separate physical racks within an Azure datacenter. By doing this, if one rack or piece of hardware fails, only a subset of your VMs are affected, while others continue running without disruption.
2. Resilience During Planned Maintenance (Update Domains)
Azure periodically performs planned maintenance on its underlying infrastructure, which might require rebooting or patching servers. If all your VMs were hosted on the same update domain, they would all be rebooted simultaneously, causing application downtime. Availability Sets spread your VMs across multiple update domains so that only a portion of your VMs are restarted at any given time. This rolling update approach ensures continuous availability of your application.
3. Achieve High Availability SLAs
Microsoft offers a Service Level Agreement (SLA) of 99.95% uptime for VMs deployed within an Availability Set. This means that your application can expect to be operational nearly all the time, with minimal downtime. Meeting this SLA is crucial for business-critical applications that require consistent availability and uptime.
4. Cost-Effective High Availability
Availability Sets provide a simple yet cost-effective way to increase your application’s reliability without needing complex multi-region architectures. By leveraging fault and update domains, you reduce risks while optimizing infrastructure costs.
Step-by-Step Guide to Add VM to Availability Set
Perform the following steps:
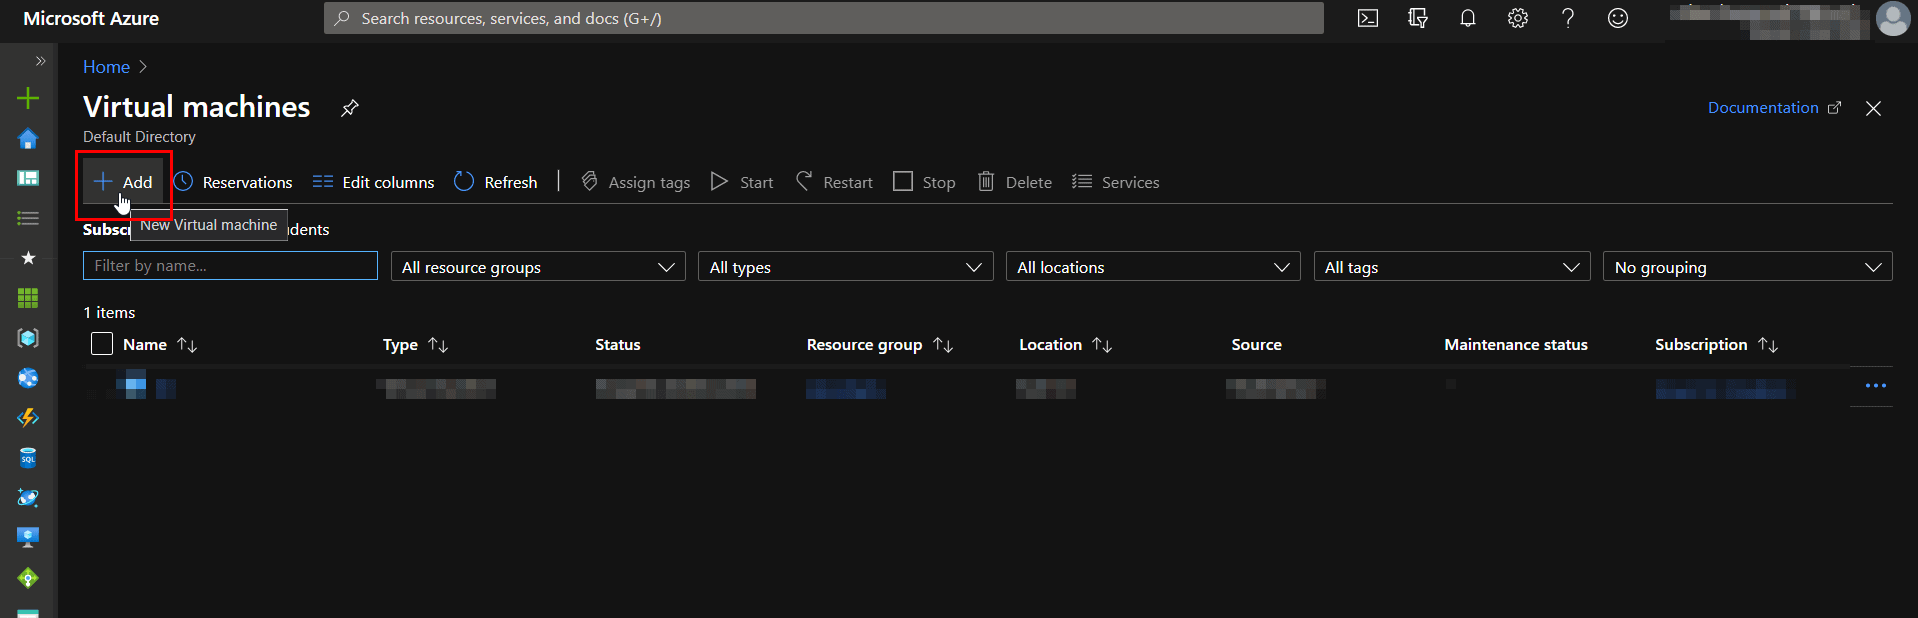
1. To Sign in to the Azure portal click here.
2. In the Search bar, type Virtual Machines, and then click Add.
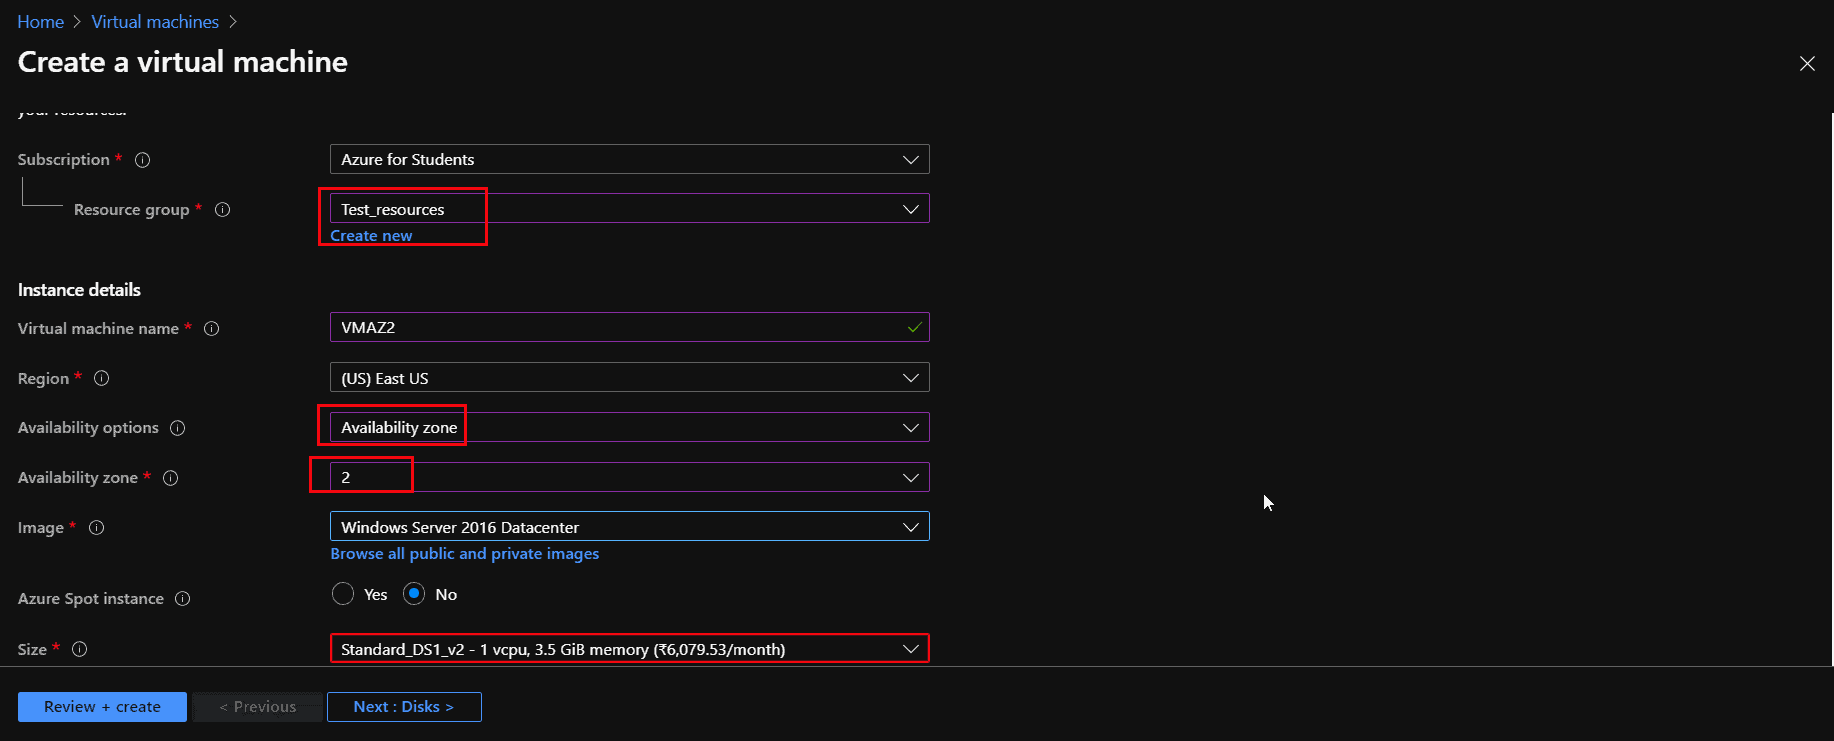
3. On the Create virtual machine blade, click Basics. Enter Unique VM Name, VM disk type, User name and Password, Subscription, Azure Resource Group (New or Existing), Azure DataCenter Location (Region), and Select Availability Options to Add Availability set.
Also Read: Our blog post on Azure Kubernetes Service. Click here
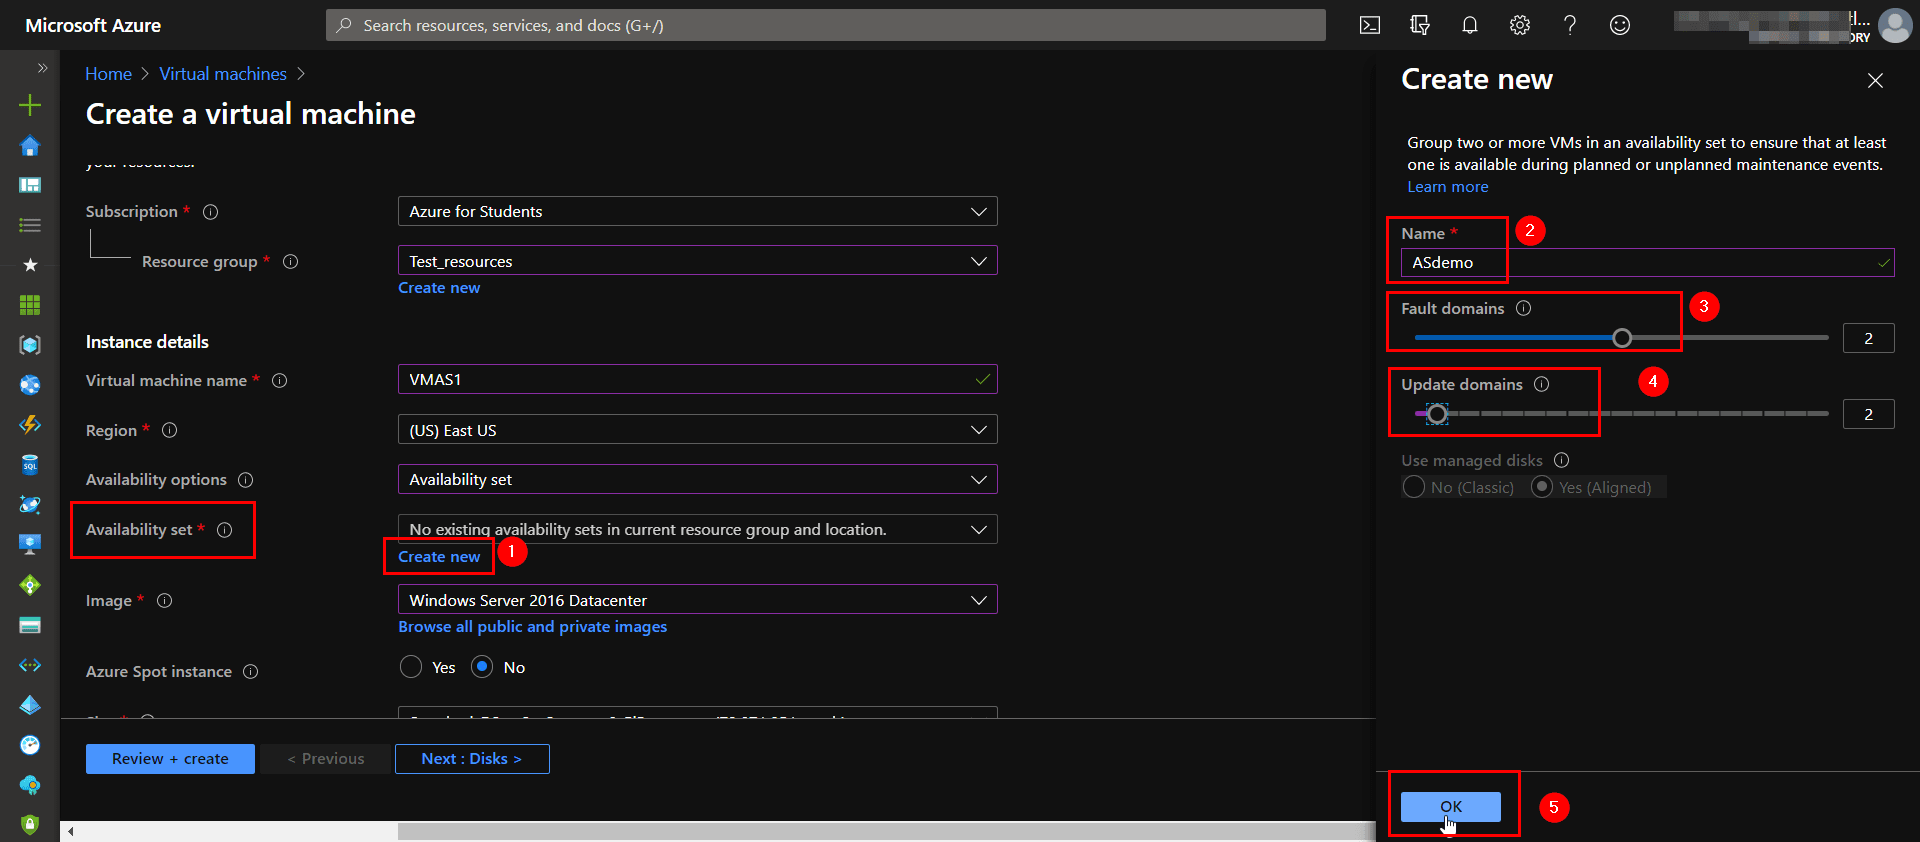
4. Click Create New, type the name for the Availability set, select the no. of Fault Domains and Update Domain, Then click OK.
Fault domains – The group of VMs that share a common power source and network switch. By default, the VMs are separated across up to three fault domains and can be changed to between 1 and 3.
Update domains – Update domains indicate groups of virtual machines and underlying physical hardware that can be rebooted at the same time. By default, 5 domains are assigned. This can be set to between 1 to 20.
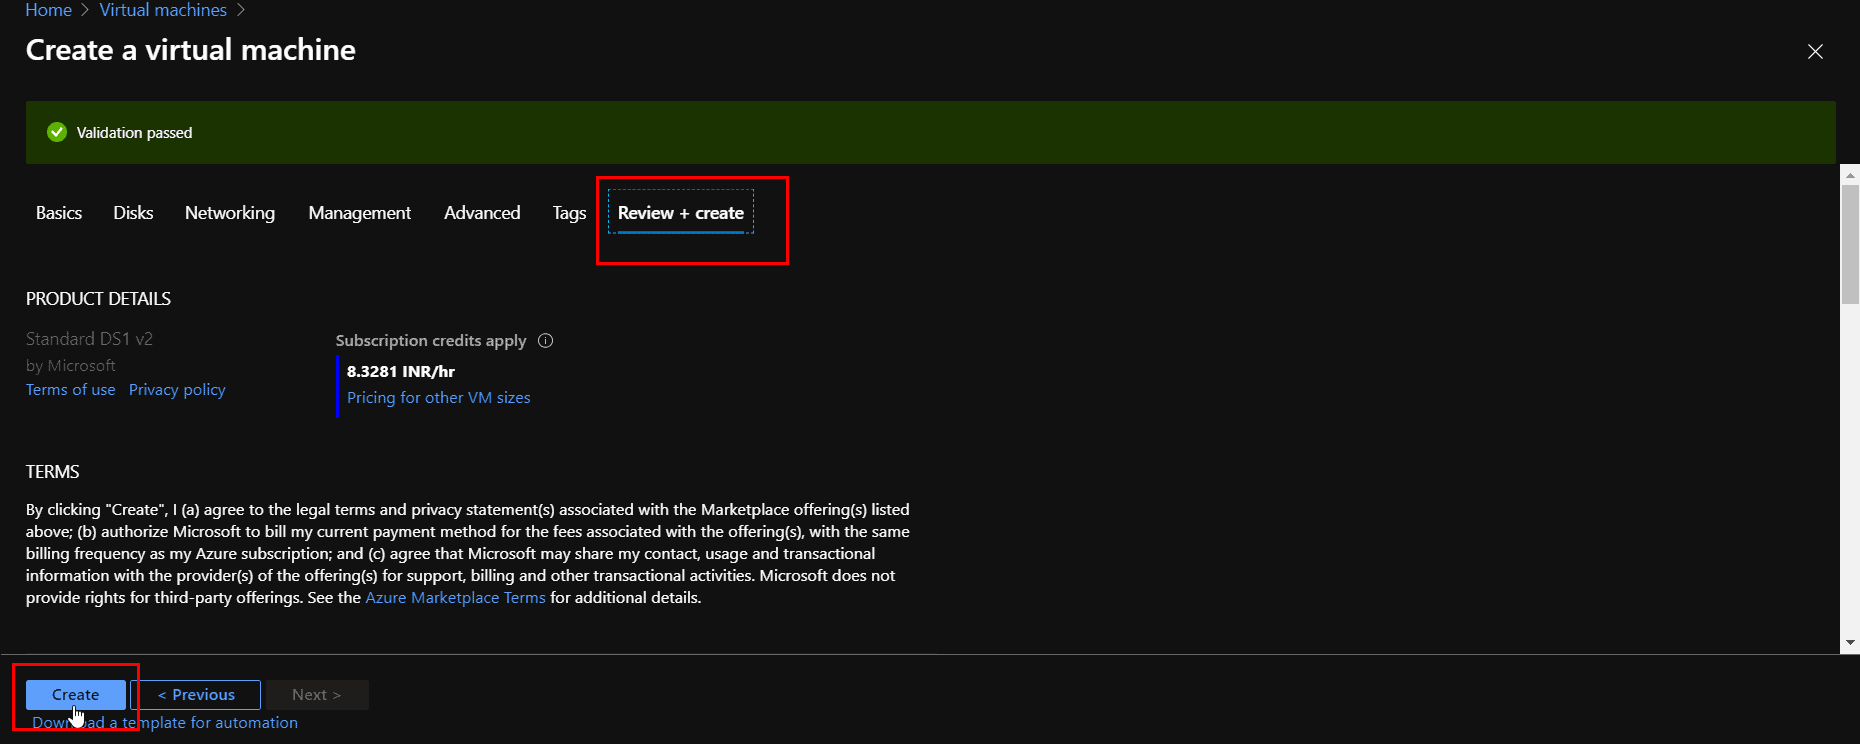
5. Leave the rest tabs to their default values and select Review + Create.
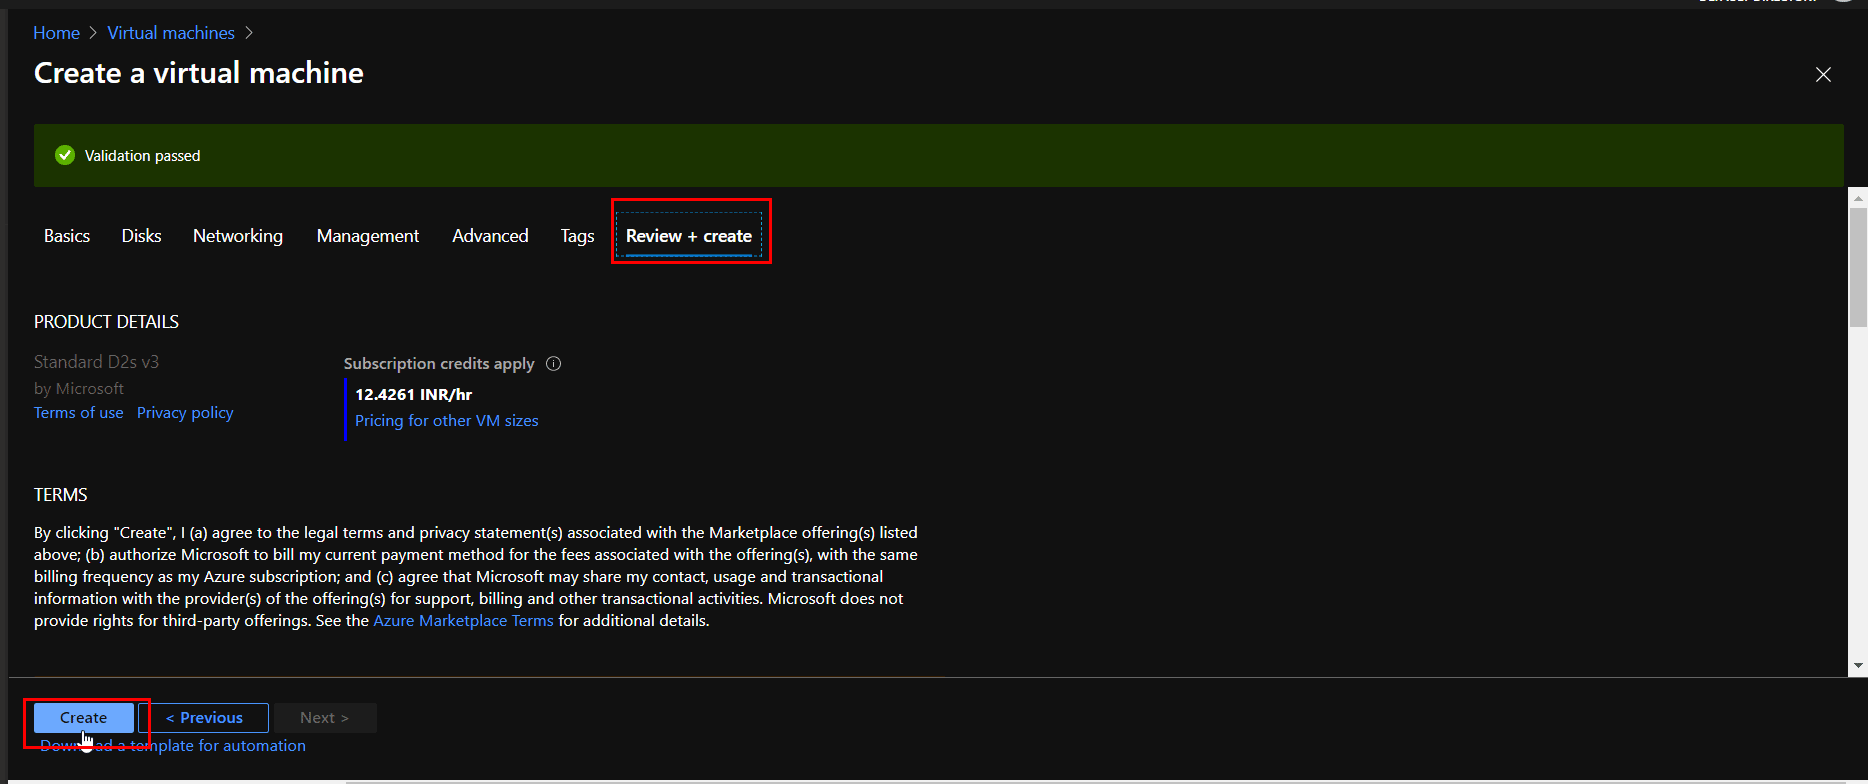
Now your First VM is created and deployed in an Availability Set.
Also Check: Our blog post on Azure Virtual Machine. Click here
Create a new second Virtual Machine and Add to the same Availability Set in the Azure Portal:
1. Repeat the same steps from 1-3 of the previous VM creation and Select the Availability Set (AS demo) in the Availability Set option.
NOTE: Second VM should be in the same Resource Group as the First VM.
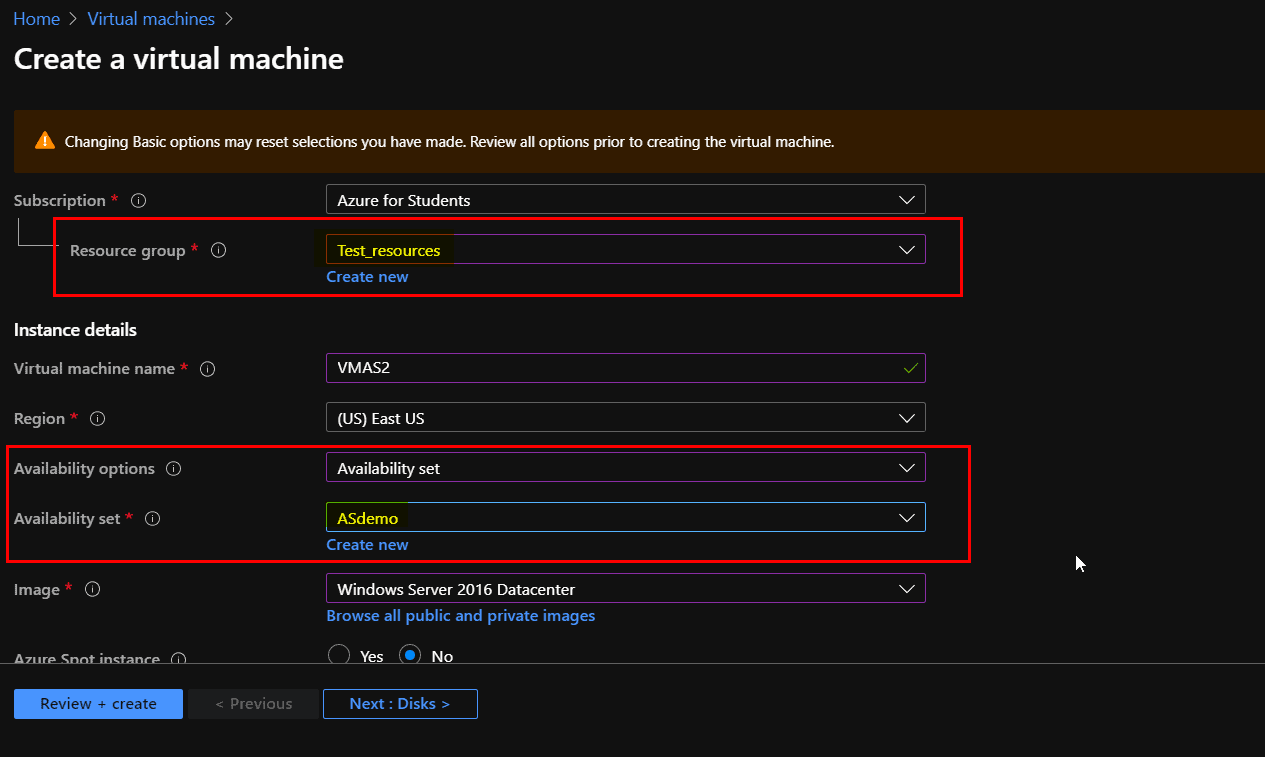
2. Leave the rest tabs to their default values and select Review + Create.
Now you have successfully deployed both the VMs in the Availability Set.
Also Read: Our blog post on AZ 104 Microsoft Azure Administrator. Click here
3. Check the status of the Availability Set by going into the Resource Group and select the created Availability Set(ASDemo) resource.
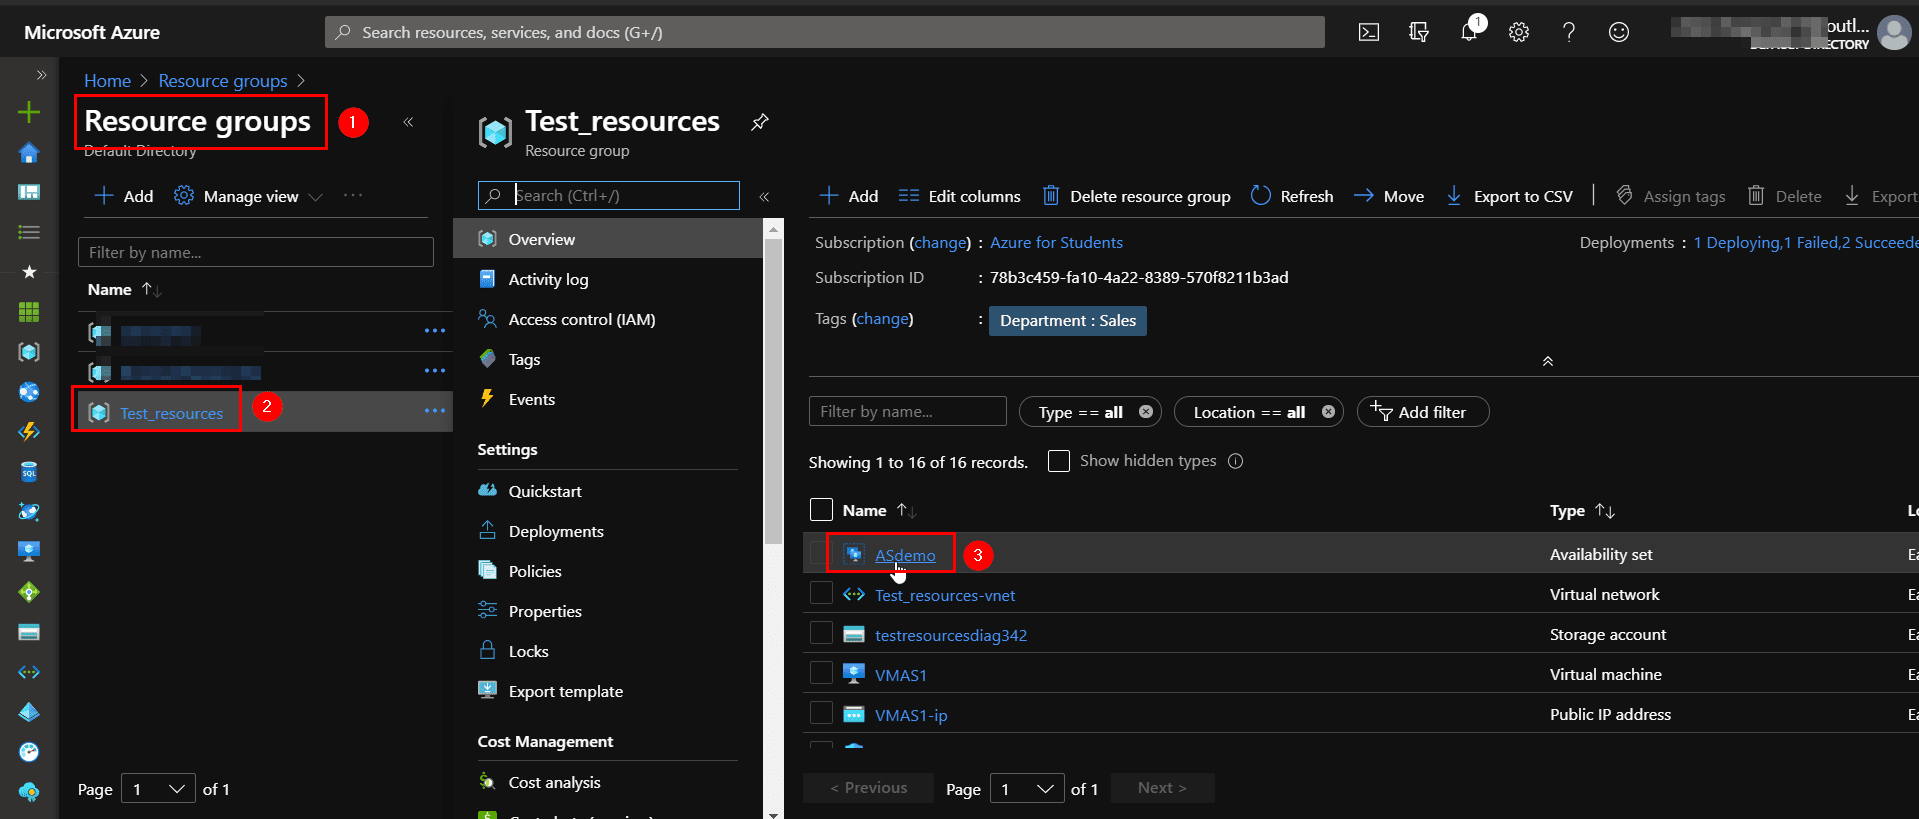
4. Now you can see your both the Virtual Machines are deployed in the Fault Domain and Update Domain.
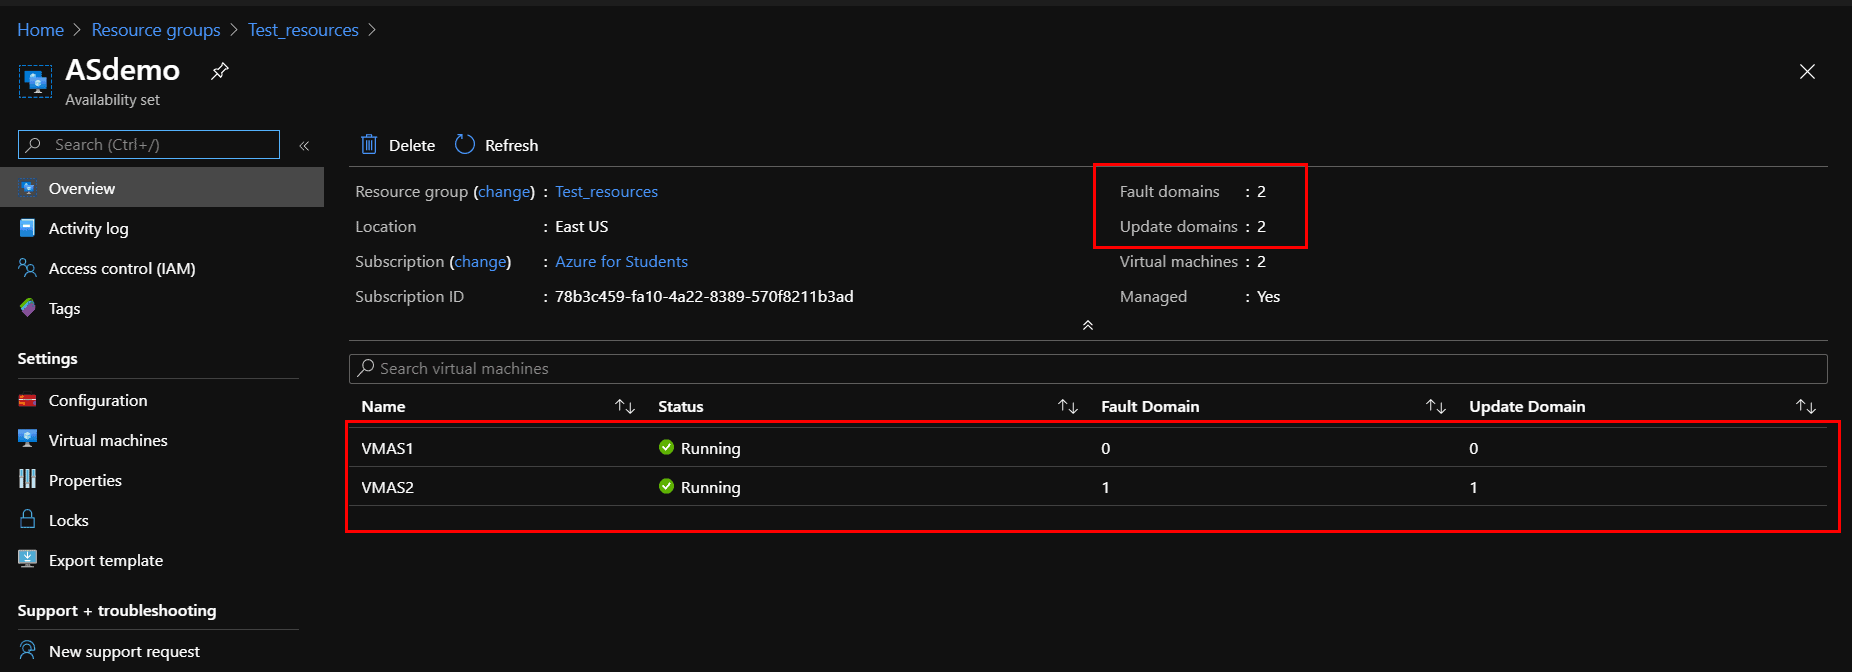
This is how Azure automatically keeps track of which VMs belong to each domain respectively. Just remember, you may not move a VM from one Availability set to another. This would require you to delete and recreate the VM.
To expand the level of control you have to maintain the high availability of the applications and data on your VMs. Availability Zones are unique physical locations within an Azure region.
What is an Azure Availability Zone?
An Azure Availability Zone is a powerful high-availability solution designed to protect your applications and data against datacenter-level failures. Unlike Availability Sets, which distribute VMs within a single datacenter, Availability Zones are physically separate locations within an Azure region, each consisting of one or more datacenters.
Related Readings: Azure Availability Zones, Azure Regions, Availability sets, Fault & Update domain
Deploy VMs In Availability Zones To Protect From Datacenter Level Failures:
Perform the following steps to do so:
1. To Sign in to the Azure portal click here.
2. In the Search bar, type Virtual Machines, and then click Add.
3. On the Create virtual machine blade, click Basics. Enter Unique VM Name, VM disk type, User name and Password, Subscription, Azure Resource Group (New or Existing), Azure DataCenter Location (Region), and Select Availability Options to Add Availability Zone.
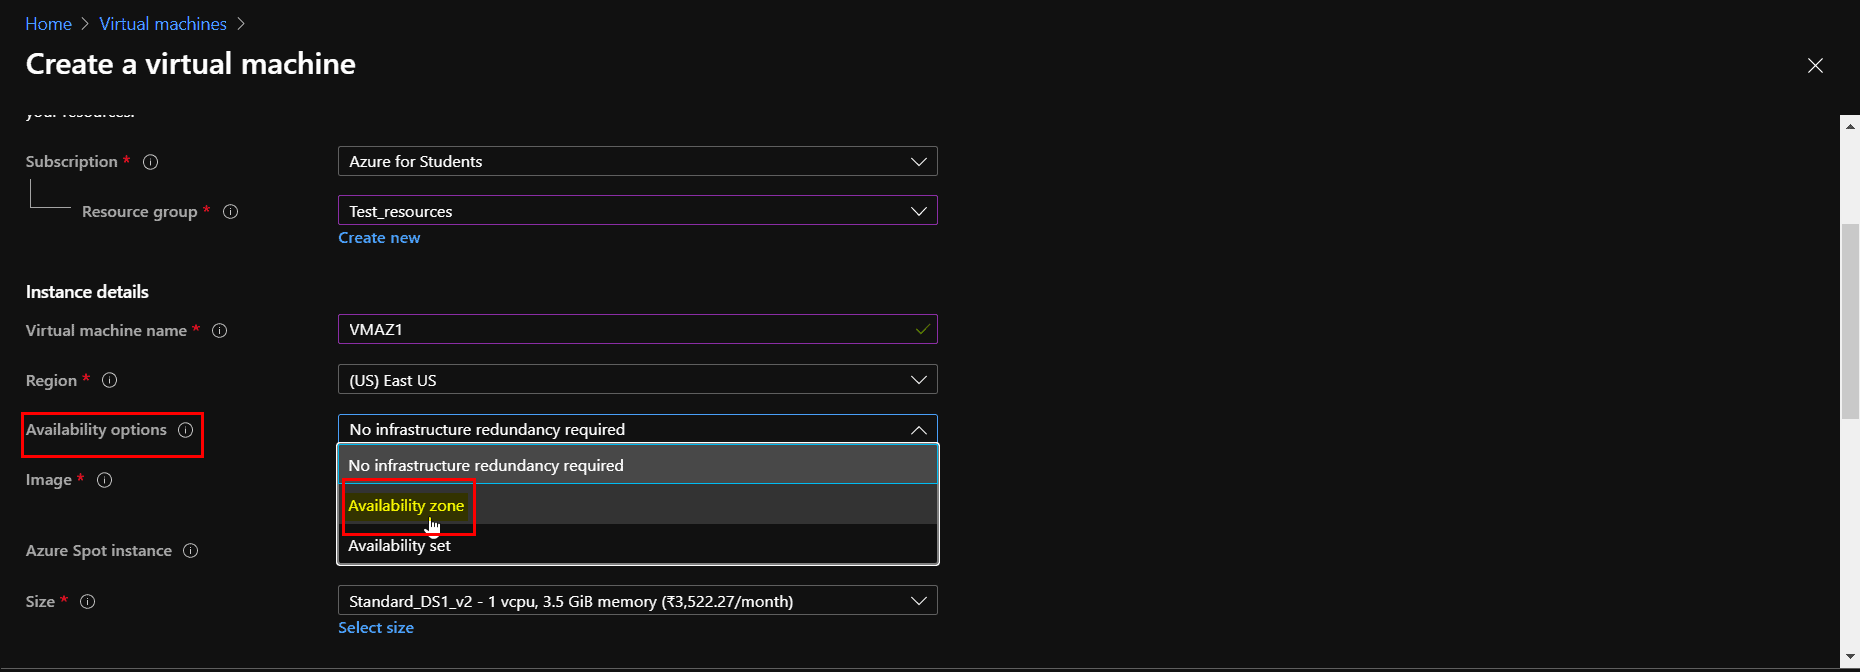
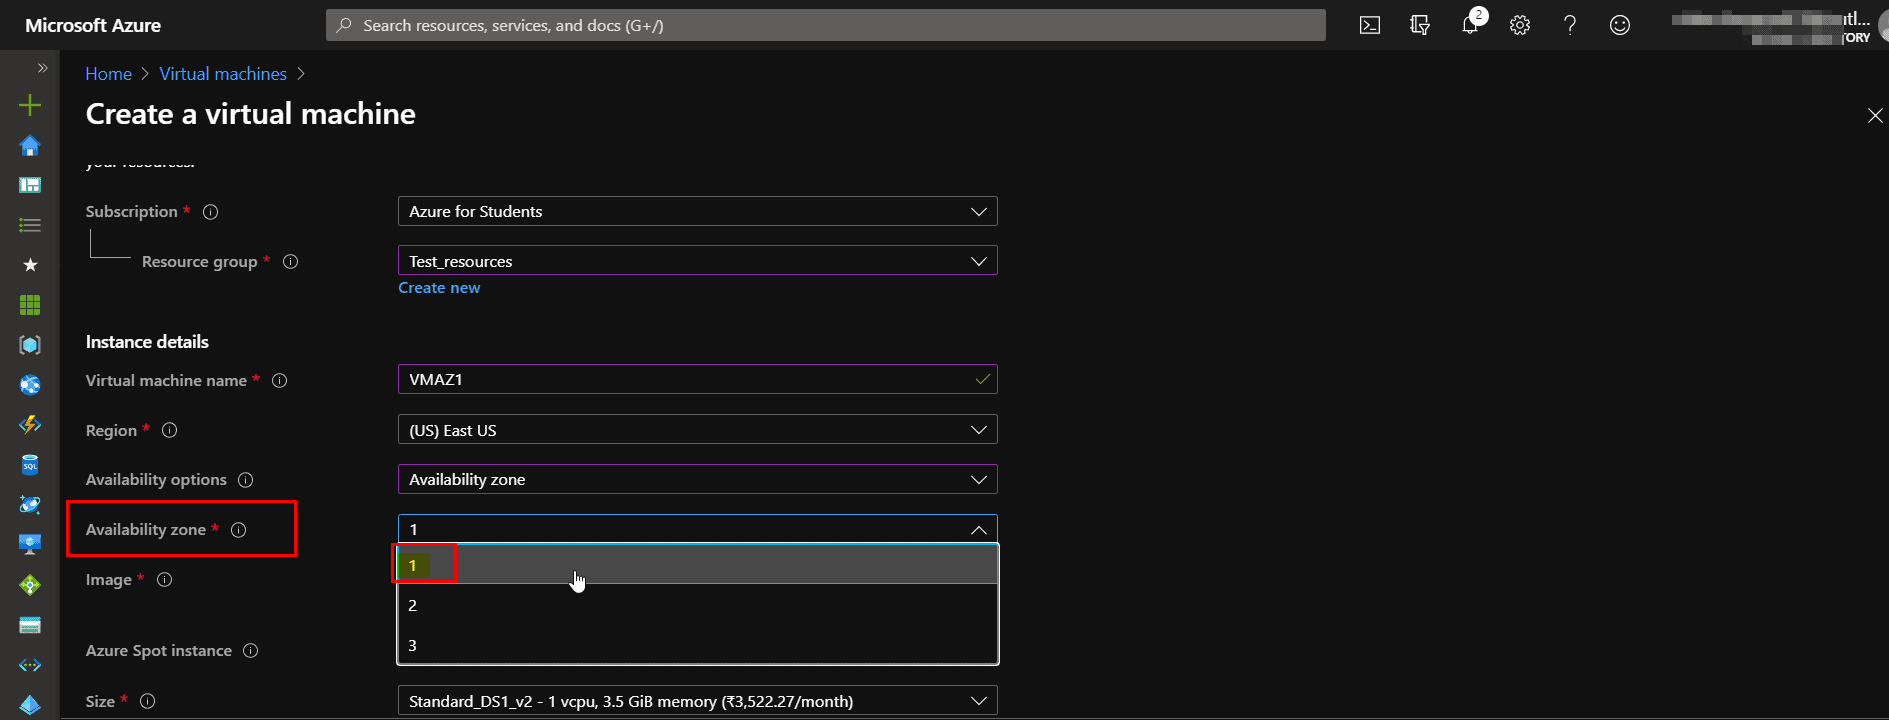
4. Now select the first Availability Zone for your first VM from the Availability Zone option drop-down list.
NOTE: Not every region has support for Availability Zones. A region can have up to 3 max. Availability Zones.
To check whether the target region has support for Availability Zones or not, click here.
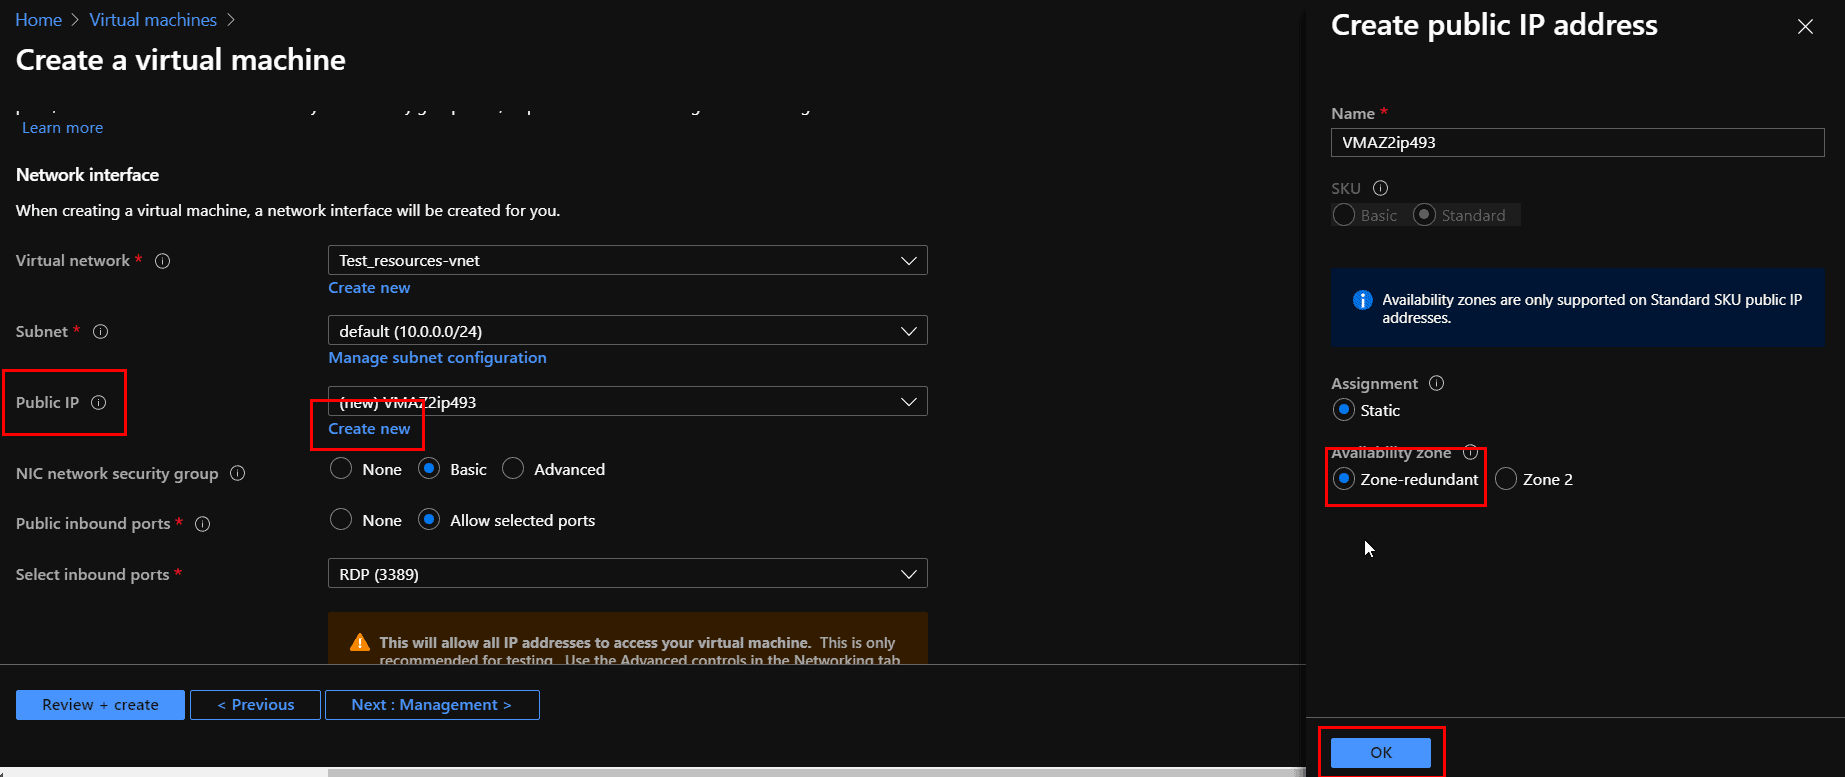
5. Click Next and Leave the Disks Tab to its default value and jump to Networking Tab.
Check Out: Our previous blog post on Microsoft az 104. Click here
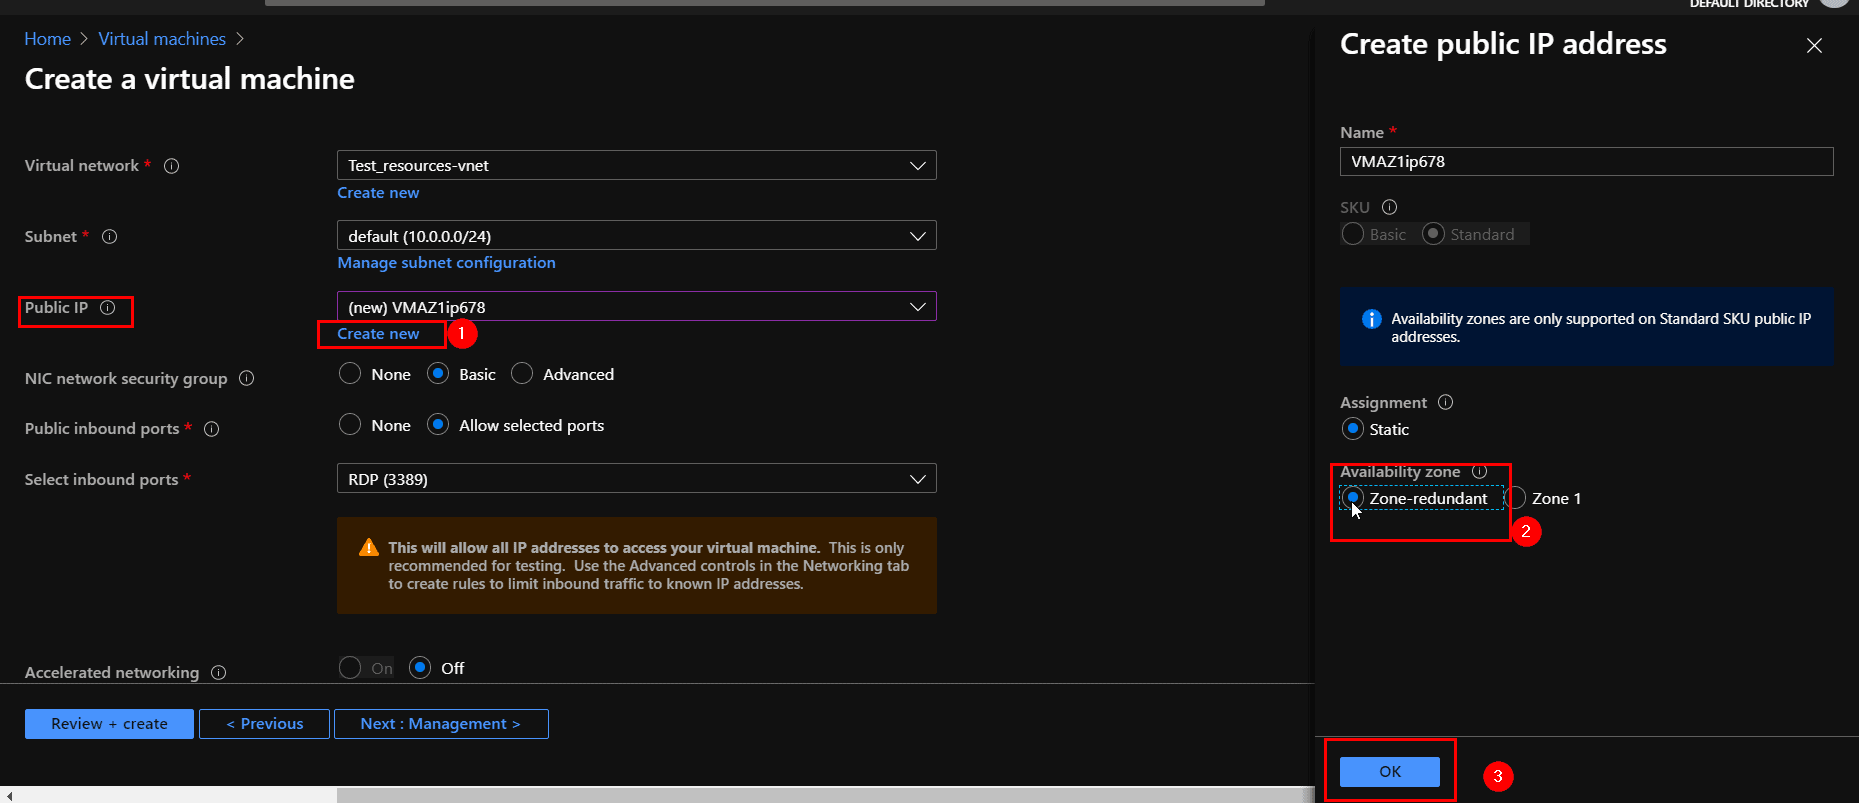
6. Select Create New from the Public IP option and choose Zone-redundant in the Create public IP address page and click OK.
This will make your VM available for zone redundancy otherwise the VM will behave like in an Availability Set.
7. Leave the rest tabs to their default values and select Review + Create tab, then Create.
Now you have successfully deployed your First VM in the first Availability Zone of East US region.
Also Check: What are the roles and responsibilities of an Azure Administrator. Click here
Create a new second Virtual Machine and Add to the second Availability Zone in the Azure Portal:
1. Repeat the same steps from 1-3 of the previous VM creation.
2. Now select the second Availability Zone for your second VM from the Availability Zone option drop-down list.
3. Repeat the same steps from 5-6 of the previous VM creation.
Also Read: Our blog post on Microsoft Azure Blob Storage. Click here
4. Leave the rest tabs to their default values and select Review + Create tab, then Create.
Now you have successfully deployed your VMs in the Availability Zone of East US region.
Using Azure CLI to Create VM in an Availability Set
The Azure Command-Line Interface (CLI) is a powerful tool for managing and automating your Azure resources directly from the command line or scripts. It enables you to create, configure, and manage virtual machines, availability sets, and other resources efficiently.
Step 1: Create an Availability Set with Azure CLI
Before you create a virtual machine (VM) in an availability set, you need to create the availability set itself. Use the following Azure CLI command to create an availability set:
az vm availability-set create --resource-group <your-resource-group-name> --name myAvailabilitySet --platform-fault-domain-count 2 --platform-update-domain-count 2
Step 2: Create a VM and Assign it to the Availability Set
Once the availability set is created, you can create VMs and assign them to this set using the Azure CLI by including the –availability-set parameter during VM creation:
az vm create --resource-group <your-resource-group-name> --name <vm-name> --availability-set myAvailabilitySet --image Win2019Datacenter --admin-username azureuser --admin-password <YourSecurePasswordHere>
These commands creates a Windows VM in the specified availability set ensuring it benefits from the high availability features.
Frequently Asked Questions(FAQ’s)
1. What is the difference between Availability Sets and Availability Zones?
Answer: Availability Sets distribute VMs within a single data center across fault and update domains. Availability Zones distribute VMs across physically separate Azure datacenters for higher fault tolerance.
2. Can I add an existing VM to an Availability Set?
Answer: No, you must recreate or migrate the VM to include it in an Availability Set.
3. How many fault domains and update domains should I use?
Answer: Azure supports up to 3 fault domains and 20 update domains, but usually, 2 or 3 fault domains are used.
Related/Reference:
- To Create FREE Microsoft Azure Trial Account, click here.
- To create a Windows virtual machine in the Azure portal, click here.
- Region, Availability Zone, Availability Sets and Fault Domain, Update Domain In Microsoft Azure
- AZ-104 v/s AZ-103: Microsoft Azure Certification Exam
- Virtual Network (VNet) Peering in Azure
- Azure Kubernetes Service & Azure Container Instances For Beginners
- Azure PowerShell Module & Guide
- [AZ-104] Microsoft Azure Administrator Certification Exam: Everything You Need To Know
- Exam AZ-305: Azure Solutions Architect Expert Certification
Next Task For You
Begin your journey toward Mastering Azure Cloud and landing high-paying jobs. Just click on the register now button on the below image to register for a Free Class on Mastering Azure Cloud: How to Build In-Demand Skills and Land High-Paying Jobs. This class will help you understand better, so you can choose the right career path and get a higher paying job.


![AWS DevOps [DOP-C02] Professional Step By Step Activity Guides (Hands-On Labs)](https://k21academy.com/wp-content/uploads/2023/02/DOP-C02-1.png)