


![]()
Reading the AWS exam guide will get you about halfway to clearing the AWS Certified Generative AI Developer Professional (AIP-C01). The other half is doing the work in a real AWS account, with real foundation models, real prompts, and real outputs you can show in an interview. That is what this blog is for.
AIP-C01 is the first AWS certification built specifically for people who design, build, and ship Generative AI applications on AWS. The exam tests real architecture decisions, not just service trivia. You will be asked which foundation model fits a workload, when to pick Retrieval Augmented Generation over fine-tuning, how to set up Bedrock Guardrails, and how to wire up an agent that calls Lambda. None of that sticks from reading alone.
The labs below are the ones we run inside the K21 Academy AWS Generative AI program. Each lab maps to a topic on the exam guide, and most of them double as portfolio pieces. We have left out the labs that are still in draft, so every lab in this list is ready to run today.
Why Hands-On Labs Are Non-Negotiable for AIP-C01
The AIP-C01 question style is heavily scenario-based. You will read a paragraph about a company that wants to summarize legal contracts, or build a customer support bot, or fine-tune a model on internal documentation, and you will need to choose the right AWS service combination. Candidates who have actually clicked through the Bedrock console, requested model access, written a prompt, and seen a token bill answer those questions in seconds. Candidates who have only read about it second-guess every option.
There is a second reason. AWS keeps adding capabilities to Bedrock, SageMaker, and Amazon Q every quarter. Labs keep your mental model fresh in a way a PDF cannot.
List of Labs in Our AIP-C01 Program
Here is the full lab roadmap, organized by topic in the order most learners follow.
1.0 Getting Started: Account, Billing and Quotas
- Lab 1: Create an AWS Cloud Account
- Lab 2: Create a CloudWatch Billing Alert
- Lab 3: Request AWS Service Quota Increases
1.1 SageMaker and Bedrock Console
- Lab 1: Set Up SageMaker Domain, Studio, Notebooks and Canvas
- Lab 2: Invoke Foundation Models on the Bedrock Console
1.2 Amazon Bedrock APIs
- Lab 1: Invoke a Foundation Model for Text, Image and Code Generation via API
- Lab 2: Build an AI Solution with the Bedrock Converse API
- Lab 3: Explore Transformer Tokenization with GPT-2
- Lab 4: Watermark Detection with Amazon Bedrock
- Lab 5: Build and Deploy an AI Chatbot with Bedrock and Lambda
- Lab 1: Prompt Techniques using a Bedrock FM on the Console
- Lab 2: Invoke a Zero-Shot Prompt for Text Generation via API
- Lab 3: Mitigating Image Bias with Effective Prompts
1.4 Retrieval Augmented Generation (RAG)
- Lab 1: Set Up Guardrails with Amazon Bedrock
- Lab 2: Build a RAG App on the Console
- Lab 3: Text and Vector Embeddings using the Bedrock FM API
- Lab 4: Build a QA-Based RAG App using the Bedrock API
- Lab 5: Build an End-to-End RAG System using the API
1.5 Agentic AI and Workflow Orchestration
- Lab 1: Build a Bedrock Agent with Action Groups
- Lab 2: Bedrock Model Integration with LangChain Agents
- Lab 1: Design Scalable Pipelines with AWS Glue and Step Functions
1.7 Foundation Model Customization
- Lab 1: Create a Bedrock Custom Model with Fine-Tuning
- Lab 2: Bedrock Evaluation, Monitoring and Cost Optimization
1.8 AWS Managed AI Services
- Lab 1: Amazon Polly and Rekognition
That is 23 labs across 8 sections. Let’s walk through each one.
Getting Started: Account, Billing, and Quotas
Before you touch a single foundation model, you need an account that will not surprise you with a bill and that has the right quotas. These three labs take maybe forty minutes total, and they save you days of debugging later.
Lab 1: Create an AWS Cloud Account
Objective: Sign up for a working AWS account that can run Bedrock and SageMaker workloads.
This is Day 1 for every AIP-C01 candidate. You will register an account, validate your billing details, set a strong root password, and enable multi-factor authentication on the root user. Most importantly, you will create an IAM user with admin privileges, because you should never run labs as the root user.
What you’ll learn:
- How to register for an AWS account
- How to verify the account and set up MFA on the root user
- How to create an IAM user and switch to it for daily work
- How to navigate the AWS Management Console for the first time
To learn more about getting started, check our blog, How to Create an AWS Free Tier Account.
Lab 2: Create a CloudWatch Billing Alert
Objective: Set up a billing alarm so you never get a surprise invoice.
Even small Bedrock workloads can rack up cost if a prompt loops or an agent gets stuck calling itself. In this lab you enable billing alerts in your AWS account, then use Amazon CloudWatch to create an alarm tied to your account-level billing metric. You wire it up to SNS so AWS emails you the moment your spend crosses, say, ten dollars.
What you’ll learn:
- How to enable AWS billing alerts at the account level
- How to create a CloudWatch alarm tied to the EstimatedCharges metric
- How to configure SNS email notifications
- Why this is the first thing to set up in any AI account
To learn more about CloudWatch, check our blog, CloudWatch vs. CloudTrail: Comparison, Working, and Benefits.

Lab 3: Request AWS Service Quota Increases
Objective: Raise the quota on GPU-backed SageMaker instances so your fine-tuning and inference labs can actually launch.
A fresh AWS account starts with a zero quota on most GPU instance types. The first time you try to launch an ml.g5.2xlarge for a SageMaker notebook, the request will fail. This lab walks you through finding the right quota in the Service Quotas console, filling in the request form, and tracking it through to approval, which usually takes a few hours.
What you’ll learn:
- How to navigate the Service Quotas console
- Which instance types matter for SageMaker and Bedrock customization labs
- How to write a justification that AWS will actually approve
- How to monitor quota request status
SageMaker and Bedrock Console
Now that the account is ready, the next two labs will get you comfortable inside the two consoles you will spend the most time in.
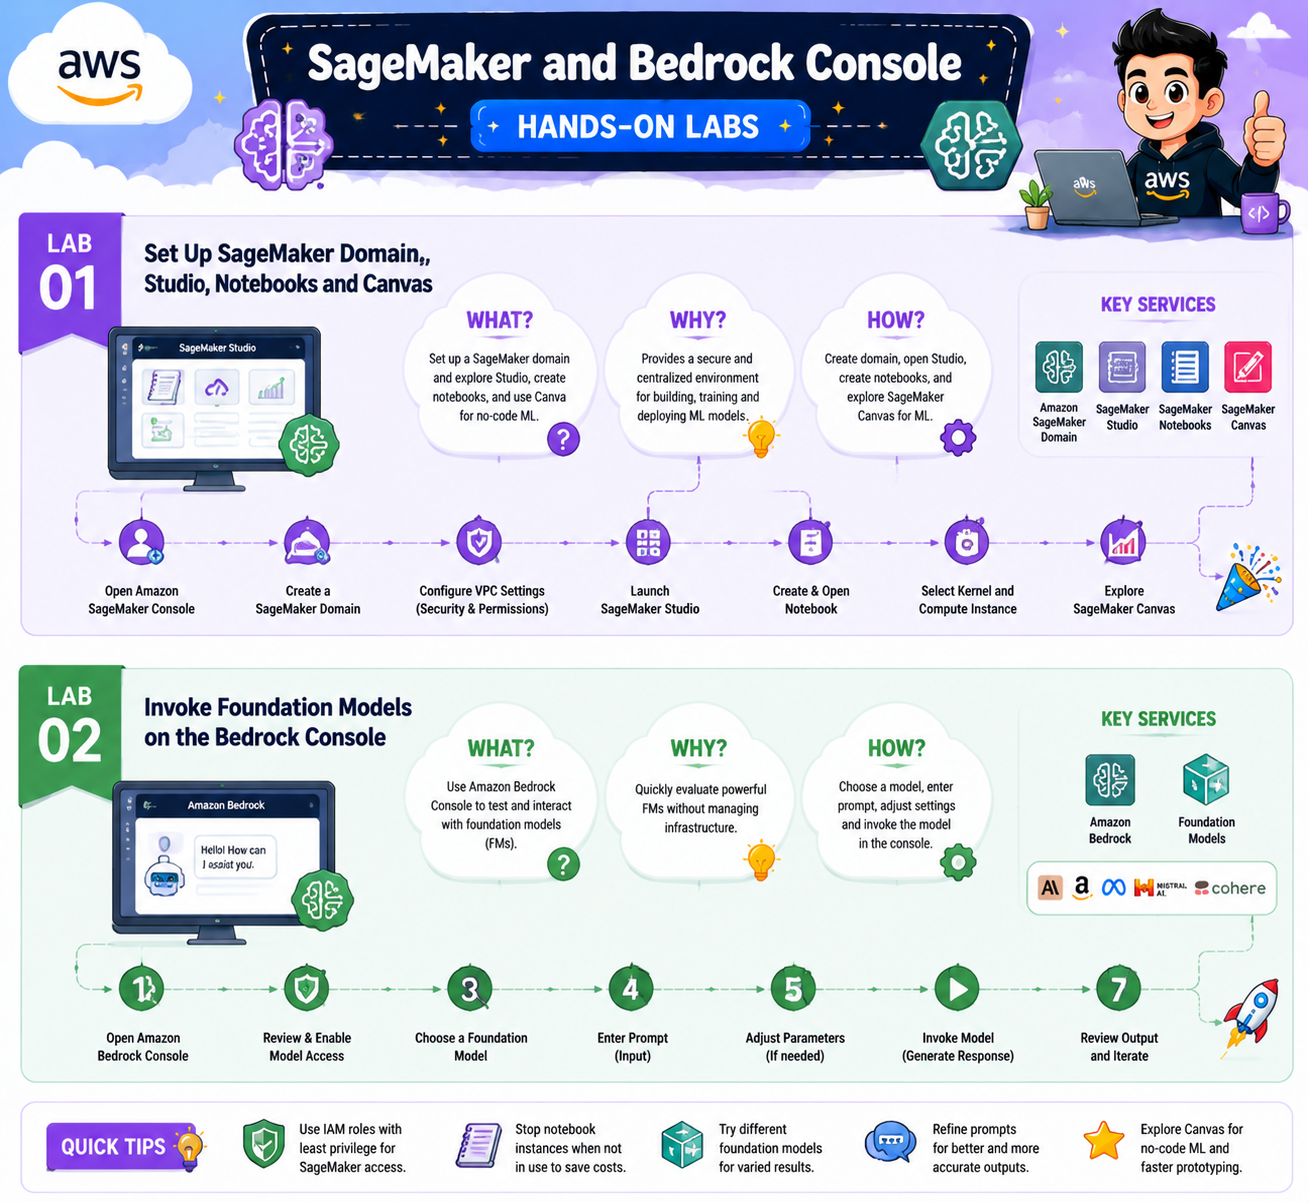
Lab 1: Set Up SageMaker Domain, Studio, Notebooks, and Canvas
Objective: Create a SageMaker domain and launch Studio so you can run notebooks for every later lab.
SageMaker Studio is your IDE for everything custom in this program. In this lab, you create a SageMaker domain (which is a one-time setup), launch Studio, spin up a JupyterLab space, and run a small test notebook to confirm everything works. You will also briefly explore SageMaker Canvas, the no-code interface that comes up in Domain 1 of the exam.
What you’ll learn:
- How to create a SageMaker domain and user profile
- How to launch SageMaker Studio and a JupyterLab space
- How SageMaker Canvas differs from Studio
- How to shut down resources cleanly to avoid runaway costs
To learn more about SageMaker, check our blog, Amazon SageMaker AI for Machine Learning: Overview and Capabilities.
Lab 2: Invoke Foundation Models on the Bedrock Console
Objective: Request access to foundation models in Bedrock and run your first prompts in the Playground.
This is the lab where Generative AI on AWS starts to feel real. You open the Bedrock console, request model access for the providers you want (Anthropic Claude, Amazon Titan, Meta Llama, Stability AI), wait for approval, and then run prompts in the Text and Image Playgrounds. You will compare outputs across models so you can feel the difference between Claude and Titan firsthand.
What you’ll learn:
- How to request and manage Foundation Model access in Bedrock
- How to use the Text Playground and Image Playground
- How model choice changes output quality, latency, and cost
- Which providers ship in which AWS region
To learn more about Bedrock, check our blog, Amazon Bedrock Explained: A Comprehensive Guide to Generative AI.
Amazon Bedrock APIs
Console clicks teach you the shape of the service. The API is what shows up at work. These five labs are the technical core of Domain 2 of the AIP-C01 exam.
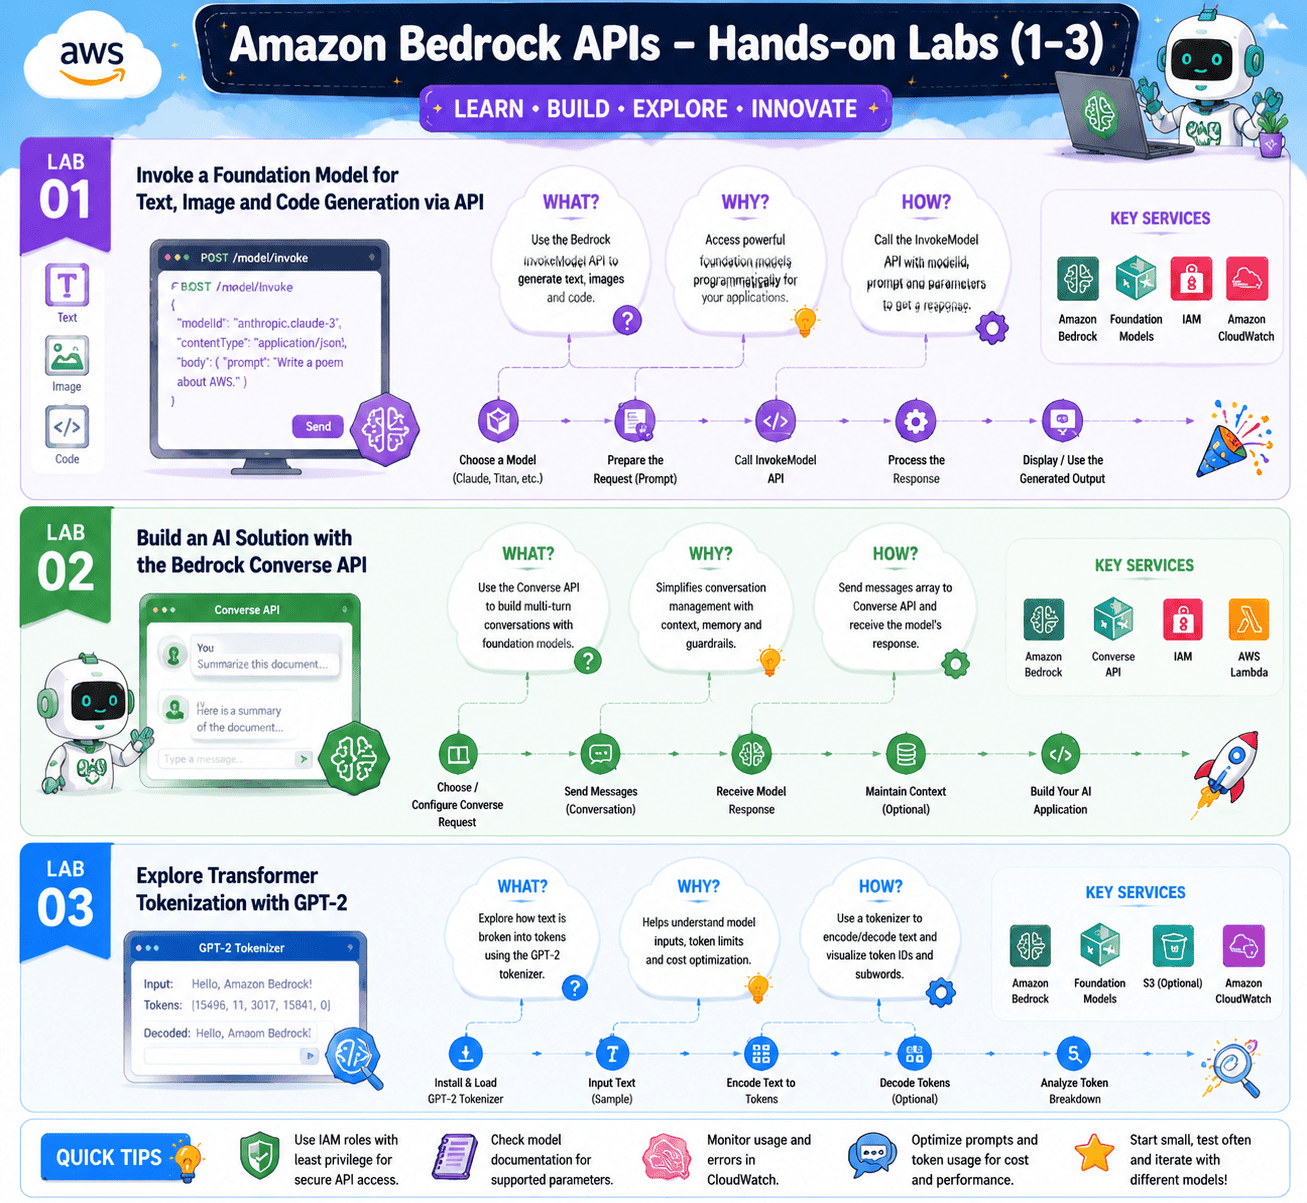
Lab 1: Invoke a Foundation Model for Text, Image, and Code Generation via API
Objective: Call Bedrock from a Python script to generate text, images, and code.
This is the lab every AIP-C01 candidate should know cold. You set up Boto3, write Python that targets the InvokeModel API, and run the same prompt against Claude, Titan, and Stable Diffusion. You will see the request and response payloads, the token counts, and the latency. By the end you can read a Bedrock invocation log and tell instantly what model was called and what it cost.
What you’ll learn:
- How to authenticate to Bedrock with Boto3
- How to call InvokeModel for text, image, and code use cases
- How to read request and response payloads across model families
- How input and output tokens translate into cost
Lab 2: Build an AI Solution with the Bedrock Converse API
Objective: Use the Converse API to build a multi-turn chat experience that handles conversation state for you.
Invoke is stateless. Every call is a single round trip. The Converse API was built for chatbots because it handles conversation history, system prompts, and tool use in one consistent shape across every Bedrock model. In this lab, you build a small chat experience that remembers context across turns, and you compare it to the same thing built with raw Invoke calls.
What you’ll learn:
- The difference between the Invoke and Converse APIs
- How to manage conversation history with Converse
- How to attach a system prompt that holds across turns
- When Converse is the right call and when Invoke is
Lab 3: Explore Transformer Tokenization with GPT-2
Objective: See exactly how a transformer turns text into tokens, the unit you pay for on every API call.
Tokenization is a topic that quietly shows up across the exam. This lab uses the open-source GPT-2 model inside a SageMaker notebook so you can watch words get split into tokens, see how the same sentence costs more in one language than another, and understand why prompt length is the biggest hidden cost lever you have.
What you’ll learn:
- What tokens are and how a tokenizer works
- Why does English text usually cost less than Chinese or code
- How embeddings come out of the transformer stack
- The mental model that makes every later prompt and RAG lab make sense
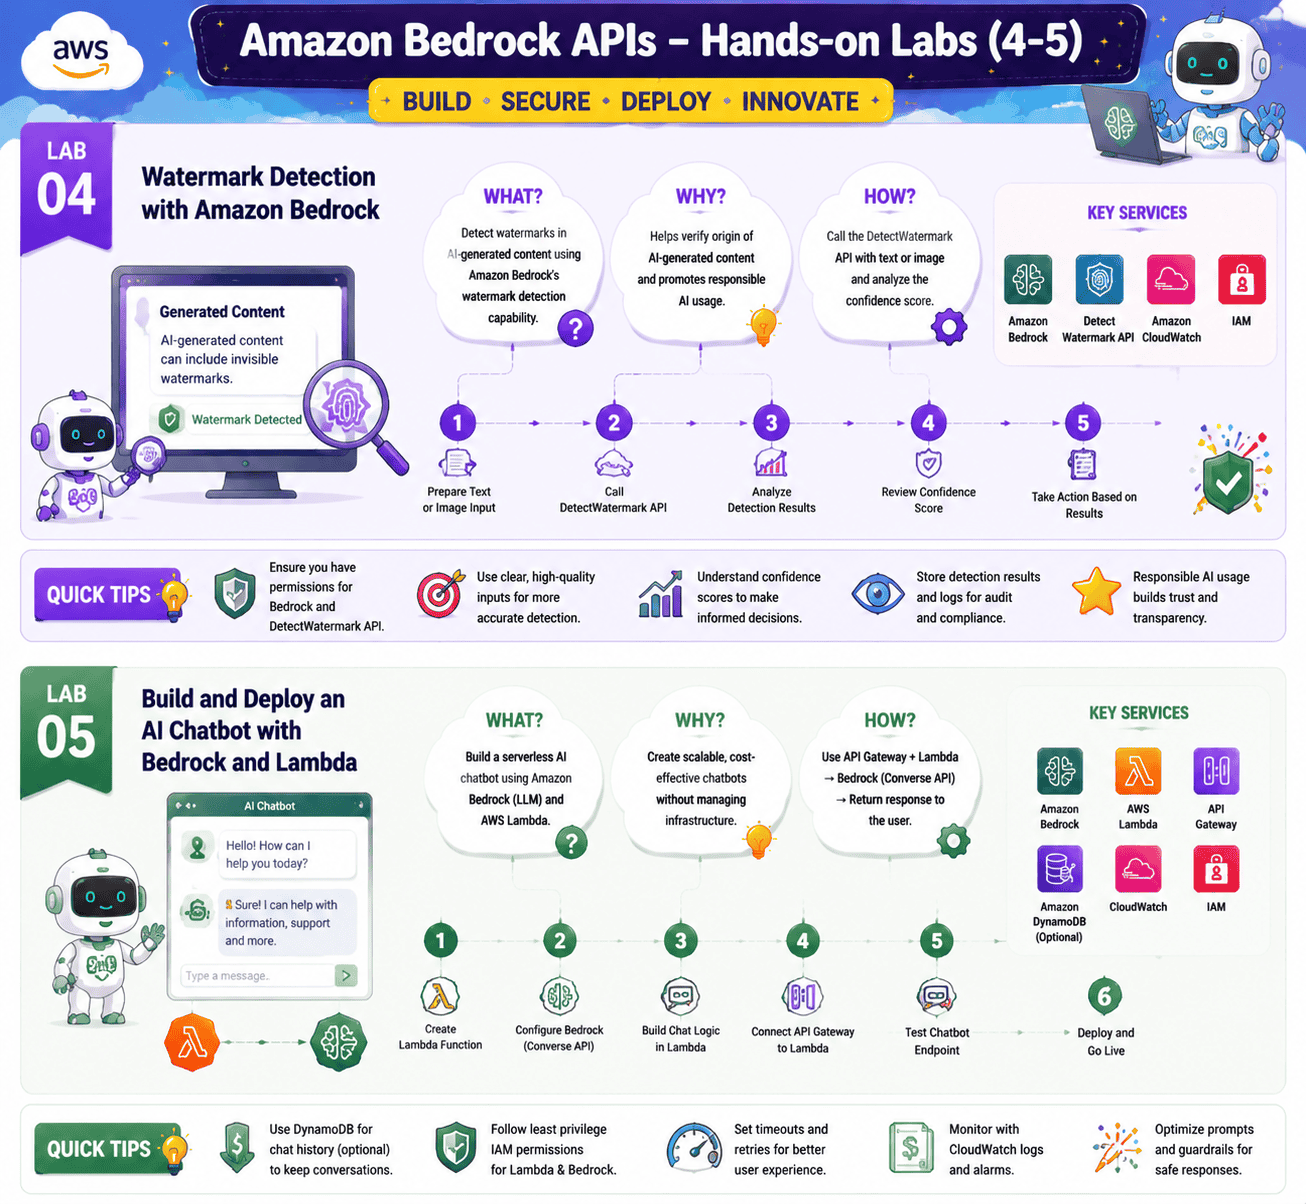
Lab 4: Watermark Detection with Amazon Bedrock
Objective: Use Bedrock to detect invisible watermarks on images created by the Titan Image Generator.
Every image that Amazon Titan Image Generator G1 produces carries a watermark. Bedrock has a built-in API to detect it. In this lab you generate an image, save it, run it through the detection API, and confirm the watermark is present. You will also try the API on an image from a different source so you can see how the response changes.
What you’ll learn:
- How Titan Image Generator embeds watermarks
- How to call the Bedrock watermark detection API
- What the detection response looks like
- Where this fits into responsible AI workflows
Lab 5: Build and Deploy an AI Chatbot with Bedrock and Lambda
Objective: Wrap a Bedrock model with Lambda and API Gateway to ship a real chatbot endpoint.
This is the pattern you will use at work. API Gateway receives the user’s message, Lambda formats the prompt, Bedrock generates the answer, and Lambda streams the result back. In this lab, you build the full pipeline, deploy it, and call it from a simple client. You also wire in CloudWatch so you can see every request, latency, and token count.
What you’ll learn:
- How to expose Bedrock through API Gateway and Lambda
- How to handle streaming responses end-to-end
- How to add CloudWatch logging for cost and quality monitoring
- The serverless wrapper pattern that wins on most AIP-C01 architecture questions
Prompt Engineering
Prompt engineering is the cheapest, fastest lever for AI quality, and it owns a healthy chunk of Domain 2. These three labs are short, but you will come back to them every time you write a new prompt at work.
Lab 1: Prompt Techniques using a Bedrock FM on the Console
Objective: Practice the core prompt patterns (zero-shot, few-shot, chain-of-thought, role-task) inside the Bedrock Playground.
In this lab, you take one task, say summarizing a customer email, and you run it five different ways. You try the same prompt with no examples, with two examples, with chain-of-thought reasoning, with a defined role, and with a strict output schema. The point is to feel how much output quality changes based purely on prompt shape, not model choice.
What you’ll learn:
- The five prompt patterns that cover most production use cases
- How to write a role, plus task, plus context, plus output prompt
- When few-shot beats zero-shot, and when it does not
- How to evaluate prompts side by side in the Playground
To learn more, check our blog, What is Prompt Engineering?
Lab 2: Invoke a Zero-Shot Prompt for Text Generation via API
Objective: Move the same zero-shot prompt from the console into a SageMaker notebook calling Bedrock via Boto3.
The console is great for exploration, but production runs over the API. In this lab, you take the prompt you wrote in the previous lab and put it inside a SageMaker notebook. You parameterize the prompt, run it across a list of inputs, and capture every output to a CSV. This is the loop every production AI engineer runs daily.
What you’ll learn:
- How to template prompts in Python
- How to batch-run prompts against Bedrock
- How to capture and analyze outputs at scale
- How to A/B test two prompt versions over a dataset
Lab 3: Mitigating Image Bias with Effective Prompts
Objective: Use prompt design to reduce bias in image outputs from a Bedrock image model.
Default image prompts can produce biased outputs. Ask for “a CEO,” and you tend to get a certain demographic. In this lab, you write prompts that explicitly broaden the output distribution, run them through the Titan Image Generator, and compare results side by side. This is the kind of question that shows up on Domain 5 of the exam.
What you’ll learn:
- How prompt phrasing influences demographic distribution in image outputs
- Specific patterns for inclusive prompting
- How to evaluate bias visually
- Where this connects to AWS Responsible AI principles

Retrieval Augmented Generation (RAG)
RAG is the single most important architecture on the AIP-C01 exam. These five labs take you from “I have heard of vector embeddings” to “I have shipped a production RAG pipeline”.
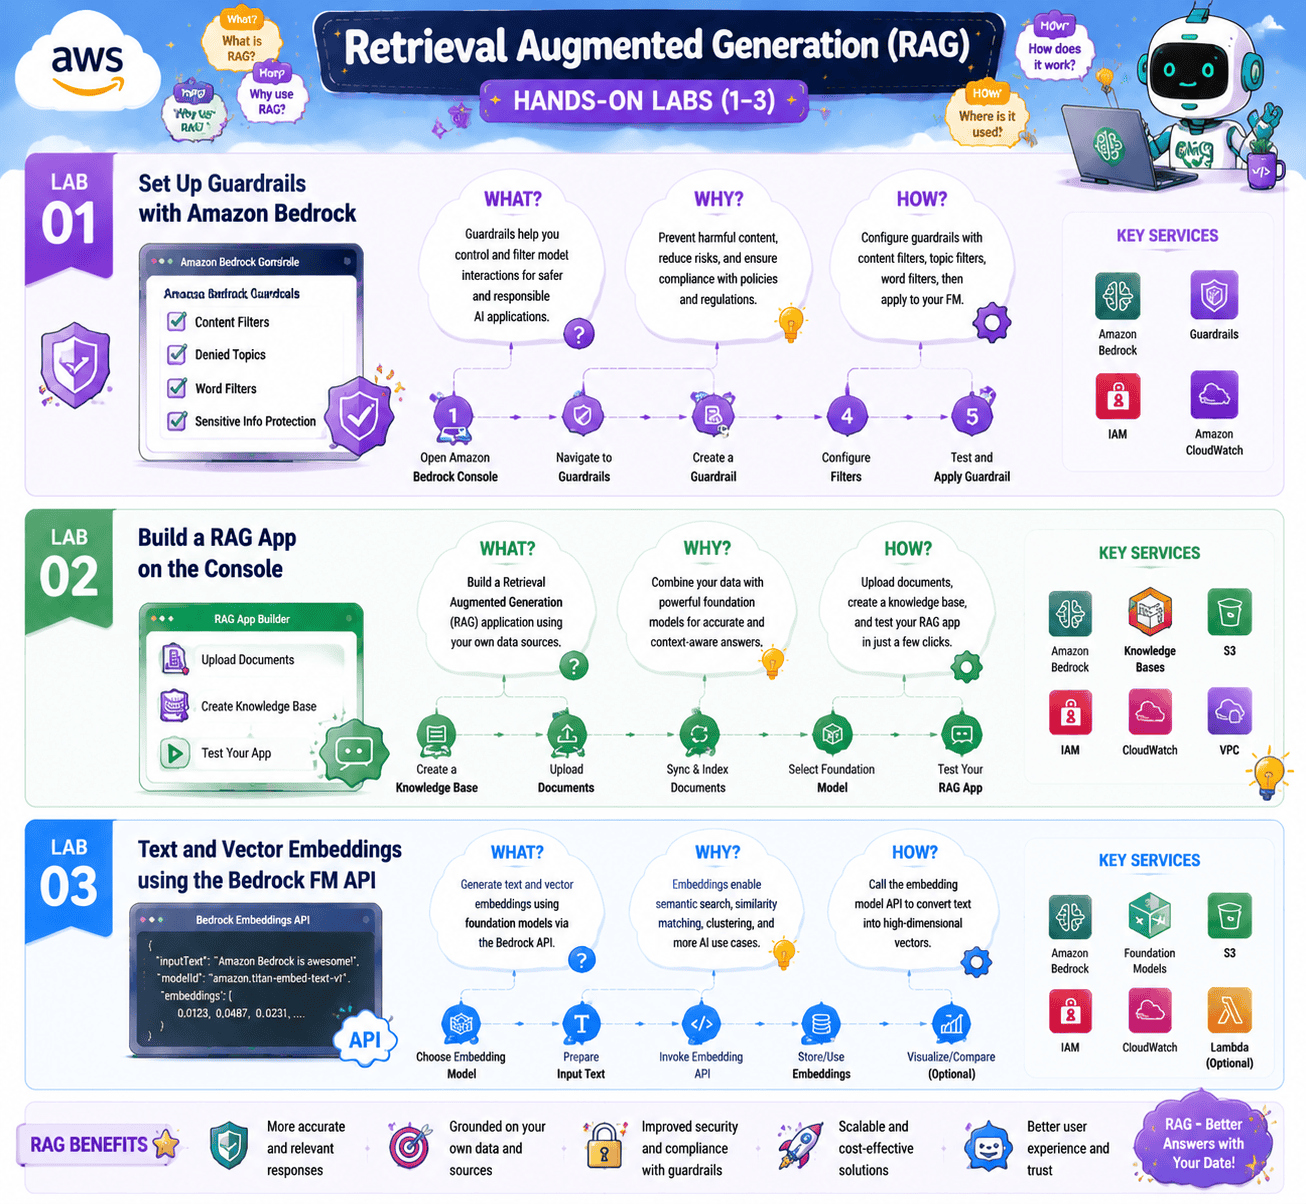
Lab 1: Set Up Guardrails with Amazon Bedrock
Objective: Configure Bedrock Guardrails to filter content, redact PII, and block denied topics.
Guardrails are the policy layer between your model and your users. In this lab, you create a guardrail, set thresholds on the built-in filters (hate, violence, sexual, and insults), define a few denied topics in natural language, enable PII detection, and attach the guardrail to a Bedrock model. You then test it with prompts that should pass and prompts that should be blocked.
What you’ll learn:
- How to configure Bedrock Guardrails content filters
- How to define denied topics in plain English
- How PII detection works and what categories it covers
- How to attach a guardrail to a model and verify it fires
To learn more about Bedrock, check our blog, Amazon Bedrock Explained: A Comprehensive Guide to Generative AI.
Lab 2: Build a RAG App on the Console
Objective: Build a working RAG application end-to-end using Bedrock Knowledge Bases without writing code.
Bedrock Knowledge Bases handles ingestion, chunking, embedding, indexing, and retrieval for you. In this lab, you create a Knowledge Base, point it at an S3 bucket of documents, pick an embedding model, pick a vector store, sync the data, and then run queries that pull grounded answers with citations.
What you’ll learn:
- How to set up a Bedrock Knowledge Base end-to-end
- How the chunking strategy changes retrieval quality
- How citations work in the response payload
- The full RAG loop in less than thirty minutes of clicks
To learn more about RAG, check our blog, Understanding RAG with LangChain.
Lab 3: Text and Vector Embeddings using the Bedrock FM API
Objective: Generate text embeddings with Amazon Titan and measure semantic similarity between sentences.
This is the lab that makes vectors stop being magic. You take a list of sentences, pass each one through the Titan embeddings model, get back a numeric vector, and then compute cosine similarity to find the closest match. This is exactly what a vector database does under the hood when it serves an RAG query.
What you’ll learn:
- How to generate embeddings with the Titan API
- What an embedding vector actually looks like
- How cosine similarity ranks results
- Why semantic search beats keyword search for AI use cases
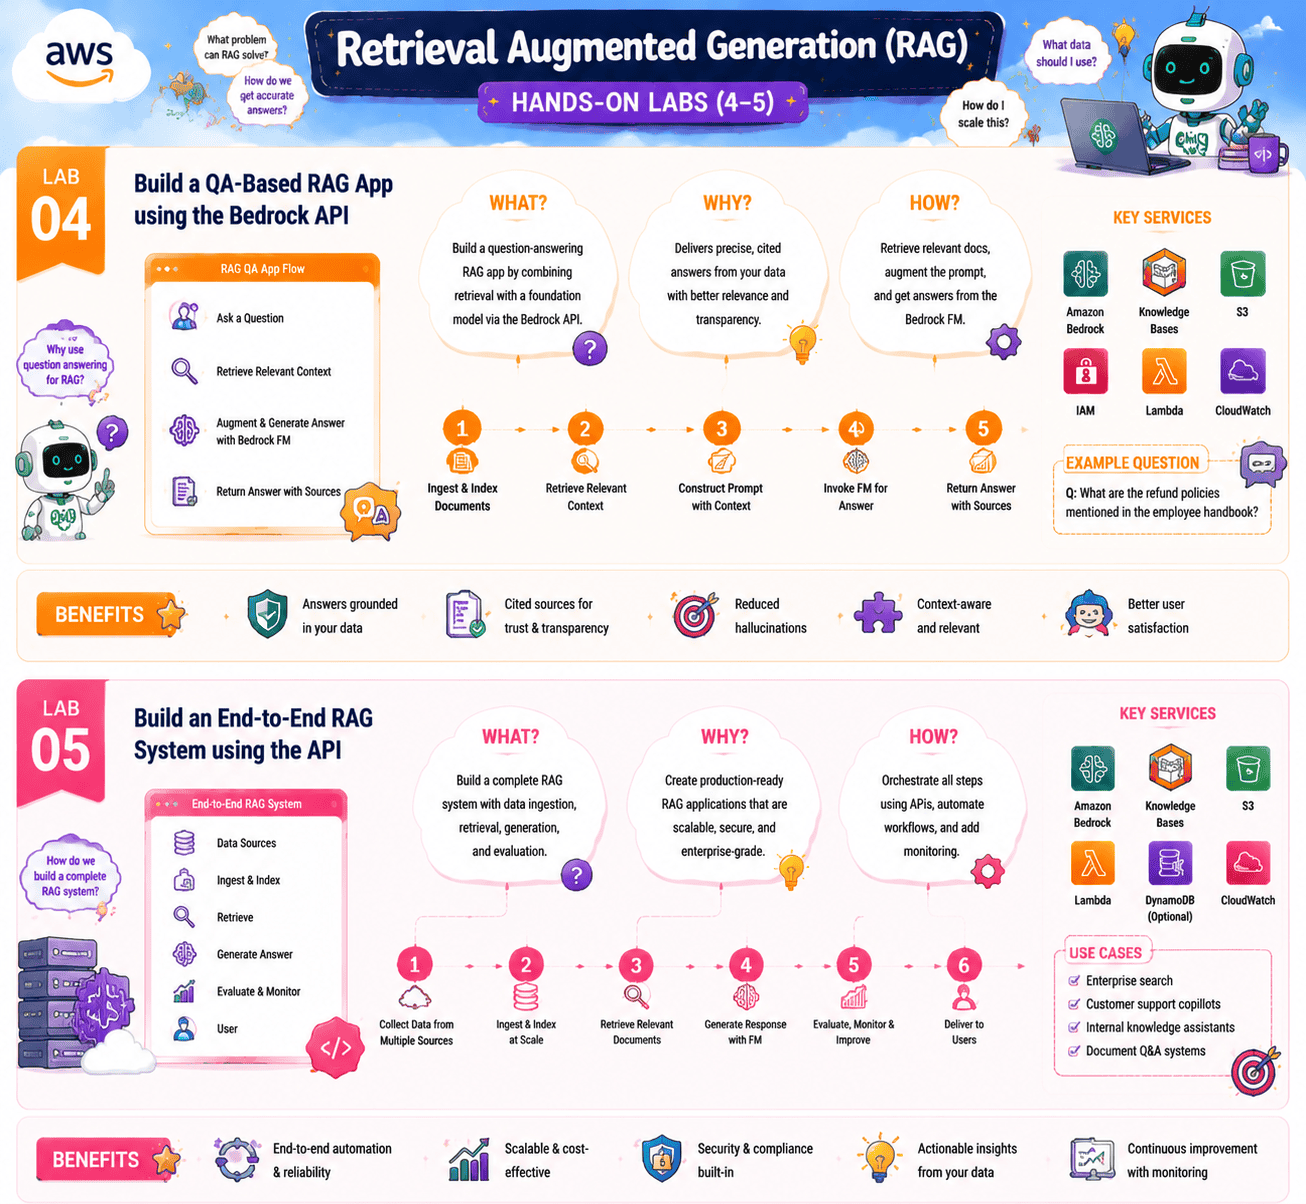
Lab 4: Build a QA-Based RAG App using the Bedrock API
Objective: Write the RAG loop in Python so you understand every step that Knowledge Bases hide from you.
Now that you have run RAG on the console and understand embeddings, this lab has you write the full loop in Python. You chunk a document, generate embeddings, store them in memory, run a query, retrieve the top three chunks, build an augmented prompt, and call a Bedrock model. By the end, you can debug a RAG pipeline at any layer.
What you’ll learn:
- How to build the retrieve, augment, and generate loop from scratch
- How chunk size affects answer quality
- How to format an augmented prompt for the model
- How citations are constructed from retrieved chunks
Lab 5: Build an End-to-End RAG System using the API
Objective: Combine Knowledge Bases, OpenSearch Serverless, Lambda, and API Gateway into one production-grade RAG endpoint.
This is the capstone lab for Domain 2. You replace the in-memory vector store from the previous lab with OpenSearch Serverless, wrap the whole pipeline in Lambda, expose it through API Gateway, and front it with a small client. You add CloudWatch metrics on retrieval latency, generation latency, and per-query cost. This is what a production RAG system looks like on AWS.
What you’ll learn:
- How OpenSearch Serverless fits into Bedrock RAG
- How to operationalize a RAG pipeline behind API Gateway
- How to monitor retrieval and generation latency separately
- The exact architecture pattern that wins most Domain 2 exam questions
Agentic AI and Workflow Orchestration
Agents are the frontier of what Generative AI on AWS can do today, and Domain 4 spends fifteen percent of the exam testing them. These two labs are the most fun in the program.
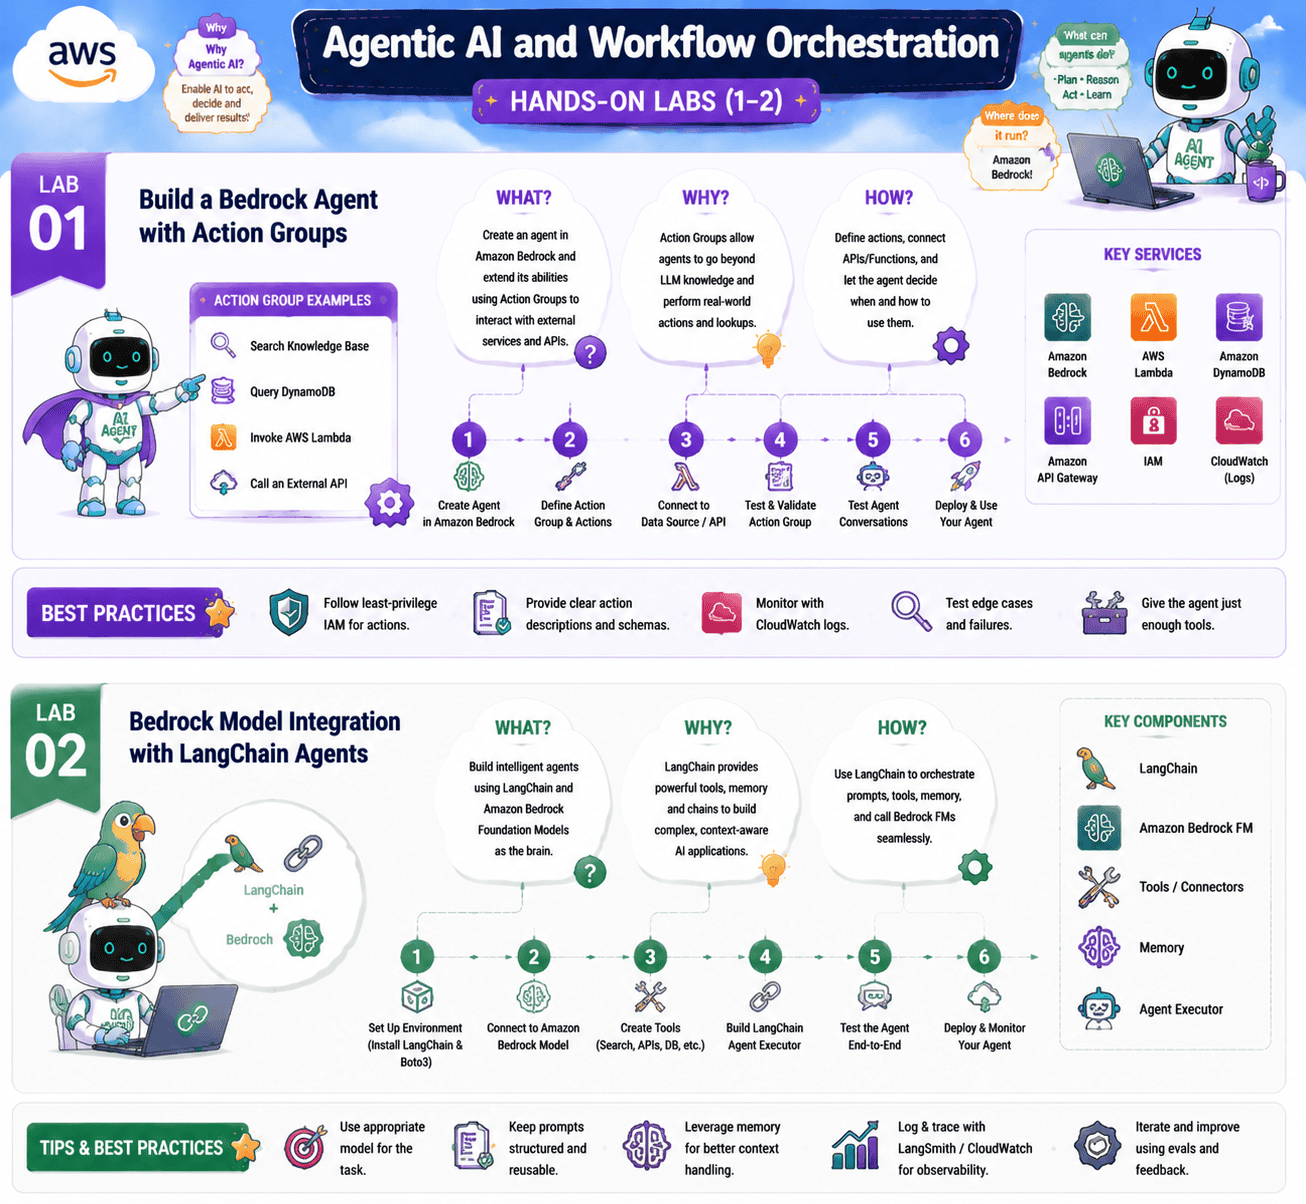
Lab 1: Build a Bedrock Agent with Action Groups
Objective: Create a Bedrock Agent that calls a Lambda-backed Action Group to complete a real task.
In this lab, you build an agent that can do something real, for example, check stock levels in a fake inventory database. You define an Action Group, write a Lambda that backs it, write an OpenAPI schema that tells the agent how to call the Lambda, and then watch the agent reason its way through a task. You will see the plan, the action, the observation, and the next step in the agent trace.
What you’ll learn:
- How to design an Action Group and OpenAPI schema
- How agents pick which tool to call
- How to debug the agent reasoning loop in the trace
- The architectural pattern that wins most Domain 4 exam questions
Related Readings: What is Agentic AI
Lab 2: Bedrock Model Integration with LangChain Agents
Objective: Use LangChain to orchestrate a Bedrock model as part of a multi-tool agent.
Not every agent has to use Bedrock Agents. LangChain is the most popular open framework for chaining together models, tools, memory and prompts. In this lab, you wire Bedrock into LangChain, define a set of tools the agent can call, and run the same kind of task you ran in the previous lab. You will see clear trade-offs between the AWS-native and open-source approaches.
What you’ll learn:
- How to use Bedrock as the LLM inside a LangChain agent
- How LangChain tools compare to Bedrock Action Groups
- When to pick LangChain over Bedrock Agents and vice versa
- The basics of memory in a LangChain agent
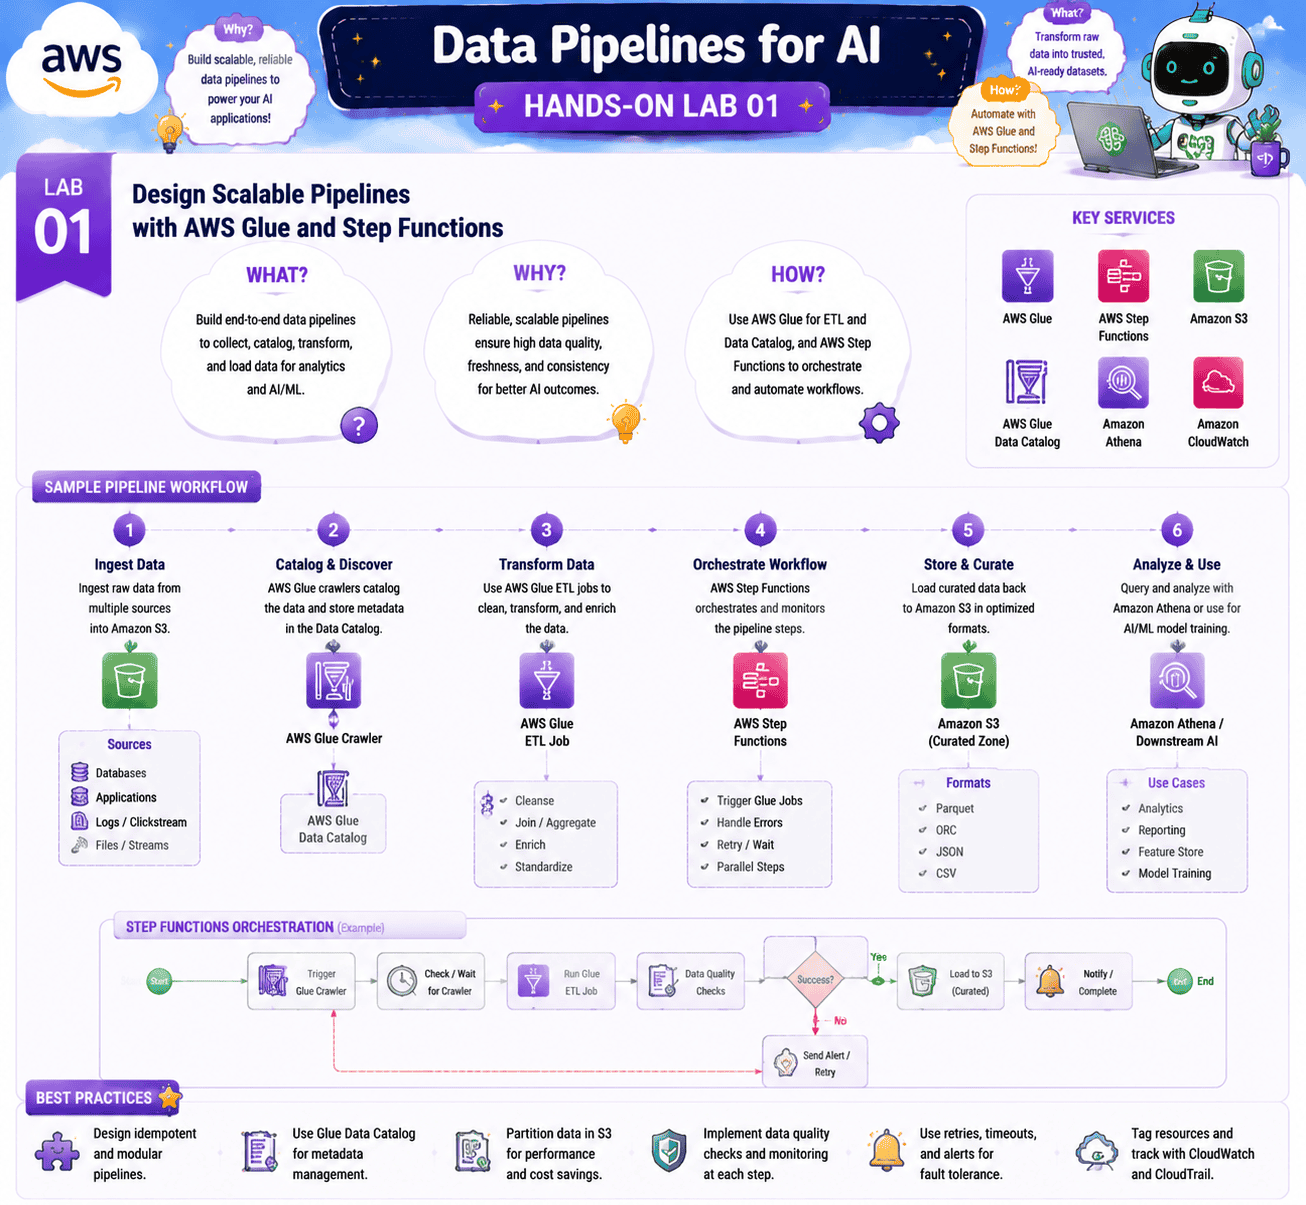
Data Pipelines for AI
Reliable AI rides on top of reliable data. This module is short, but the lab inside it shows up directly on Domain 2.
Lab 1: Design Scalable Pipelines with AWS Glue and Step Functions
Objective: Build a data pipeline that prepares raw documents for downstream Bedrock and SageMaker workloads.
In this lab, you load raw documents into S3, use Glue to clean and transform them, orchestrate the steps with Step Functions, and write the prepared output to a second S3 prefix that a Bedrock Knowledge Base can consume. This is the standard upstream pattern for any AI pipeline at scale.
What you’ll learn:
- How to build a Glue ETL job for unstructured data
- How to orchestrate Glue, Lambda, and SageMaker steps with Step Functions
- How to structure S3 prefixes for Knowledge Base ingestion
- How to add data quality checks before model inference
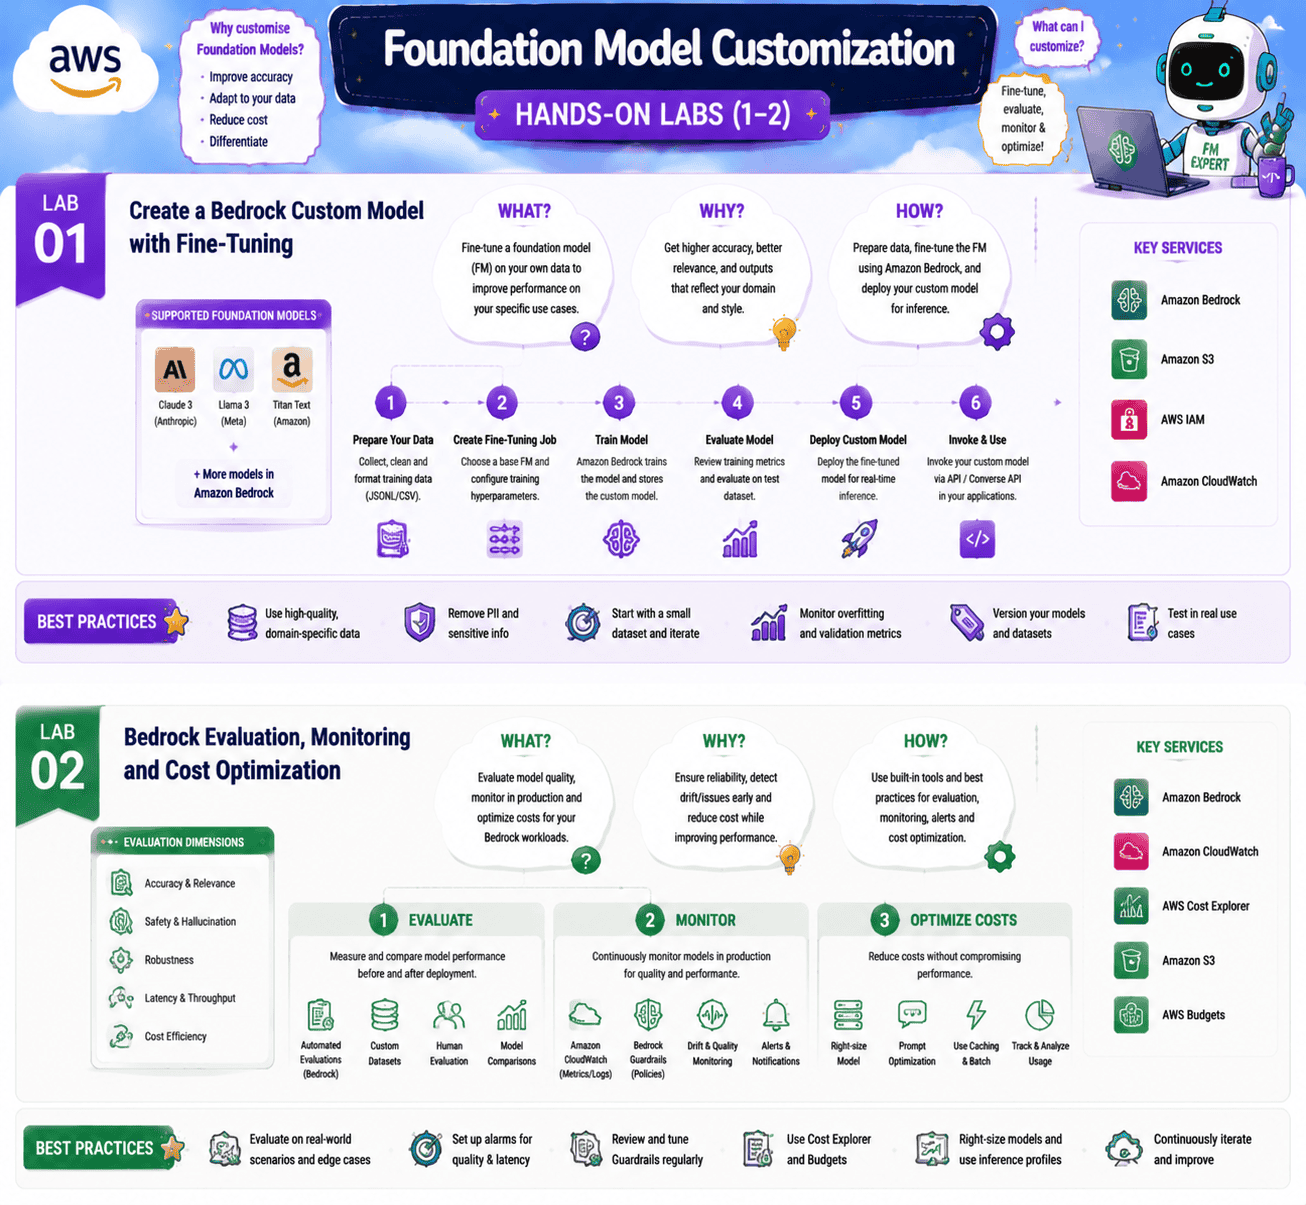
Foundation Model Customization
Domain 3 lives here. It is the smallest domain by weight after Domain 4 and Domain 5, but it carries the most depth per question.
Lab 1: Create a Bedrock Custom Model with Fine-Tuning
Objective: Fine-tune a Bedrock-supported foundation model on a small custom dataset and deploy it.
In this lab, you prepare a small JSONL dataset that captures your domain or tone, kick off a Bedrock fine-tuning job, and then deploy the resulting custom model behind provisioned throughput. You run the same prompt through the base model and your fine-tuned model, so you can feel the difference, and you check the cost difference too.
What you’ll learn:
- The JSONL format Bedrock expects for fine-tuning
- How to launch and monitor a fine-tuning job
- How provisioned throughput pricing works for custom models
- When fine-tuning beats RAG and when it does not
Lab 2: Bedrock Evaluation, Monitoring, and Cost Optimization
Objective: Run a Bedrock model evaluation job and apply the cost levers that cut Bedrock bills in half.
In this lab, you create a Bedrock model evaluation job, pick a benchmark, run it across two model candidates, and read the report. You then walk through the cost optimization checklist: pick a smaller model first, cap max tokens, shorten system prompts, cache repeated prompts, batch where possible, and use provisioned throughput for steady traffic.
What you’ll learn:
- How Bedrock automated evaluation jobs work
- Which metrics matter (accuracy, faithfulness, latency, cost, hallucination, toxicity)
- The five cost levers that move Bedrock bills the most
- How to set up CloudWatch dashboards for ongoing FM monitoring
Related Readings: Amazon Bedrock Explained: A Comprehensive Guide
AWS Managed AI Services
Bedrock is not the only AI service on the exam. Domain 1 expects you to know when a managed AI service beats building from scratch.
Lab 1: Amazon Polly and Rekognition
Objective: Get hands-on with the two most-tested managed AI services beyond Bedrock.
In this lab, you use Amazon Polly to convert text to natural-sounding speech across several voices and languages, and Amazon Rekognition to detect faces, objects, and unsafe content in an image. Both are pay-per-call managed services, so the lab is fast, cheap, and covers exam ground that pure Bedrock work does not.
What you’ll learn:
- How to use Polly for text-to-speech in production
- How Rekognition handles object, face, and moderation use cases
- When a managed AI service is the right answer instead of Bedrock
- How pricing compares between managed AI services and custom Bedrock
To learn more, check our blog, AWS AI, ML, and Generative AI Services and Tools.

Frequently Asked Questions
These labs provide hands-on experience with Amazon Bedrock, SageMaker, and other AWS services to build, deploy, and manage Generative AI applications effectively.
Each lab typically takes 30-60 minutes, with the full program spanning approximately 10-15 hours of learning.
Yes, the skills learned in these labs are applicable to real-world scenarios, from text summarization to image generation and more.
Hands-on experience solidifies theoretical knowledge, preparing you for practical AI implementation and enhancing problem-solving skills. Q1: How do these labs align with Generative AI on AWS?
Q2: How much time should I allocate to complete all labs?
Q3: Can these labs be applied to real-world Generative AI projects?
Q4: How does hands-on experience compare to theoretical learning?
Next Task For You
Don’t miss our EXCLUSIVE Free Training on Generative AI on AWS Cloud! This session is perfect for those pursuing the AWS Certified AI Practitioner certification. Explore AI, ML, DL, & Generative AI in this interactive session.
Click the image below to secure your spot!


![AWS DevOps [DOP-C02] Professional Step By Step Activity Guides (Hands-On Labs)](https://k21academy.com/wp-content/uploads/2023/02/DOP-C02-1.png)