


![]()
The areas covered in this blog are given below:
What is Azure Load Balancer? | Why Choose Azure Load Balancer? | Azure Load Balancer Types | Features Of Azure Load Balancer | Steps to create an Azure Load Balancer
In this blog post, we are going to cover a case study on How to create a Azure Load Balancer in Azure using the Azure Portal which we will be discussing in detail in our Microsoft Azure Job Oriented Program (In this FREE class we will talk about Azure Job Oriented Program).
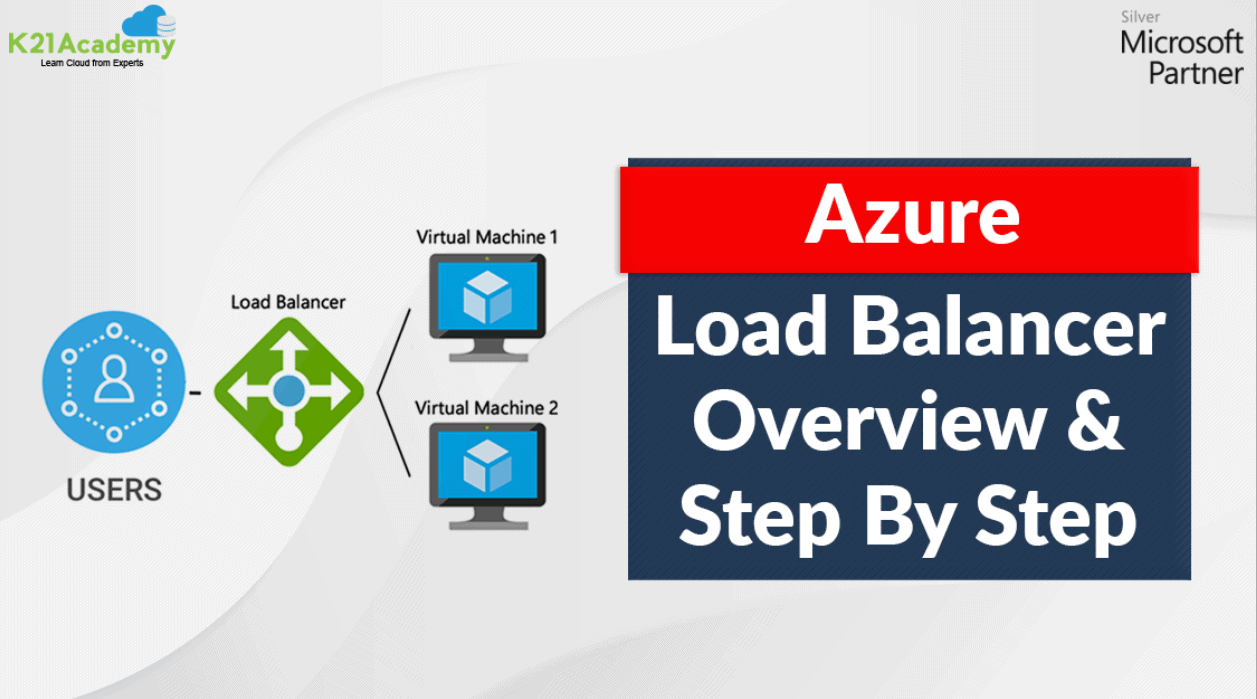
An Azure load balancer is used to distribute traffic loads to backend virtual machines or virtual machine scale sets, by defining your own load balancing rules you can use a load balancer in a more flexible way.
What Is Azure Load Balancer?
Azure load balancer allows you to distribute traffic to your backend pool which can contain virtual machines or virtual machine scale set or containers. An Azure load balancer provides high availability for your application. The Azure load balancer is a fully managed service itself.
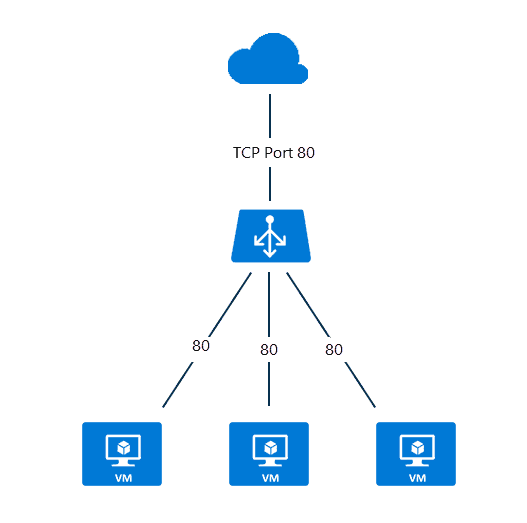
Load balancer use 5 tuple or data points hasing algorithm to distribute the traffic. These are as below:
- Source IP address: The IP address of the device sending the request.
- Source port: The port number used by the application on the source device.
- Destination IP address: The IP address of the Azure Load Balancer itself.
- Destination port: The port number the client is trying to reach on the backend server.
- Protocol type: This specifies TCP or UDP, the type of communication used.
Why Choose Azure Load Balancer?
Some of the key scenarios that you can accomplish using Standard Load Balancer include:
- Load balance internal and external traffic to Azure virtual machines.
- Increase availability by distributing resources within and across zones.
- Use health probes to monitor load-balanced resources.
- Employ port forwarding to access virtual machines in a virtual network by public IP address and port.
- Standard Load Balancer provides multi-dimensional metrics through Azure Monitor. These metrics can be filtered, grouped, and broken out for a given dimension. They provide current and historic insights into the performance and health of your service. Resource Health is also supported.
- Load balance services on multiple ports, multiple IP addresses, or both.
Read : Azure Storage
What are the types of load balancer in Azure?
In Azure, you can create two types of the load balancer
- Public load balancer
- Internal/ private load balancer
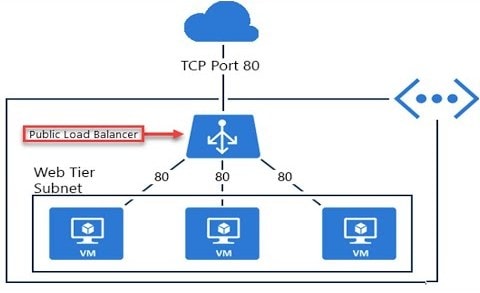
Public Load Balancer: A public load balancer can be used to load balance internet traffic to virtual machines. It can provide outbound connections for virtual machines (VMs) inside your virtual network.
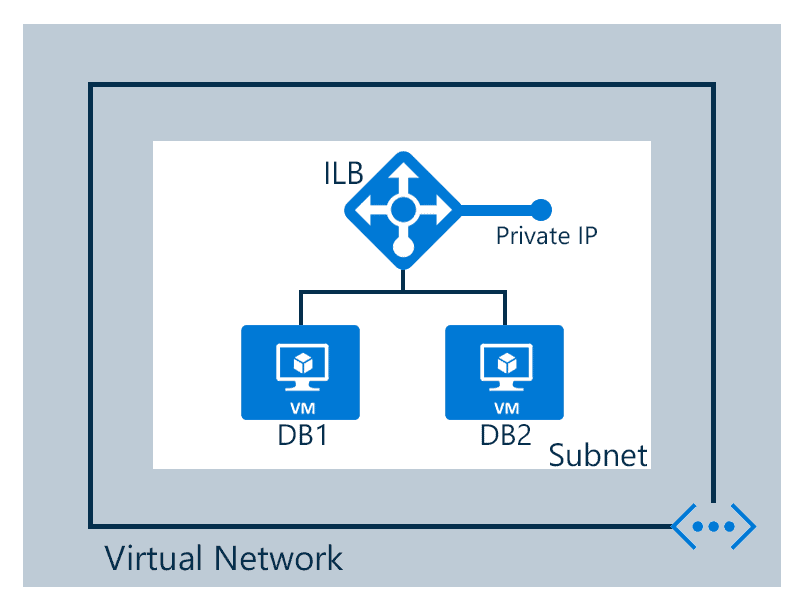
Internal/ Private Load Balancer: An internal (or private) load balancer is used to balance traffic from within a virtual network.
Along with load balancer, there are two pricing tiers available Basic and Standard
Basic: Basic tier load balancer provides basic features and is restricted to some limits for backend pool size it is restricted to only 300 instances, it’s restricted to a single availability set and it only supports multiple frontends for inbound traffic. This will be retiring soon
Standard: Standard tier load balancer is generally available and offers higher-scale and new features. It is a paid-for feature using a complex set of consumption-based charges and the Basic tier continues to be free. Also, we can scale out to 1000 instances and can span any virtual machine in a single virtual network, including blends of scale sets, availability sets, and machines.
To know more features of Basic and Standard tier check the official Azure Load Balancer SKUs
Features Of Azure Load Balancer

- Load Balancing: Azure load balancer uses a 5-tuple hash that contains source IP, source port, destination IP, destination port, and protocol.
- Outbound connection: All the outbound flows from a private IP address inside our virtual network to public IP addresses on the Internet can be translated to a frontend IP of the load balancer.
- Automatic reconfiguration: The load balancer is able to reconfigure itself when it scales up or down instances on the basis of conditions. So, if more virtual machines are added into the backend pool, automatically load balancer will reconfigure.
- Application agnostic and transparent: It doesn’t directly interact with TCP or UDP protocols. We can route the traffic based on URL or multi-site hosting
- Health probes: When any failed virtual machines in a load balancer are recognized by the health probe in the backend pool then it stop routing the traffic to that particular failed virtual machine. It can configure a health probe to determine the health of the instances in the backend pool.
- Port forwarding: The load balancer supports port forwarding ability if we have a pool of web servers, and we don’t want to attach a public IP address for every web server in that pool.
Read: Basics of the Convolutional Neural Network (CNN) and how we train our CNN’s model on Azure ML service without knowing to code.
Azure Load Balancing Rules
- Load balancing rules define how to route traffic when it arrives on the load balancer
- These rules can use to redirect traffic into the backend pool
- You can also enable session persistence- Here’s client IP’s can be directed to the same backend virtual machines

Overview of Azure storage account, Storage account types, Storage account services, how to create a storage account and how to delete a storage account
[Demo] Steps To Create An Azure Load Balancer
Here, I am going to demonstrate how we can load balance a web server using Azure standard load balancer. This demo includes the following tasks:
- Create Azure load balancer
- Create a virtual network
- Create a backend pool
- Create health probes
- Create a load balancer rule
- Setup two new windows VM
- Install IIS for Testing
- Add virtual machines to the backend pool
- Testing
Task 1: Create Azure load balancer
Step 1) Log in to Azure Portal (Please make sure you have a subscription before doing all this. If you created a free account for the first time, you’ll already have a FREE TRIAL subscription for 1 month).
Note: If you don’t know how to get a free Azure account then click on Azure Free Trial Account to know more
If you don’t know how to create an instance or virtual machine then click on Create a Virtual Machine to know more
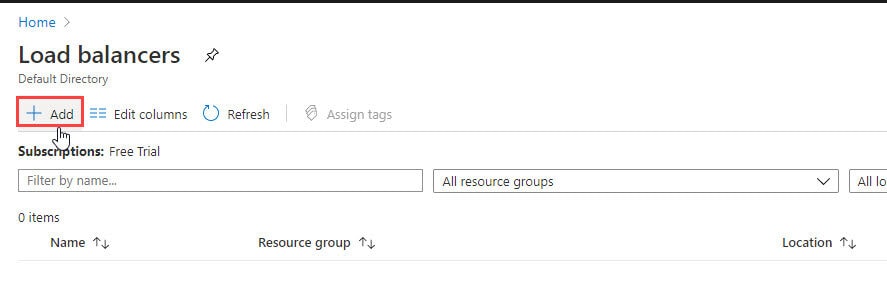
Step 2) On top use the search bar and search for Load Balancer and then choose Load Balancer
Step 3) On the top left-hand side of the screen, click Add
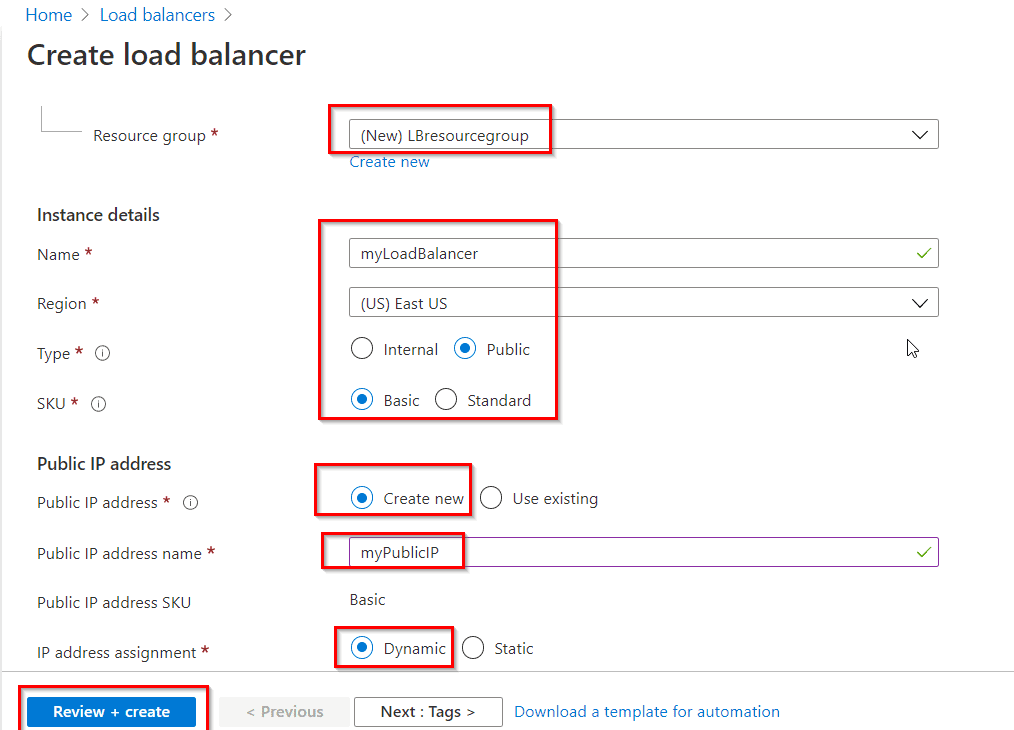
Step 4) In the Basics tab of the Create load balancer page, enter or select the following information, accept the defaults for the remaining settings, and then select Review + create.
- Subscription: Select your subscription.
- Resource group: Select Create new and type LBresourcegroup in the text box.
- Name: Enter myLoadBalancer
- Region: Select East US
- Type: Select Public.
- SKU: Select Basic
- Public IP address: Select Create new. If you have an existing Public IP you would like to use, select Use existing.
- Public IP address name: Type myPublicIP in the text box.
Read: Azure ExpressRoute Vs Azure VPN Gateway
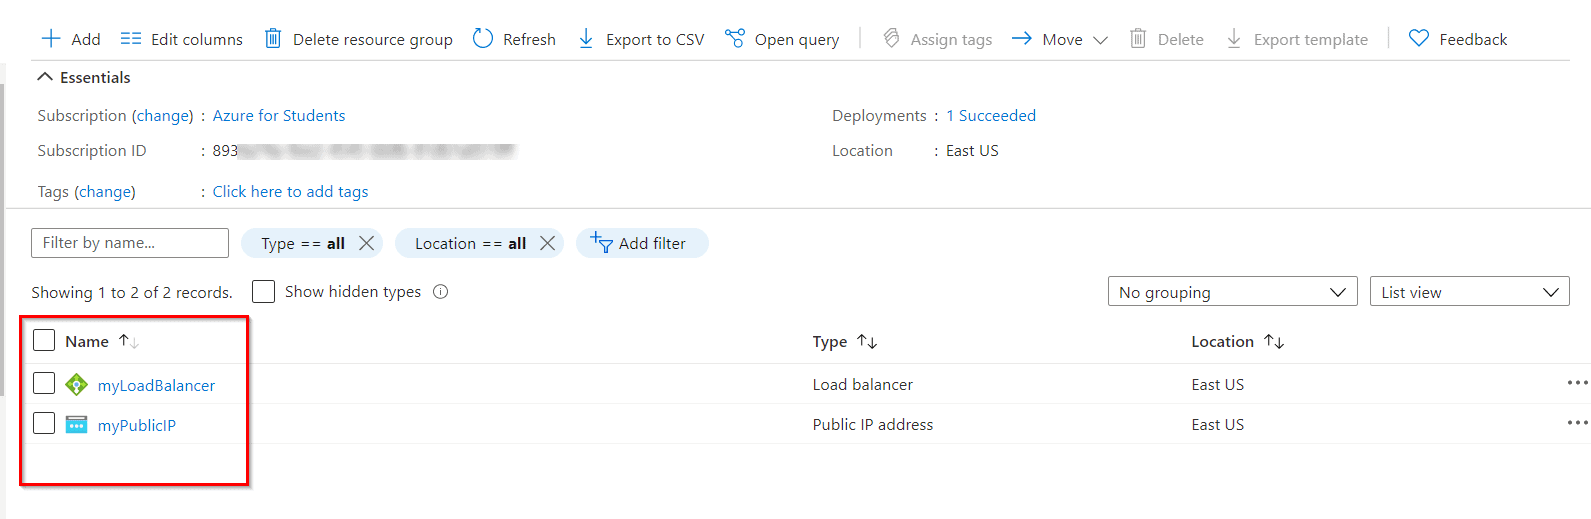
Step 5) Now Click On Create and check your Load Balancer Is Created.
Read: What is Azure Computing?
Task 2: Create a Virtual Network
Step 1) On the upper-left side of the screen, select Create a resource > Networking > Virtual network or search for Virtual network in the search box.
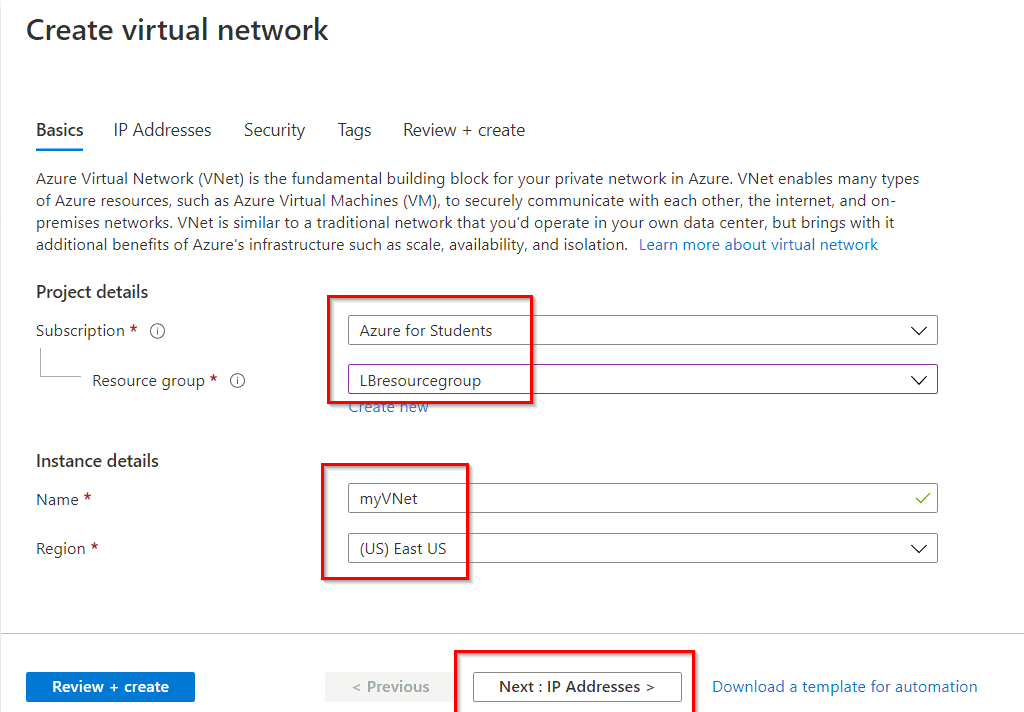
Step 2) In Create virtual network, enter or select the following information in the Basics tab:
Read:Azure Networking : Brief Introduction of Azure Virtual Network
Step 3) Select the Next: IP Addresses button at the bottom of the page. In the IP Addresses tab, enter this information:
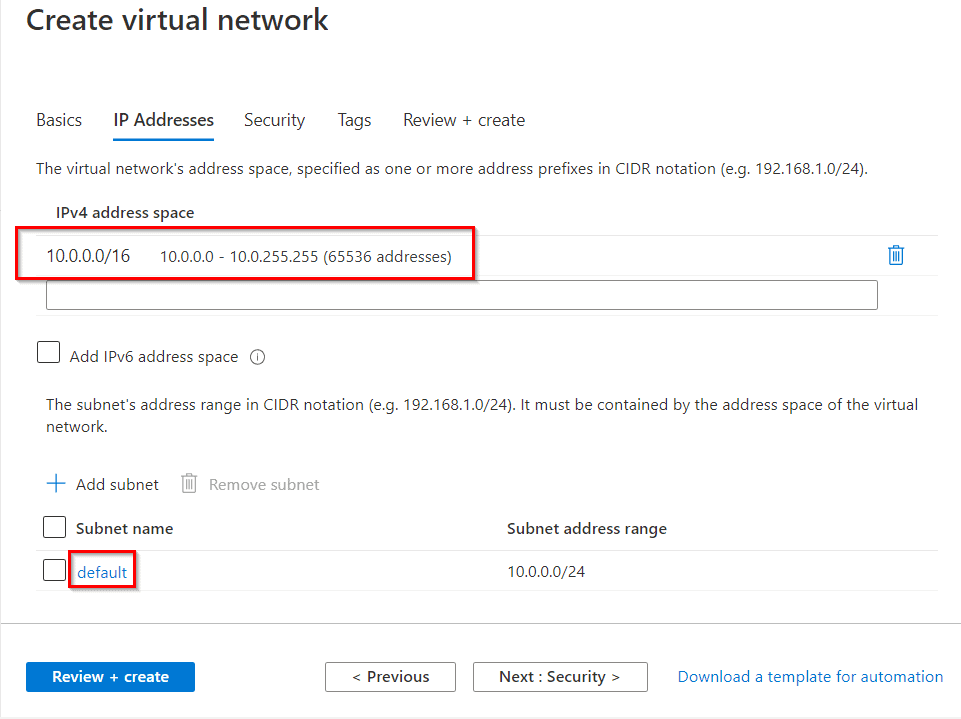
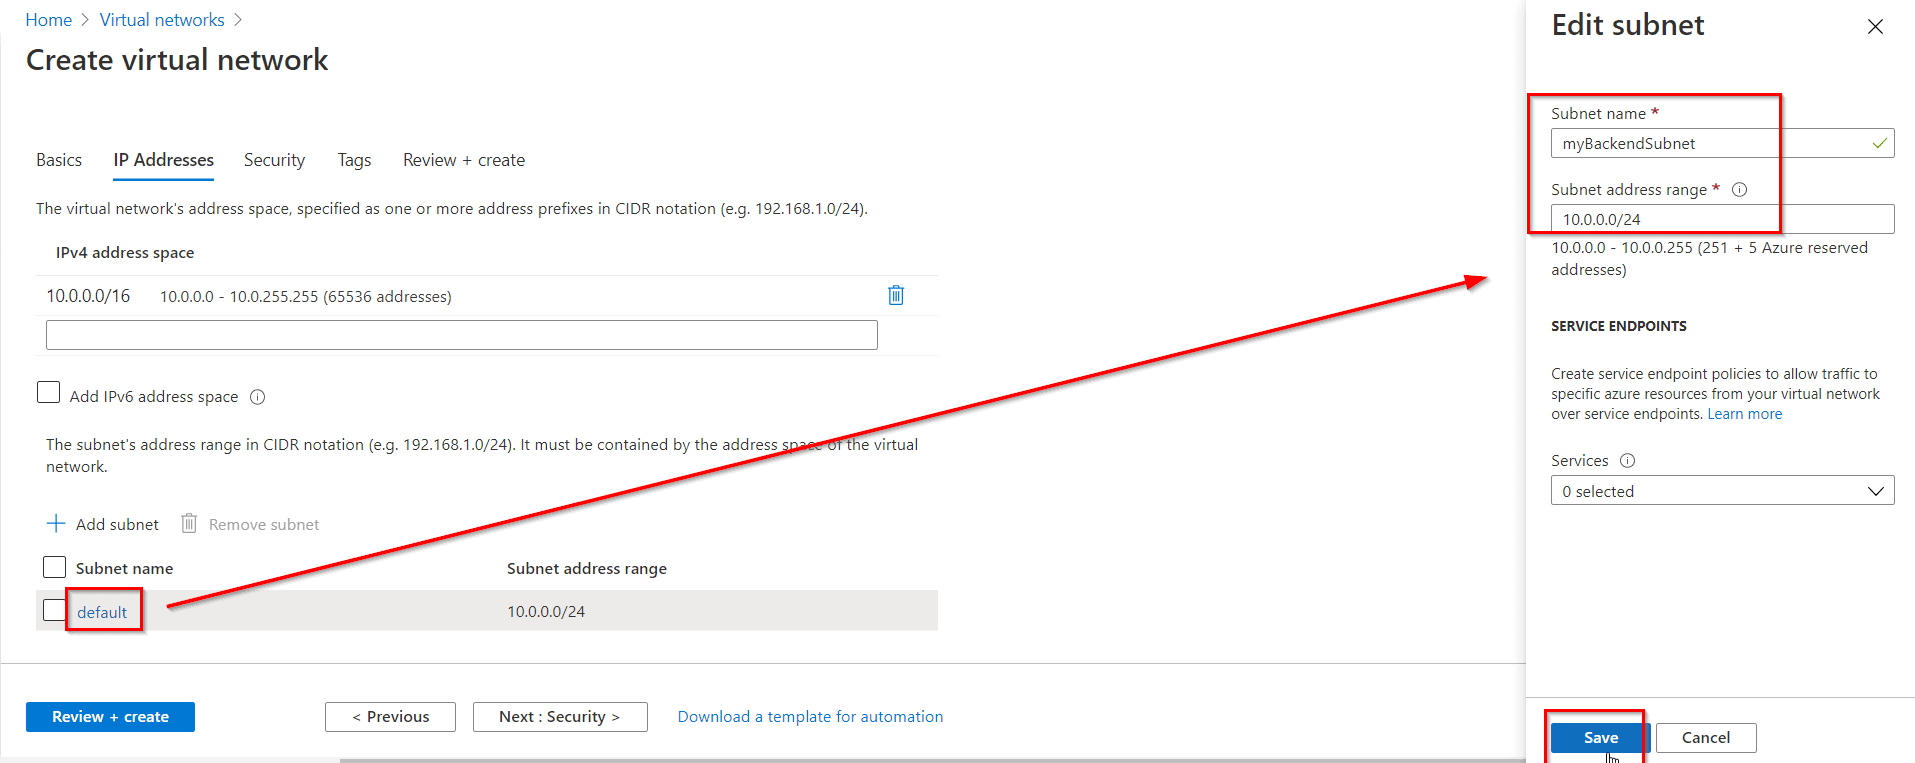
Step 4) Under Subnet name, select the word default. In Edit subnet, enter this information and select Save then select the Review + create tab.
Read: Azure Active Directory (Azure AD) : Everything you need to know
Task 3: Create a Backend Pool
A backend address pool contains the IP addresses of the virtual (NICs) connected to the load balancer.
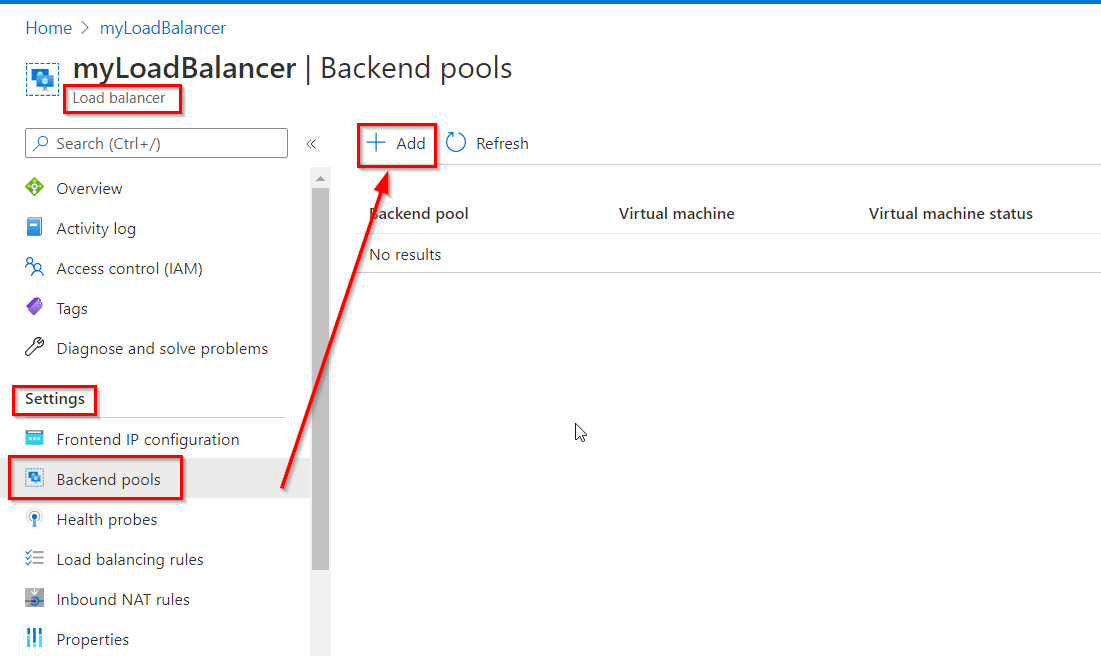
Step 1) Select All services in the left-hand menu, select All resources, and then select myLoadBalancer from the resources list.
Step 2) Under Settings, select Backend pools, then select Add.
Read: Microsoft Azure Cloud Cost Saving Tips And Tricks
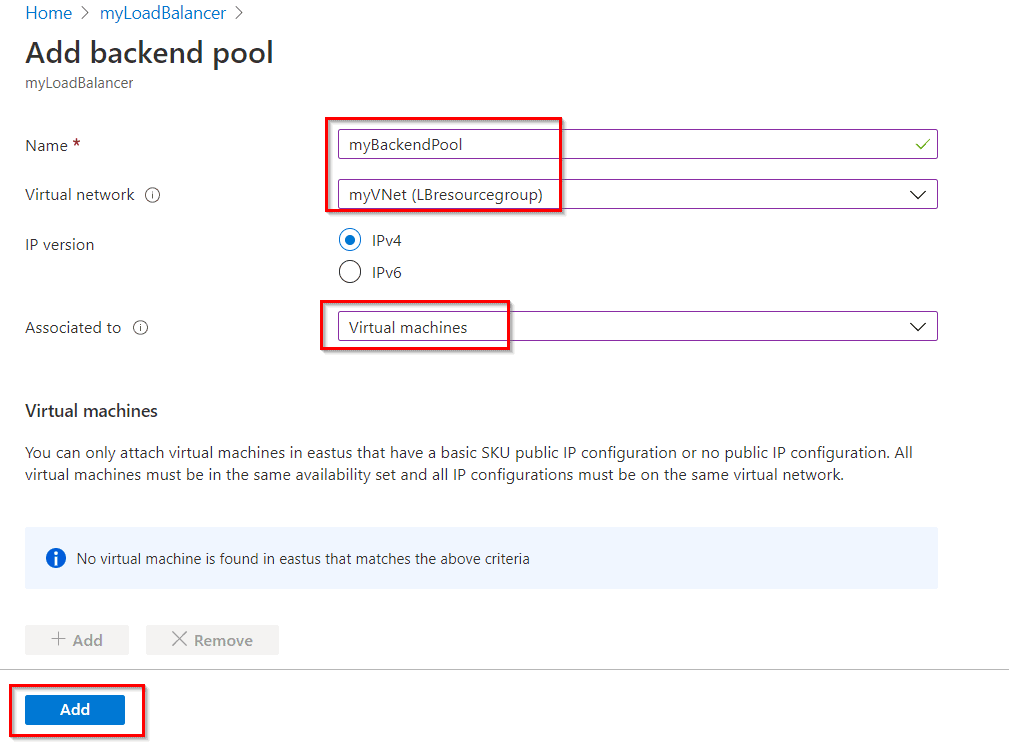
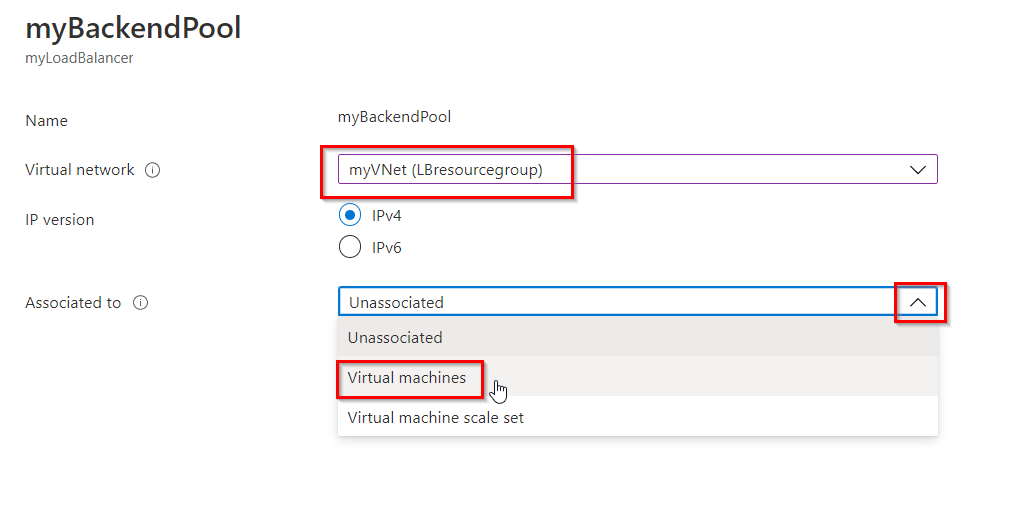
Step 3) In the Add a backend pool page, enter the following information and then select Add.
Read: Azure Kubernetes Service
Task 4: Create a Health Probe
The load balancer monitors the status of your app with a health probe. The health probe adds or removes VMs from the load balancer based on their response to health checks.
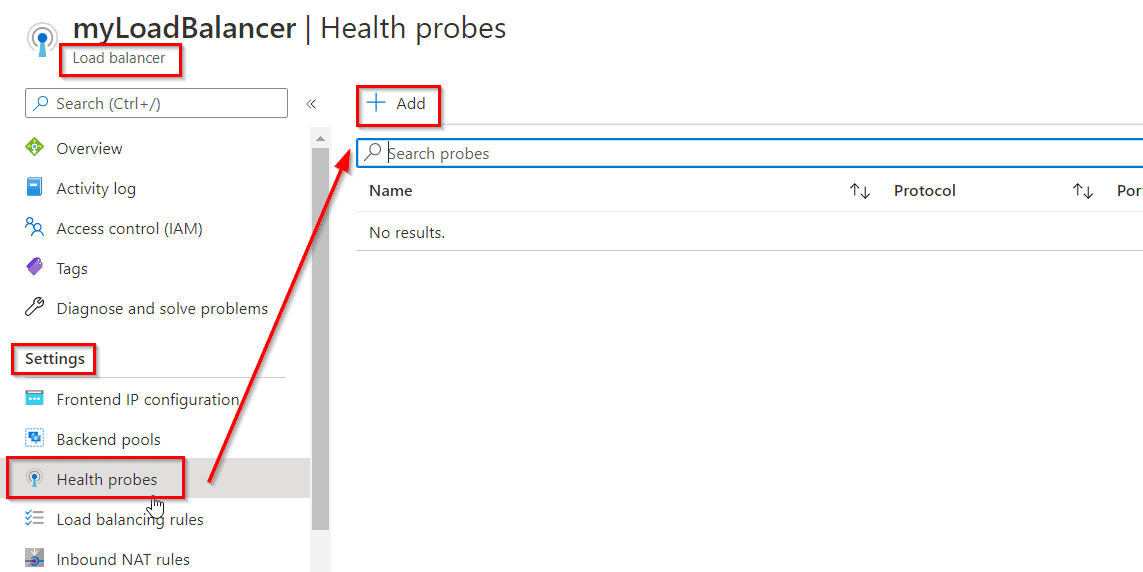
Step 1) Select All services in the left-hand menu, select All resources, and then select myLoadBalancer from the resources list.
Step 2) Under Settings, select Health probes, then select Add.
Read: Availability Zone in Azure.
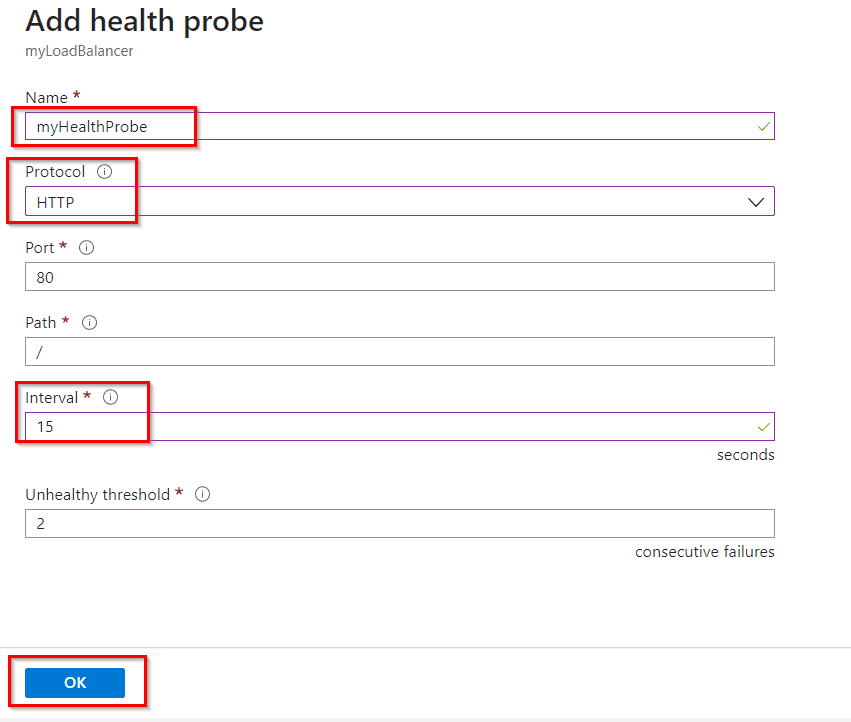
Step 3) Enter the below information in the Add health probe page and then select OK.
Read: Azure PowerShell Module & Guide
Task 5: Create a Load Balancer Rule
A load balancer rule is used to define how traffic is distributed to the VMs. You define the frontend IP configuration for the incoming traffic and the backend IP pool to receive the traffic. The source and destination ports are defined in the rule.
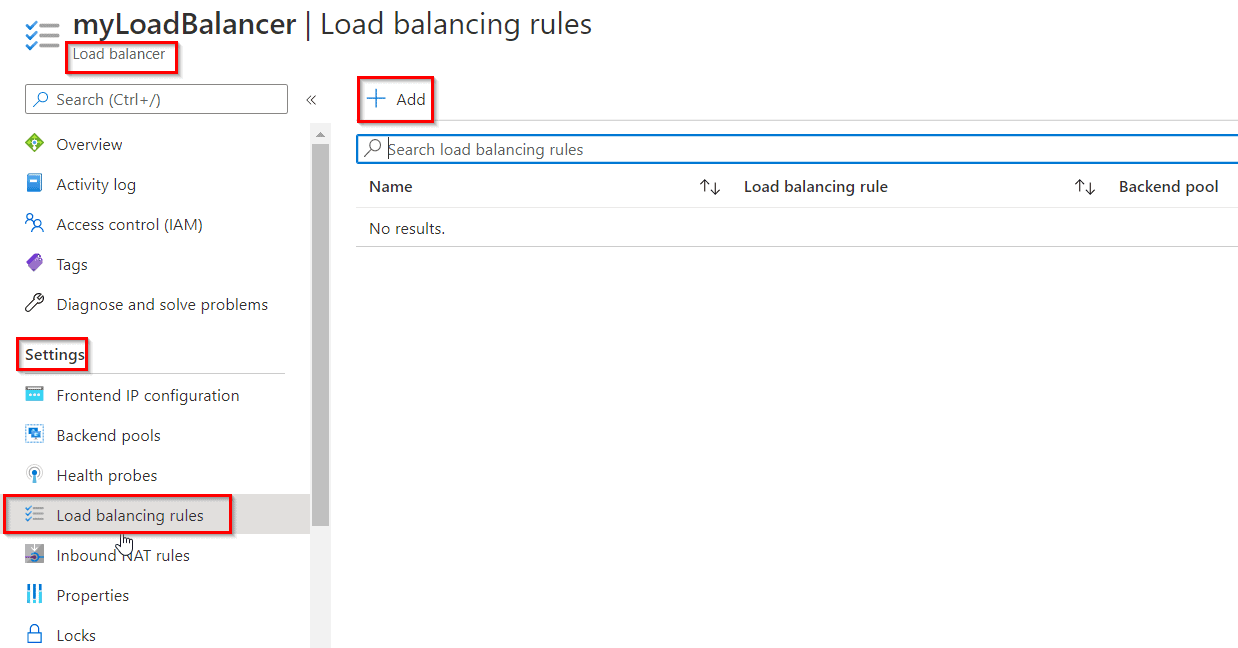
Step 1) Select All services in the left-hand menu, select All resources, and then select myLoadBalancer from the resources list.
Step 2) Under Settings, select Load balancing rules, then select Add.
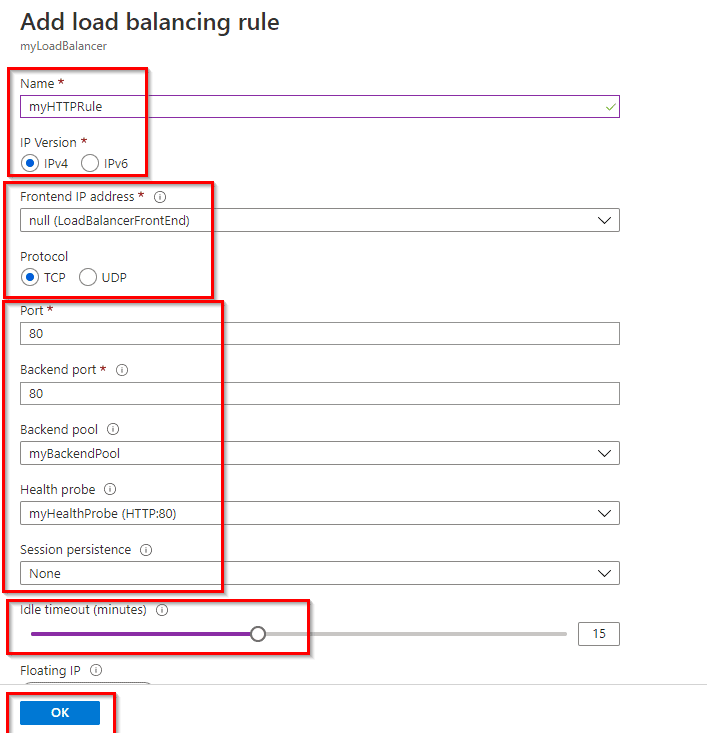
Step 3) Use these values to configure the load-balancing rule and then select OK.
Read: Top 50+ Microsoft Azure Interview Questions & Answers in 2024
Task 6: Setup Two New windows VM
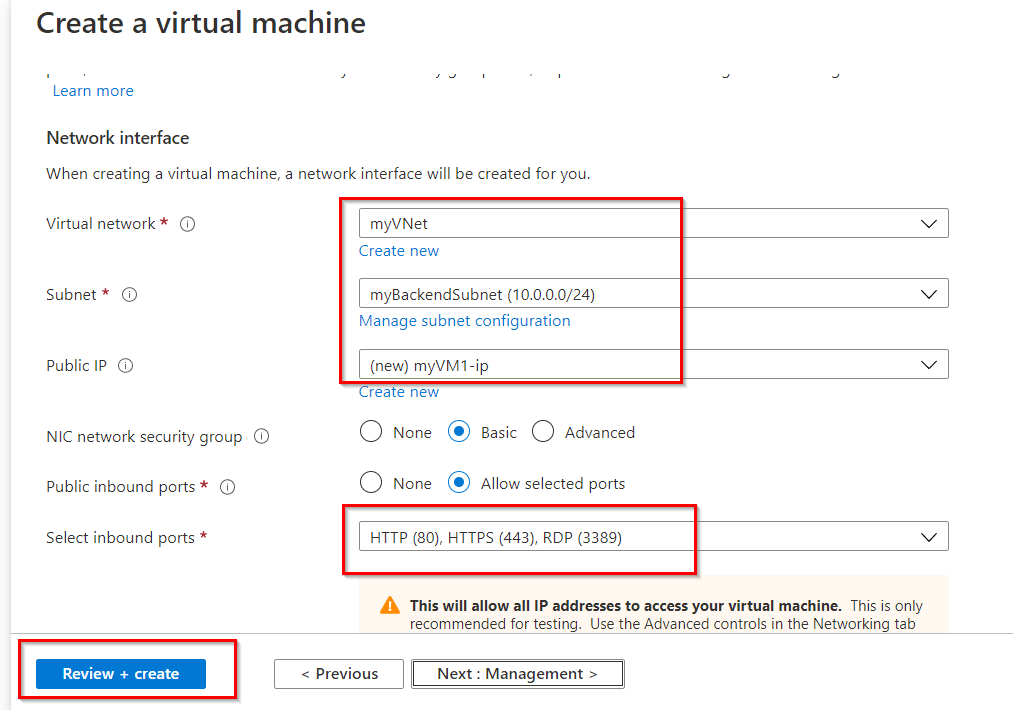
Now you have to create two different ‘Windows Server’ Virtual Machines and to do so you can follow the steps given in this Documentation.
Note: Create both the VMs in an Availability Set and Select the previously created VNet named “myVNet” under the Networking tab.
Read: VMSS (Virtual Machine Scale Set) In Microsoft Azure
Task 7: Install IIS for Testing
Install IIS Web Server on the virtual machines to test the load balancer.
Step 1) Run the following command in the Azure Cloud Shell (PowerShell) to install IIS on the virtual machine. Change the Location and Resource Group parameter according to the VM in which you have deployed:
Set-AzVMExtension `
-ResourceGroupName LBresourcegroup `
-ExtensionName IIS `
-VMName myVM1 `
-Publisher Microsoft.Compute `
-ExtensionType CustomScriptExtension `
-TypeHandlerVersion 1.4 `
-SettingString ‘{“commandToExecute”:”powershell Add-WindowsFeature Web-Server; powershell Add-Content -Path \”C:\\inetpub\\wwwroot\\Default.htm\” -Value $($env:computername)”}’ `
-Location EastUS
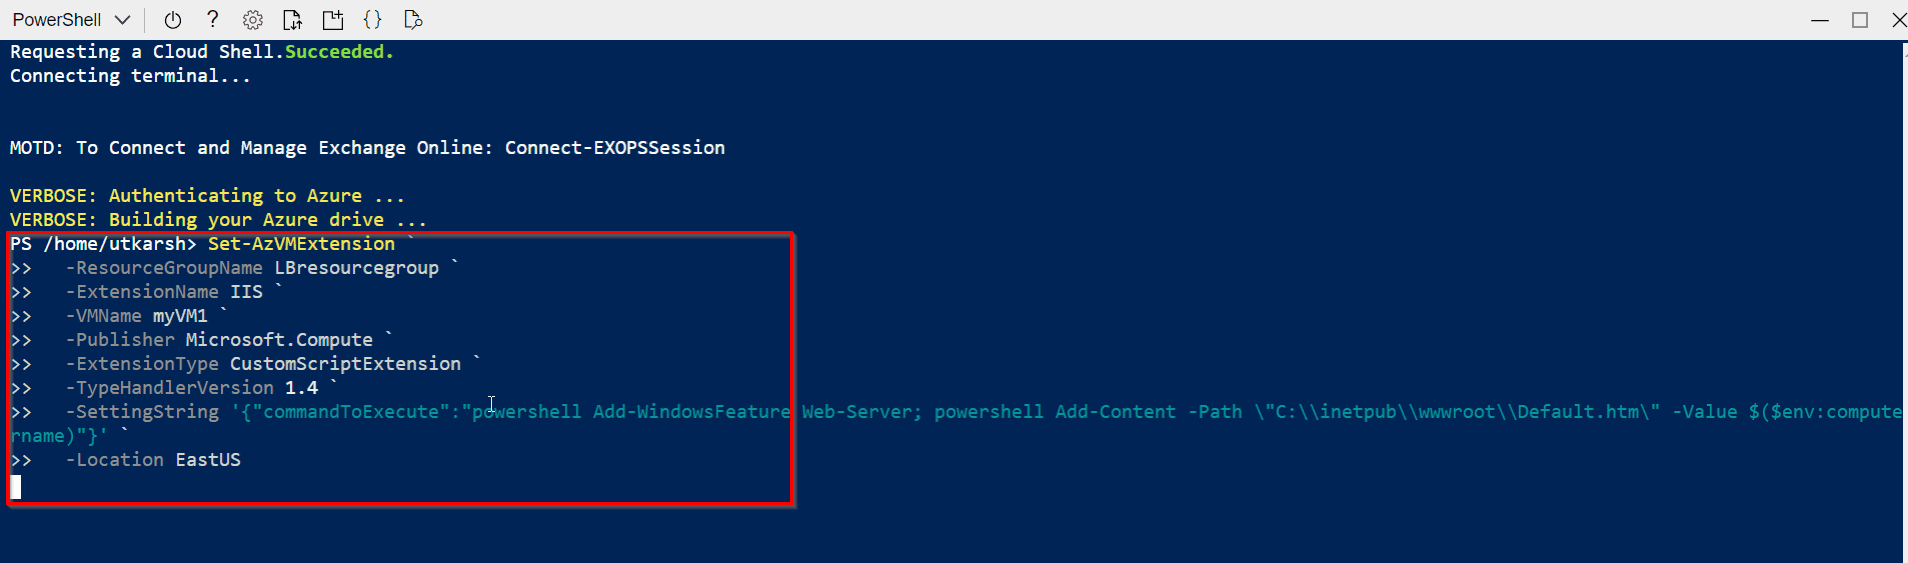
Note: Change the -VMName line to “myVM2” for installing IIS on the second Virtual Machine.
Read: Azure Front Door vs Application Gateway
Task 8: Add Virtual Machines to the Backend Pool
Step 1) Select All services in the left-hand menu, select All resources, and then select myLoadBalancer from the resources list.
Step 2) Under Settings, select Backend pools, then select myBackendPool.
Step 3) Select the myVNet in the Virtual Network and Select Virtual machines in Associated to.
Read: Azure Traffic Manager
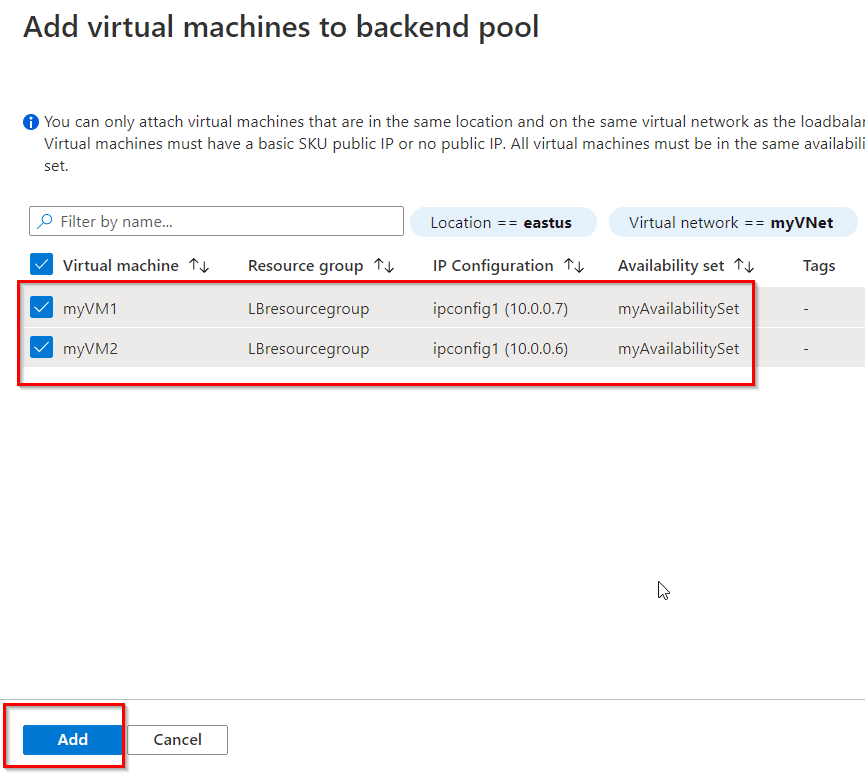
Step 4) In the Virtual machines section, select + Add and then select the newly created both VMs, Select Save.
Read: Azure vnet peering.
Task 9: Test the Load Balancer
Step 1) Find the public IP address for the load balancer on the Overview screen of the Load Balancer.
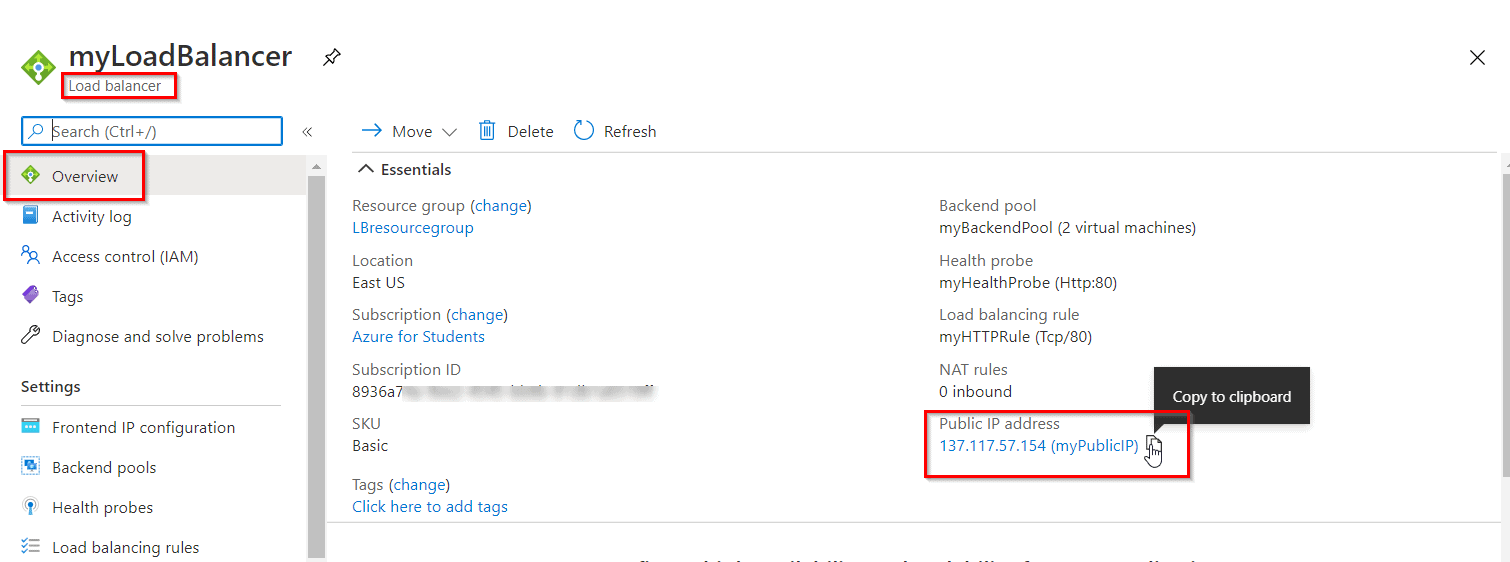
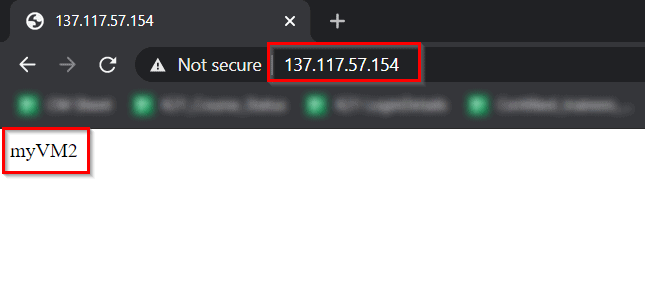
Step 2) Copy the public IP address, and then paste it into the address bar of your browser. Check the response. A valid response verifies that the load balancer was successfully created and can successfully connect with the backend VMs.
Read: ARM Template (Azure Resource Manager) for Beginners
Refresh the browser multiple times and you should see connections to both myVM1 and myVM2.
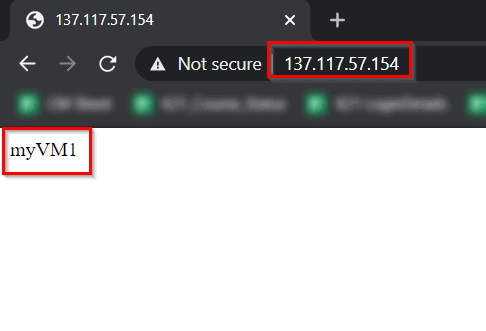
And hence, this confirms the load balancer is working as expected.
To Download Azure Solutions Architect Exam Questions, Click here.
Conclusion: Azure load balancer is used to distribute networking traffic load to backend virtual machines, its scaling feature provides great value during higher and lower loads. The flexibility is the major benefit of defining load balancing rules in your own way. The above discussed practical Hands-on helps you to understand concepts in more detail.
Frequently Asked Questions
How are inbound NAT rules different from load-balancing rules?
Inbound NAT rules are used to specify a backend resource to route traffic to. For example, configuring a specific load balancer port to send RDP traffic to a specific VM. Load-balancing rules are used to specify a pool of backend resources to route traffic to, balancing the load across each instance. For example, a load balancer rule can route TCP packets on port 80 of the load balancer across a pool of web servers.
How can I discover the public IP that an Azure VM uses?
There are many ways to determine the public source IP address of an outbound connection. OpenDNS provides a service that can show you the public IP address of your VM. By using the nslookup command, you can send a DNS query for the name myip.opendns.com to the OpenDNS resolver. The service returns the source IP address that was used to send the query. When you run the following query from your VM, the response is the public IP used for that VM: nslookup myip.opendns.com resolver1.opendns.com
Does Azure Load Balancer support TLS/SSL termination?
No, Azure Load Balancer doesn't currently support termination as it's a pass through network load balancer. Application Gateway could be a potential solution if your application requires termination.
References/Related
- Azure Traffic Manager Overview & Step By Step Guide
- Azure Blob Storage: Features, Usage, And Steps to Create
- Microsoft Entra ID: Everything You Need To Know
- Job Oriented Azure Cloud Program: Step-by-Step Hands-on Lab & Projects
- Cloud Infrastructure Monitoring Overview And Step By Step
- Azure RBAC Vs. Azure Policies Vs. Azure Blueprints
- Azure Notification Hub – Steps To Create
Next Task For You
Begin your journey toward Mastering Azure Cloud and landing high-paying jobs. Just click on the register now button on the below image to register for a Free Class on Mastering Azure Cloud: How to Build In-Demand Skills and Land High-Paying Jobs. This class will help you understand better, so you can choose the right career path and get a higher paying job.


![AWS DevOps [DOP-C02] Professional Step By Step Activity Guides (Hands-On Labs)](https://k21academy.com/wp-content/uploads/2023/02/DOP-C02-1.png)