


![]()
Openshift is designed to run distributed systems across a network of machines.
An IP Address, a single DNS name, and a Load Balancer are provided by Openshift Service to a group of Pods. A selector is used by a Service to identify its member Pods. A Pod must have all of the labels specified in the selector to be a member of the Service. A label is a random key/value pair attached to an object.
Openshift Services is a REST object as well as an abstraction that defines a logical set of pods as well as a policy for accessing the pod set. Openshift services are almost similar to Kubernetes services.
In this blog we will be learning about the following topics:
Pods
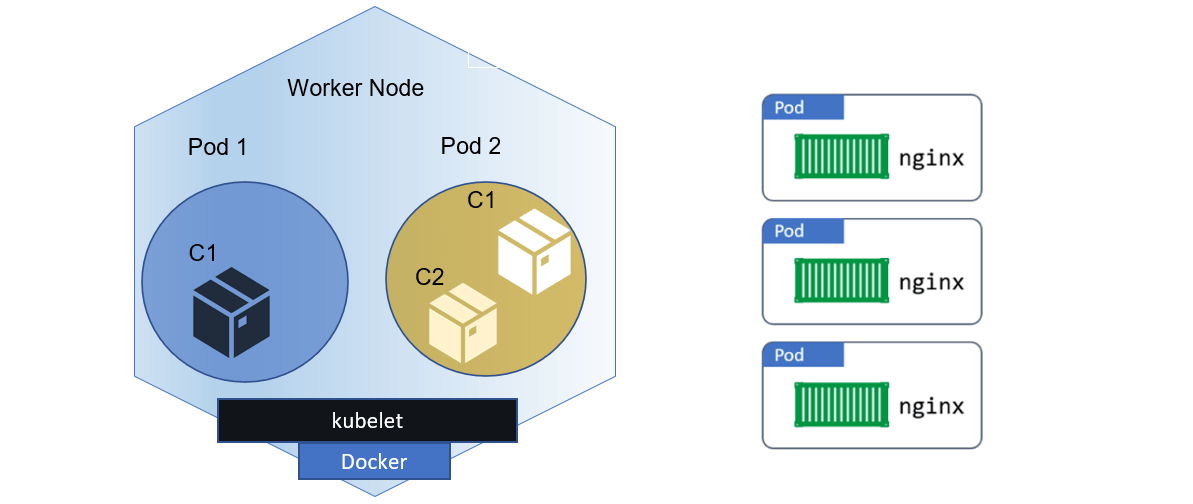
The smallest computational unit that may be specified, deployed, and managed is a pod, which is a group of containers installed on a single host and is used by OpenShift Origin.
Pods are essentially the equivalent of a physical or virtual computer instance to a container. Since each pod has its own internal IP address and thus owns its entire port space, containers within pods can share local networking and storage resources.
Pods have a lifespan in which they are defined, assigned to run on a node, and continue to run until either their container(s) exit or they are removed for some other reason. Pods may be removed after quitting or preserved to allow access to their containers’ logs, depending on the policy and exit code.
Pod definition updates cannot be made while a running pod is active, according to OpenShift Origin. By terminating an old pod and starting a new one with modified configuration, base image(s), or both, OpenShift Origin executes modifications. Pods are treated similarly to disposable objects and lose their state when rebuilt. Therefore, rather than being administered directly by users, pods should often be managed by higher-level controllers.
The integrated container registry, an example of a long-running service provided by a pod that is actually a component of the OpenShift Origin infrastructure, is described below. It illustrates a variety of pod characteristics, the majority of which are covered in other sections and are therefore just briefly treated here:
apiVersion: v1
kind: Pod
metadata:
  annotations: { ... }
  labels:
    deployment: docker-registry-1
    deploymentconfig: docker-registry
    docker-registry: default
  generateName: docker-registry-1-
spec:
  containers:
  - env:
    - name: OPENSHIFT_CA_DATA
      value: ...
    - name: OPENSHIFT_CERT_DATA
      value: ...
    - name: OPENSHIFT_INSECURE
      value: "false"
    - name: OPENSHIFT_KEY_DATA
      value: ...
    - name: OPENSHIFT_MASTER
      value: https://master.example.com:8443
    image: openshift/origin-docker-registry:v0.6.2
    imagePullPolicy: IfNotPresent
    name: registry
    ports:
    - containerPort: 5000
      protocol: TCP
    resources: {}
    securityContext: { ... }
    volumeMounts:
    - mountPath: /registry
      name: registry-storage
    - mountPath: /var/run/secrets/kubernetes.io/serviceaccount
      name: default-token-br6yz
      readOnly: true
  dnsPolicy: ClusterFirst
  imagePullSecrets:
  - name: default-dockercfg-at06w
  restartPolicy: Always
  serviceAccount: default
  volumes:
  - emptyDir: {}
    name: registry-storage
  - name: default-token-br6yz
    secret:
      secretName: default-token-br6yz
Learn more about Kubernetes Pods
Pod Restart Policy
How OpenShift Origin reacts when containers in a pod quit depends on the restart policy for that pod. All containers in that pod are covered by the insurance.
Possible values include:
- Always: Continuously attempts to restart a container that has successfully vacated the pod, with an exponential back-off delay (10s, 20s, and 40s) until the pod is restarted. Invariably is the default.
- OnFailure: Attempts to restart a failed container on the pod with a back-off delay that is exponential (10s, 20s, 40s) and has a maximum of 5 minutes.
- Never: Do not attempt to restart containers that have failed or are exiting the pod. Pods exit right away after failing.
A pod cannot be bound to another node once it has been once bound to one. This indicates that for a pod to survive a node loss, a controller is required:
| Condition | Controller Type | Restart Policy |
|---|---|---|
|
Pods that are anticipated to end (like batch computations) |
Job |
OnFailure or Never |
|
Pods that won’t likely terminate (like web servers) |
Replication Controller |
Always |
|
Pods that require one machine per pod to run |
Daemonset |
Any |
The pod remains on the node and the container is restarted if a container in a pod fails and the restart policy is set to OnFailure. Use a restart policy of Never if you don’t want the container to restart.
OpenShift Origin launches a new pod if an entire pod fails. The idea that apps might be resumed in a fresh pod must be considered by developers. Applications must specifically manage temporary files, locks, partial output, and other issues brought on by earlier executions.
Want to know more about how restart policy is used by OpenShift Origin with failing containers? Check out Example States.
Init Containers
An init container is a pod container that launches ahead of the pod app containers. Before the other containers start, the initial containers can share volumes, run network operations, and run computations. Application container startup can also be halted or postponed by initial containers until a certain need is satisfied.
The init containers are started sequentially when a pod starts, following the initialization of the network and volumes. Before the next init container is invoked, the previous one must successfully leave. An init container is restarted in accordance with the pod restart policy if it fails to start (due to the runtime) or quits with a failure.
Before any init containers have succeeded, a pod cannot be considered ready.
apiVersion: v1
kind: Pod
metadata:
  name: myapp-pod
  labels:
    app: myapp
spec:
  containers:
  - name: myapp-container
    image: busybox
    command: ['sh', '-c', 'echo The app is running! && sleep 3600']
  initContainers:
  - name: init-myservice
    image: busybox
    command: ['sh', '-c', 'until nslookup myservice; do echo waiting for myservice; sleep 2; done;']
  - name: init-mydb
    image: busybox
    command: ['sh', '-c', 'until nslookup mydb; do echo waiting for mydb; sleep 2; done;']
Except for readinessProbe, each init container contains all of the fields found in an app container. To continue, init containers must leave the pod; they can only specify readiness as completion.
Liveness and activeDeadlineSeconds on the pod are examples of initial containers.
To stop init containers from failing indefinitely, probe the container. Init containers are included in the active deadline.
Learn more about Readiness Probe and LivenessProbe
Services
Openshift services act as internal load balancers. It identifies a set of replicated pods to which it will proxy the connections it receives. Backing pods can be arbitrarily added or removed from a service while the service remains consistently available, allowing anything that relies on it to refer to it at a consistent address. The default service clusterIP addresses are from the OpenShift Origin internal network and are used to allow pods to communicate with one another.
Additional externalIP and ingressIP addresses outside the cluster can be assigned to the service to allow external access. These external IP addresses can also be virtual IP addresses, allowing for highly available service access.
When a service is accessed, it is proxied to an appropriate backing pod via an IP address and port pair. A label selector is used by a service to find all the containers that are running and provide a specific network service on a specific port.
Services, like pods, are REST objects. The following is an example of a service definition for the previously defined pod:
apiVersion: v1
kind: Service
metadata:
  name: docker-registry
spec:
  selector:
    docker-registry: default
  clusterIP: 172.30.136.123
  ports:
  - nodePort: 0
    port: 5000
    protocol: TCP
    targetPort: 5000
Learn more about Kubernetes Networking and Services
Service externalIPs
In addition to the cluster’s internal IP addresses, the user can configure external IP addresses. The administrator is in charge of ensuring that traffic reaches a node with this IP address.
Cluster administrators must choose externalIPs from the ExternalIPNetworkCIDRs range specified in the master-config.yaml file. When you make changes to master-config.yaml, you must restart the master services.
Service ingressIPs
External IP addresses in non-cloud clusters can be assigned automatically from a pool of addresses. This eliminates the need for the administrator to assign them manually.
The pool is set up in the file /etc/origin/master/master-config.yaml. Restart the master service after making changes to this file.
By default, the ingressIPNetworkCIDR is set to 172.29.0.0/16. Use the default range or set a custom range if the cluster environment is not already using this private range.
Service NodePort
Setting the service type to NodePort will allocate a port from a flag-configured range (default: 30000-32767), and each node will proxy that port into your service (the same port number on each node).
The chosen port is reported in the service configuration as spec.ports[*].nodePort.
Simply enter the port number in the nodePort field to specify a custom port. The custom port number must be within the nodePorts range. When you make changes to’master-config.yaml,‘ you must restart the master services.
Service Proxy Mode
The service-routing infrastructure is implemented in two ways in OpenShift Origin. The default implementation is entirely iptables-based, with incoming service connections distributed between endpoint pods using probabilistic iptables rewriting rules. The older implementation accepts incoming connections and then routes traffic between the client and one of the endpoint pods via a user space process.
The iptables-based implementation is much more efficient, but it requires that all endpoints accept connections at all times; the user space implementation is slower, but it can try multiple endpoints at once until it finds one that works. If you have reliable nodes and pods and good readiness checks, the iptables-based service proxy is the best option. Otherwise, you can enable the user space-based proxy during or after cluster deployment by editing the node configuration file.
Labels
Labels are used to group, organise, and select API objects. Pods, for example, are “tagged” with labels, and services use label selectors to determine which pods to proxy to. This allows services to refer to groups of pods, even pods with potentially different containers, as related entities.
Labels can be included in the metadata of most objects. Labels can thus be used to group arbitrarily related objects; for example, all of a specific application’s pods, services, replication controllers, and deployment configurations can be grouped.
Labels are simple key/value pairs, as shown in the example below:
labels:
  key1: value1
  key2: value2
Learn more about Kubernetes Labels
Endpoints
Endpoints are the servers that support a service and are specified by an object of type Endpoints with the same name as the service. When a service is backed by pods, the pods are typically specified by a label selector in the service specification, and OpenShift Origin creates the Endpoints object pointing to those pods automatically.
In some cases, you may want to create a service that is supported by external hosts rather than OpenShift Origin pods. In this case, you can skip the selector field in the service and manually create the Endpoints object.
Note: Most users will be unable to manually create an Endpoints object that points to an IP address in the network blocks reserved for pod and service IPs in OpenShift Origin. Such Endpoint objects can only be created by cluster administrators or other users with the permission to create resources under endpoints/restricted.
Related/References
- Openshift vs Kubernetes: What is the Difference?
- Containers for Beginners: What, Why and Types
- Kubernetes for Beginners – A Complete Beginners Guide
- Kubernetes Architecture | An Introduction to Kubernetes Components
- Red Hat OpenShift- What, Why, and How?
- OpenShift For Beginners: 30+ Hands-On labs You Must Perform | Step-by-Step
- Deploy Applications Using OpenShift: Step-by-Step
- Install Single Node OpenShift Cluster (OKD): Step By Step
- OpenShift Official Documentation
Next Task For You: Join Our FREE Class
Begin your journey towards becoming a Red Hat Certified Specialist in OpenShift Administrator and earning a lot more in 2021 by joining our Free Class.


![AWS DevOps [DOP-C02] Professional Step By Step Activity Guides (Hands-On Labs)](https://k21academy.com/wp-content/uploads/2023/02/DOP-C02-1.png)