


![]()
OpenShift is a platform from RedHat/IBM to run containerized applications. Under the hood, OpenShift is powered by an open-source Kubernetes engine.
Enterprise Edition aka Openshift Container Platform (OCP) is a consistent hybrid cloud foundation for building and scaling containerized applications. Benefit from streamlined platform installation and upgrades from one of the enterprise Kubernetes leaders.
OCP is an on-premises platform as a service built around containers orchestrated and managed by Kubernetes on a foundation of Red Hat Enterprise Linux. The family’s other products provide this platform through different environments: OKD serves as the community-driven upstream, OpenShift Online is the platform offered as software as a service, and OpenShift Dedicated is the platform offered as a managed service.
Deploying applications in Openshift is quite an interesting thing. In this post, we are going to cover four different types of Application deployments in Openshift (OCP).
This blog is going to cover Deploying applications Using:
- Source To Image (S2I)
- Image Streams (Docker Image)
- Database Image
- Deploy Application With Dockerfile
Note: We are providing a guide with the Steps to Deploy Application With Dockerfile (Download link below).
Pre-Requisites
To deploy applications in OpenShift (OCP) you need to have an AWS account and an Openshift cluster running on it.
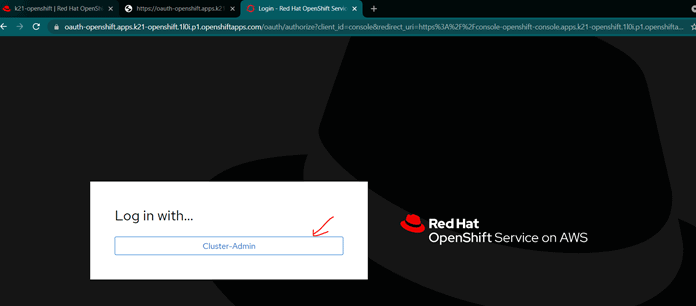
Check our blog on How to create an Openshift cluster to know more.
Source To Image (S2I)
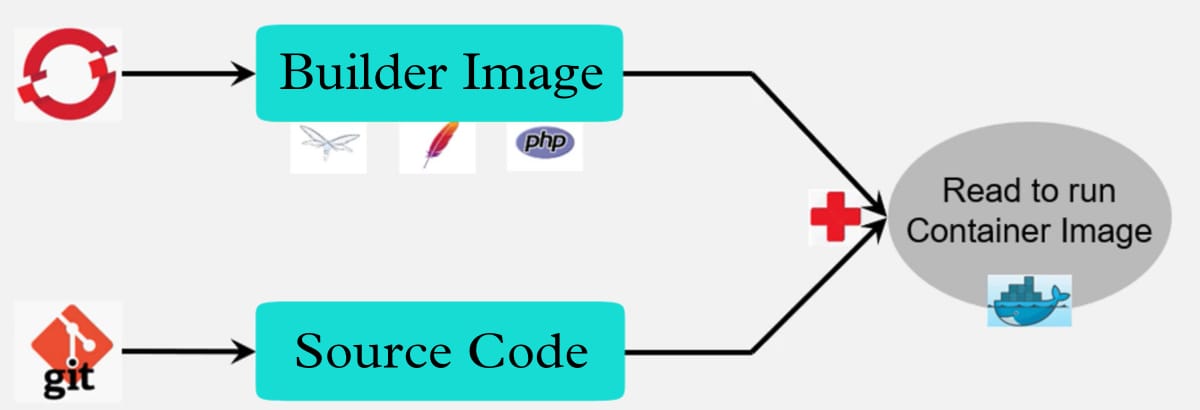
Source-to-Image (S2I) is a tool for building testable, Docker container images. S2I produces ready-to-run images by injecting the application source into a builder image and collecting a new image. The new image includes the base image and built source and is ready to use with the docker run command. S2I supports incremental builds, which re-use previously downloaded dependencies.
Build Process:
The build process consists of the following three fundamental elements, which are combined into a final Docker image:
- sources
- S2I scripts
- builder image
During the build process, S2I must put sources and scripts inside the builder image. A builder image is a container image that supports a particular language or framework and S2I specifications.
For doing that, S2I creates a tar file which contains the sources and scripts, then S2I streams that file into the builder image. S2I untars that file and places its contents into the location specified with the –destination flag or the io.openshift.s2i.destination label from the builder image, with the default location being the /tmp directory. S2I does this before executing the assemble script.
Check Out: Our blog post on Azure Redhat Openshift.
Image Streams (Docker Image)
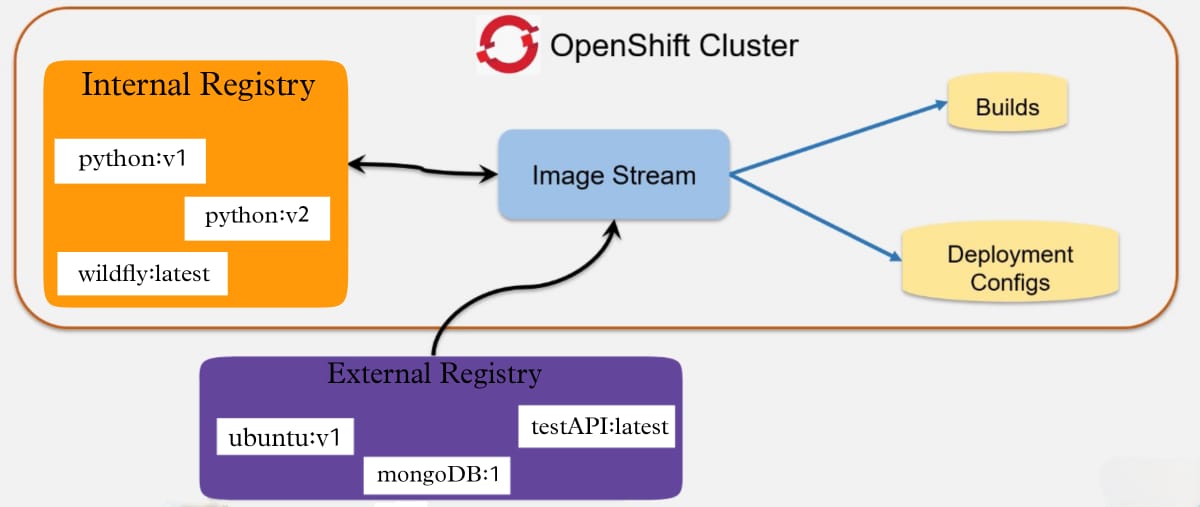
An image stream provides an abstraction for using Docker images from within OCP. The image stream and its tags let you see what images are available and make sure that you are using that specific image you need even if the image in the repository is modified or change.
Image streams do not contain actual image data, but it contains a single virtual view of the images, similar to an image repository. You can configure Builds and Deployments to watch an image stream for notifications when new images are added and react by performing a Build or Deployment, respectively.
However, if the tag used by the Deployment or Build is not updated, then even if the Docker image in the Docker registry is updated, the Build or Deployment will continue using the previous image.
The source images can be stored in any of the following:
- OpenShift Container Platform’s integrated registry
- An external registry, for example, registry.access.redhat.com or hub.docker.com
- Other image streams in the OpenShift Container Platform cluster
The image stream metadata is stored in the etcd instance along with other cluster information.
Using image streams has several significant benefits:
- You can rollback a tag, and deal with images quickly, don’t need to push it again using the command line.
- You can Build and Deploy when a new image is pushed to the registry.
- You can bind some roles around who can view and use the images through permissions on the image stream objects.
- Users that lack permission to read or list images on the cluster level can still retrieve the images tagged in a project using image streams.
Read More: About Openshift Use Cases.
Database Image
OpenShift already includes the container images for MySQL, PostgreSQL, MongoDB and MariaDB. These images can provide database services based on username, password, and database name settings provided via configuration.
To use these images, you can either access them directly from the registries or push them into your OpenShift Docker registry. In addition to that, you can create an ImageStream that indicates the image, either in your Docker registry or at the external location. Your OpenShift resources can then reference the ImageStream.
Configuration and Usage:
1. Initializing the Database
The first time you use the shared volume, the database is created along with the database administrator user. Then, the MongoDB daemon starts up. If you are re-attaching the volume to another container, then the database, database user, and the administrator user are not created, and the MongoDB daemon starts.
2. Running MongoDB Commands in Containers
OpenShift uses Software Collections (SCLs) to install and launch MongoDB. If you want to run and execute a MongoDB command inside of a running container, you must do it using bash. To do so, first, you need to identify the name of the running MongoDB pod.
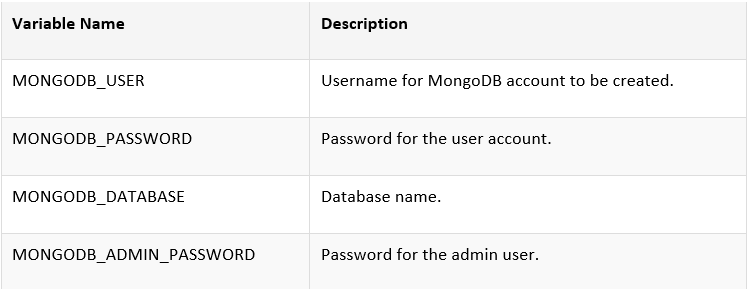
3. Environment Variables
The MongoDB user name, password, database name, and admin password must be configured with the following environment variables:
4. Volume Mount Points
The MongoDB image can be run with mounted volumes to enable persistent storage for the database:
/var/lib/mongodb – This is the database directory where MongoDB stores database files.
5. Creating the Deployment Configuration
The replication controller manages the members of the MongoDB cluster.
Deploy Application On OpenShift With Dockerfile
In this, we are going to deploy the application using Dockerfile. Openshift will take care of building the images.
With Dockerfile, everything is done in Openshift. You push the code, Openshift builds the image, push it in the registry and can deploy it automatically thanks to “triggers”
When you are deploying an application using the dockerfile make sure all the supported files should be available at the dockerfile location, so Openshift can create an image using the dockerfile.
Deploy Application With Dockerfile Using Console:
1. Go to the Developer tab to deploy the application
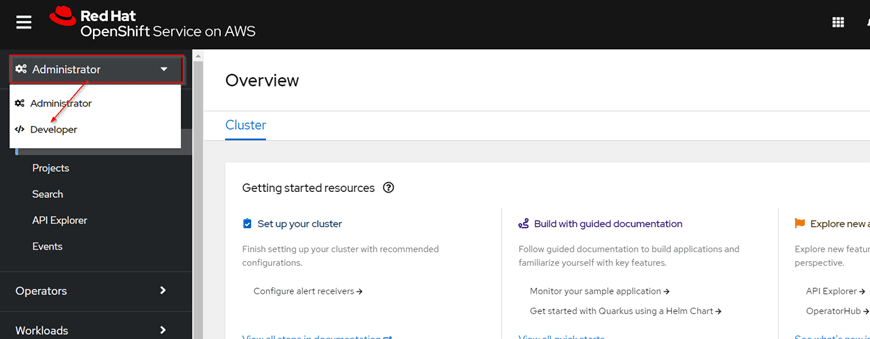
2. In developer click on the +Add to create an application
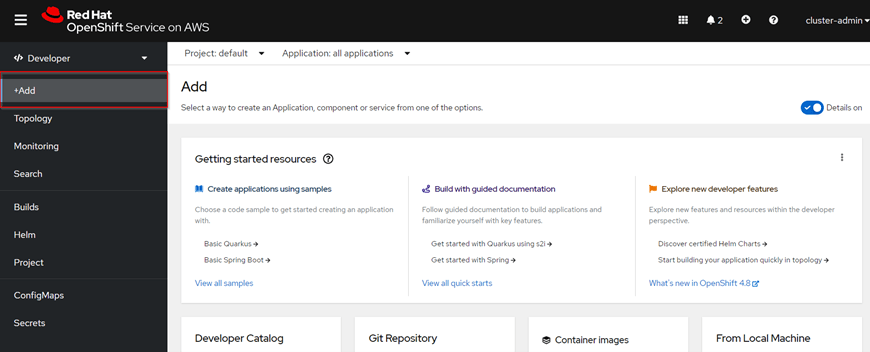
3. Create an application
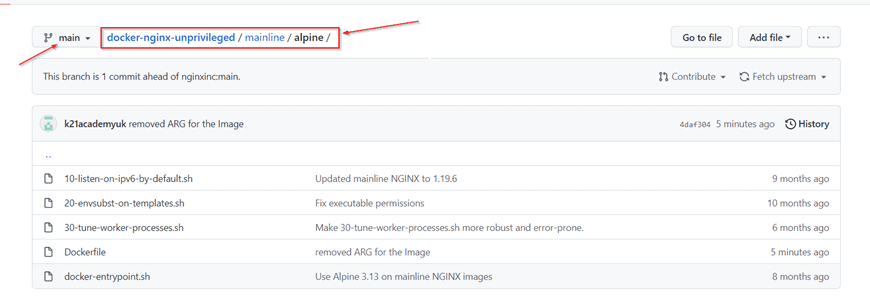
a) Under Git Repo URL: Provide the Git Repo URL (Use below URL for sample)
https://github.com/k21academyuk/docker-nginx-unprivileged.git
b) Click on the Show advanced Git Options
c) Git reference: main
d) Context dir: Provide path of the dockerfile (/mainline/alpine/)
e) Source Secret: Leave empty
4. Application deployed you can see on Topology

Note: Deploy Application With Dockerfile is covered in the guide (Download link below)
Conclusion
There are many ways to deploy an application on OpenShift. In this post, I discussed and showed some of the easiest methods on how to deploy an application on OpenShift OCP? If you already have all those tools that build and store images, then you can deploy applications using container images. Hence, OpenShift is a great tool for container-based applications over the cloud. We can build, test, deploy and maintain applications using it very easily.
Related/References
- Openshift vs Kubernetes: What is the Difference?
- Kubernetes for Beginners
- Red Hat OpenShift- What, Why, and How?
- OpenShift For Beginners: 30+ Hands-On labs You Must Perform | Step-by-Step
- Deploy Applications Using OpenShift: Step-by-Step
- Install Single Node OpenShift Cluster (OKD): Step By Step
- Install & Configure Multi-Node Openshift (OCP) Cluster Using User Provisioned Infrastructure: Step By Step
- OpenShift Official Documentation
FREE Guide Download Here: Steps to Deploy Application in OpenShuft With Dockerfile in OCP.
Next Task For You: Join Our FREE Class
Begin your journey towards becoming a Red Hat Certified Specialist in OpenShift Administrator and earning a lot more in 2021 by joining our Free Class.


![AWS DevOps [DOP-C02] Professional Step By Step Activity Guides (Hands-On Labs)](https://k21academy.com/wp-content/uploads/2023/02/DOP-C02-1.png)