


![]()
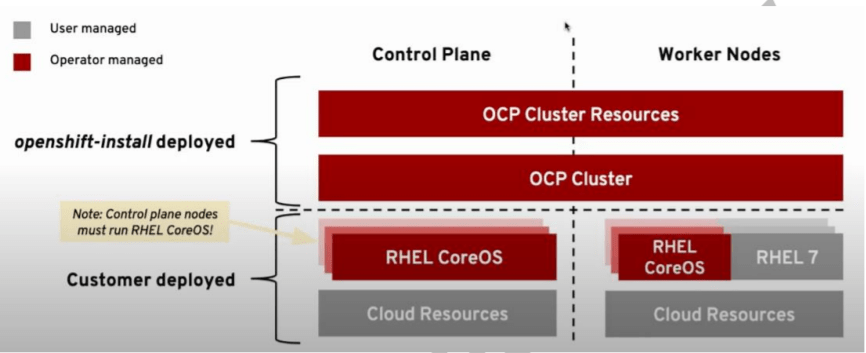
An OpenShift Cluster is a group of nodes or machines running together. At the highest level of Kubernetes, there exist two kinds of servers, a Master and a Worker node. These servers can be Virtual Machines (VM) or physical servers(Bare metal). Together, these servers form an OpenShift cluster and are controlled by the services that make up the Control Plane.
In this post, we have covered, installation & configuration steps of setting up of Multi-Node Openshift (OCP) Cluster Using User Provisioned Infrastructure on AWS.
There are three ways of installing OpenShift cluster:
a) Community Edition aka Origin Kubernetes Distribution (OKD):
An OKD stands for Origin Key Distribution, which is the open-source upstream community edition of Red Hat’s OpenShift container platform. OKD is a container management and orchestration platform based on Docker and Kubernetes.
b) Red Hat OpenShift Service on AWS (ROSA):
Red Hat OpenShift Service on AWS (ROSA) is a fully-managed OpenShift service, jointly managed and supported by both Red Hat and Amazon Web Services (AWS). Having your clusters maintained by this service gives you the freedom to focus on deploying applications.
c) Enterprise Edition aka Openshift Container Platform (OCP)
In this post, we will be installing OCP.
What is OCP in OpenShift?
Enterprise Edition aka Openshift Container Platform (OCP) is a consistent hybrid cloud foundation for building and scaling containerized applications. Benefit from streamlined platform installation and upgrades from one of the enterprise Kubernetes leaders.
OCP is an on-premises platform as a service built around Docker containers orchestrated and managed by Kubernetes on a foundation of Red Hat Enterprise Linux. The family’s other products provide this platform through different environments: OKD serves as the community-driven upstream, OpenShift Online is the platform offered as software as a service, and OpenShift Dedicated is the platform offered as a managed service.
The OpenShift Console has developer and administrator-oriented views. Administrator views allow one to monitor container resources and container health, manage users, work with operators, etc. Developer views are oriented around working with application resources within a namespace. OpenShift also provides a CLI that supports a superset of the actions that the Kubernetes CLI provides.
Also Read: Our blog post on Azure Openshift.
What is User Provisioned Infrastructure (UPI)?
With the release of Red Hat OpenShift 4, the concept of User Provisioned Infrastructure (UPI) has emerged to encompass the environments where the infrastructure (compute, network and storage resources) that hosts the OpenShift Container Platform is deployed by the user. In this type of installation, you as a user deploy underlying infrastructures like Operating System whereas the installer will install Openshift Cluster and openshift related resources.
This allows for more creative deployments while leaving the management of the infrastructure to the user. This allows us to deploy OpenShift Container Platform 4.1 on a mix of virtual and bare-metal machines.
This blog is going to cover:
- INSTALL & CONFIGURE AWS CLI ON LINUX (EC2)
- Setup Openshift Cluster Using User Provisioned Infrastructure
- Open shift Cluster Installation
- Logging Into Cluster
- Check Cluster Logs
- Delete Openshift Cluster
Prerequisites For Cluster Setup
Deploying Openshift clusters can be hard and painful, so an alternate way of doing this can be using a Cloud Platform for deploying them. You can use any Cloud Platform; here, we are using AWS Cloud. Before getting on with creating a cluster, make sure you have the following setup ready:
I) We will follow the guide here to Install & Configure Multi-Node Openshift Cluster using Run It Yourself User Provisioned Infrastructure On AWS . (Check the Guide Download link below)
II) Create an AWS Free Account, as we will use AWS Cloud for setting up an Openshift Cluster. To create an AWS Free Account, check our blog on AWS Free Trial Account.
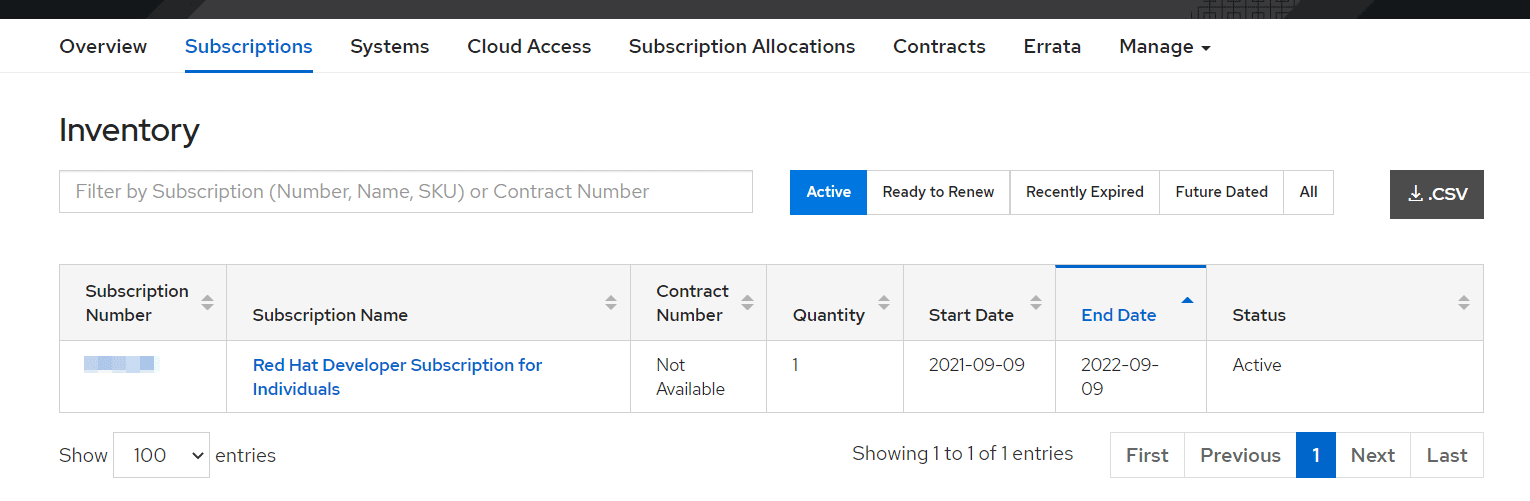
III) Subscribe to Redhat Developer and create and update Redhat account, access the Active subscription. We need to have you will reach the subscription page, where you should see one Active Subscription.
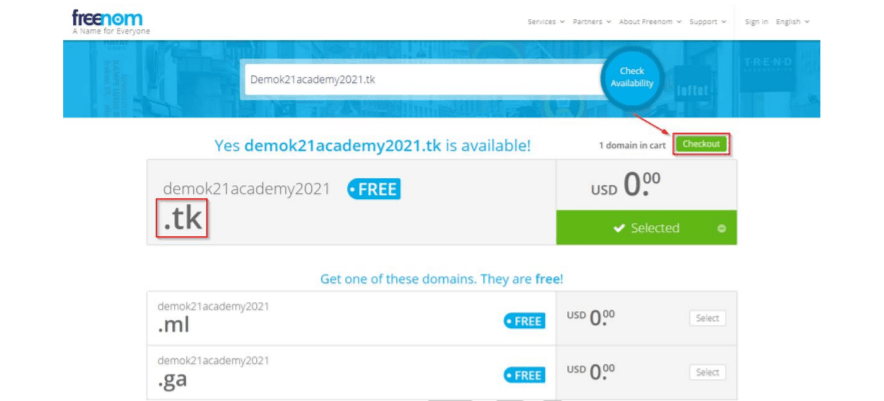
IV) Registering a domain name for free from the website Freenom.com. We will be using this domain name for multiple labs in our entire course for integrating with Amazon Route53.
V) Register for entries for the nameserver to configure Amazon Route53. To know how to configure Route53, check our blog on Introduction to AWS Route 53.
VI) Launching a Linux Instance Using EC2.
The EC2 is a computing service that provides scalable computing capacity and eliminates the equipment investment up-front, so the applications can be developed and deployed faster. Virtual machines on AWS EC2 are called instances. In this guide, we are going to use t2. Medium EC2 Instance, which is not part of the free trial period, pleases (shutdown) to delete the instance once you are done with the practice. This Setup is done on an AWS EC2 instance with the following configurations.
Read more about How to create an AWS EC2 instance.
- AMI: select 64-bit (x86) architecture.
- Instance type: t2.micro
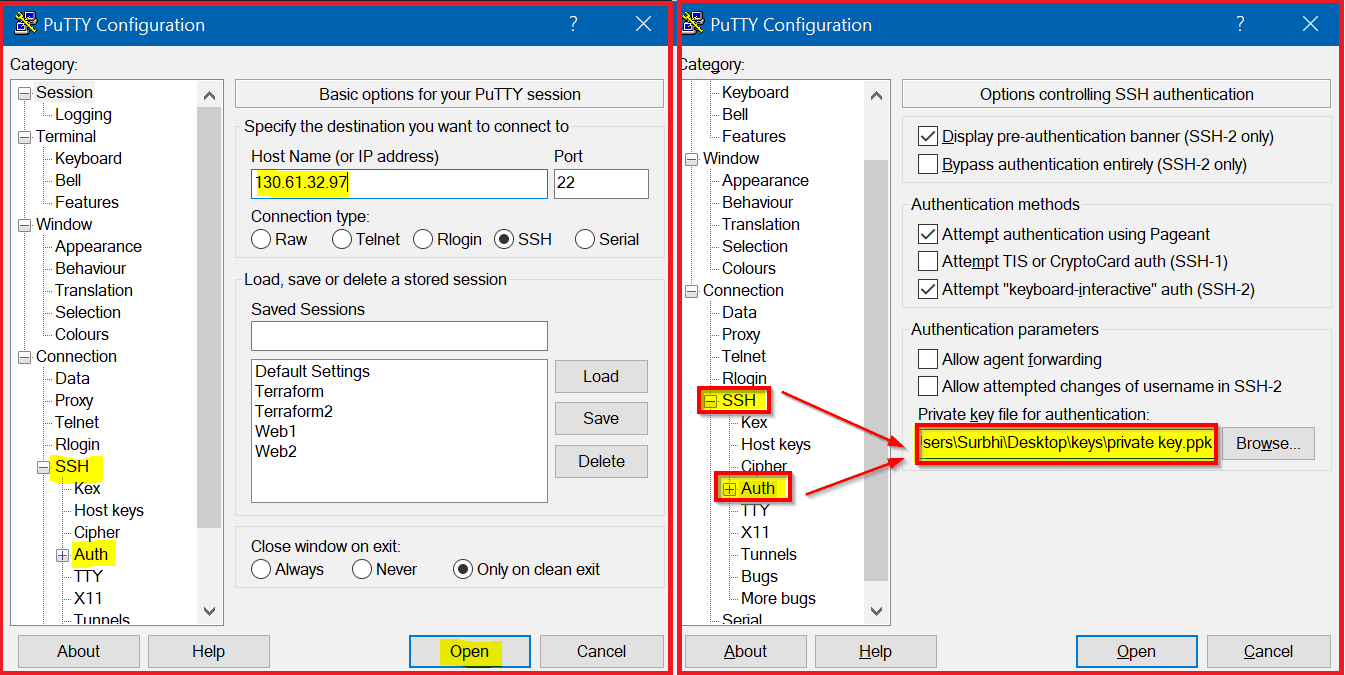
VII) Connect to EC2 instance using Putty
PuTTY is an SSH and telnet client. PuTTY is a free and open-source terminal emulator, serial console, and network file transfer application. It supports several network protocols, including SCP, SSH, Telnet, rlogin, and raw socket connection. In this section, we will download and install Putty and try to SSH (Secure Shell) into our instance using it. Connect to the newly created instance using Putty using the .pem file. Here when we select the Save private key, we are basically saving the .ppk key that we require to login into our instance.
So, make sure you save it. Follow our blog here to know more about How to Generate SSH Keys Pair (Windows/Linux).
Note: The Pre-requisite covered in Section 3 in the guide (Download link below).
Also Check: Our blog post on OpenShift Application Deployment.
Install & Configure AWS CLI On Linux (EC2)
One of the AWS tools is known as AWS CLI (Command-line interface). It is used to manage AWS services through commands. AWS Command Line Interface (CLI) is a unified configuration to administer AWS public cloud services. With only one tool, we can download, configure and monitor multiple AWS services using commands and automate them via scripts.
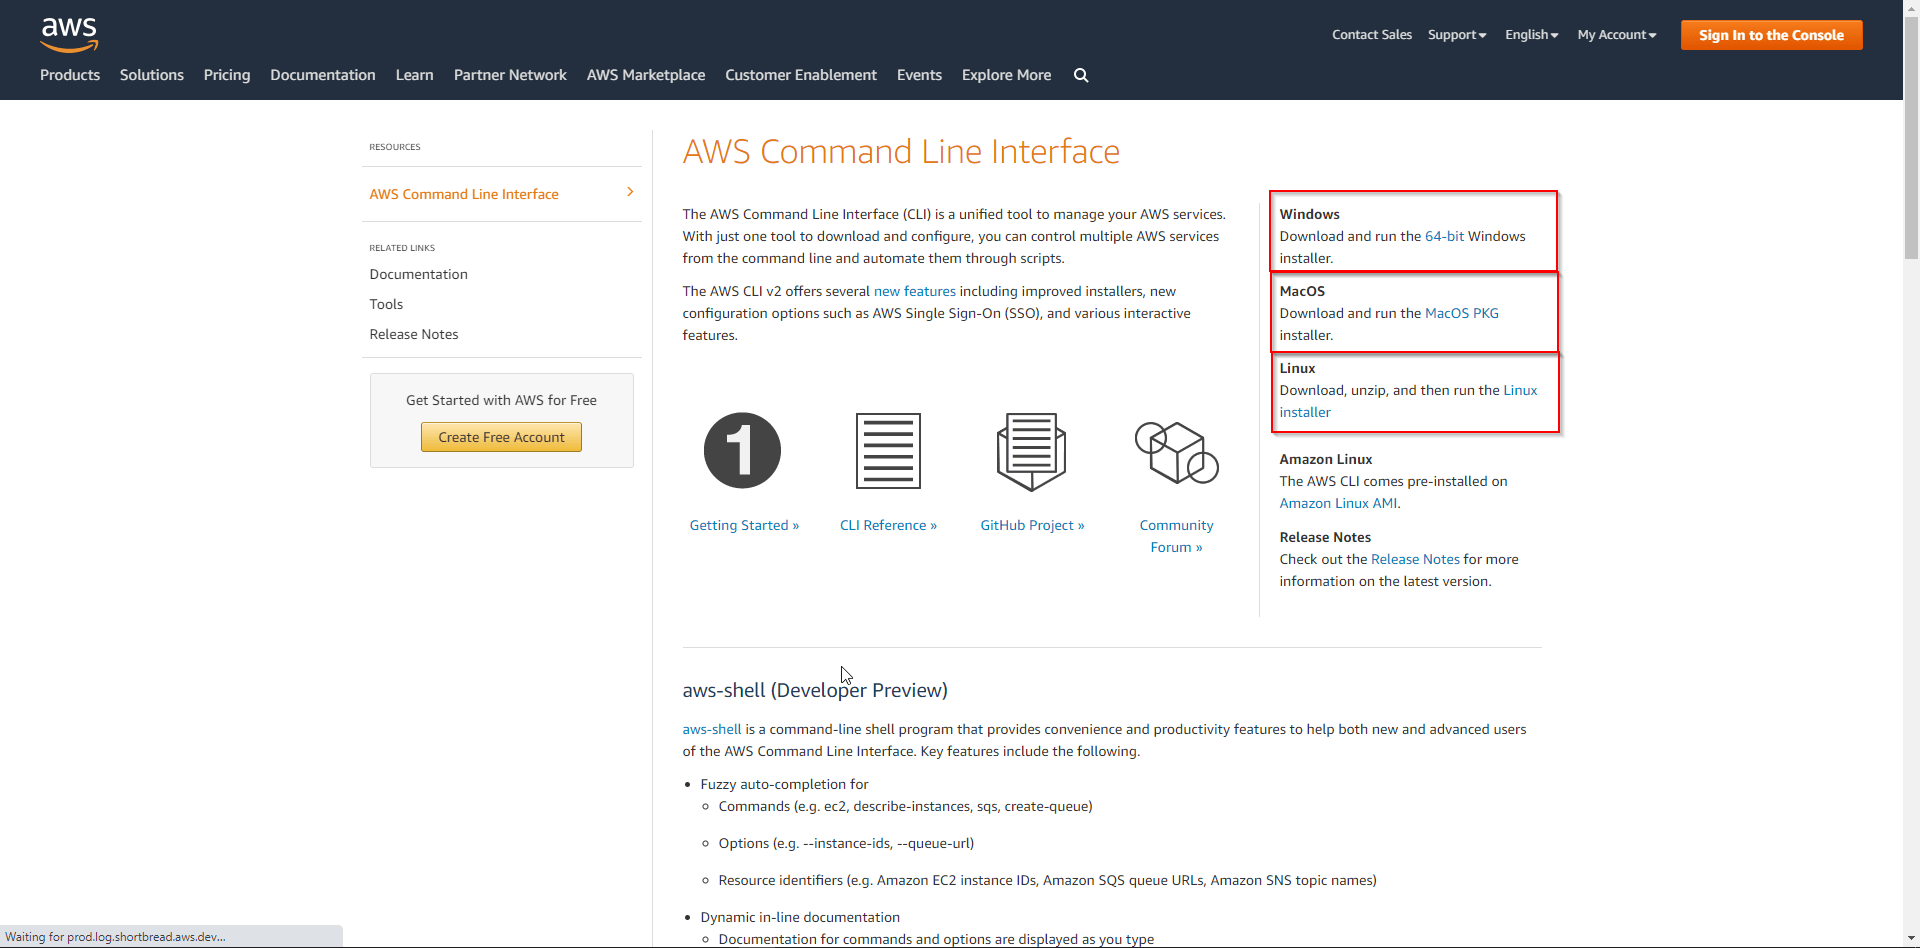
Read more about How to Install & Configure AWS CLI on Linux (EC2)
Note: Install & Configure AWS CLI On Linux (EC2) is covered in Section 7 of the guide (Download link below)
Setup Openshift Cluster Using User Provisioned Infrastructure
1. Generating Key Pair For Cluster Node SSH Access:
a) Create key pair:
$ sudo -i
$ ssh-keygen -t ed25519 -N '' -f ~/.ssh/id_rsa
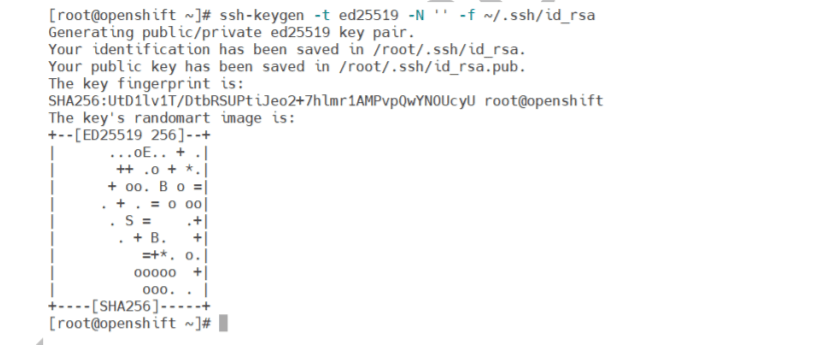
b) View the public SSH key:
$ cat ~/.ssh/id_rsa.pub

2. Obtaining the Installation Program:
Access the Infrastructure Provider page on the Red Hat OpenShift Cluster Manager site. If you have a Red Hat account, log in with your credentials. If you do not, create an account. To create an account follow the Pre-requisite section Subscription to Redhat.
Click on this link to open Infrastructure Provider: https://console.redhat.com/openshift/install
a) Login into your cluster and Scroll down till Run it yourself and click on AWS
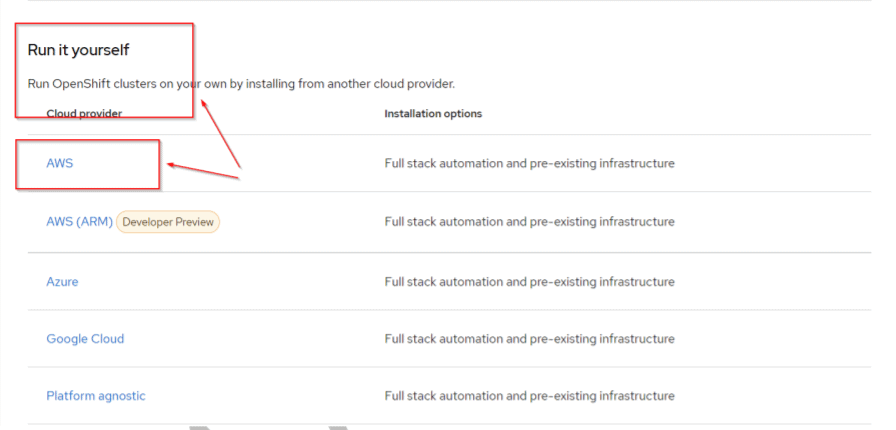
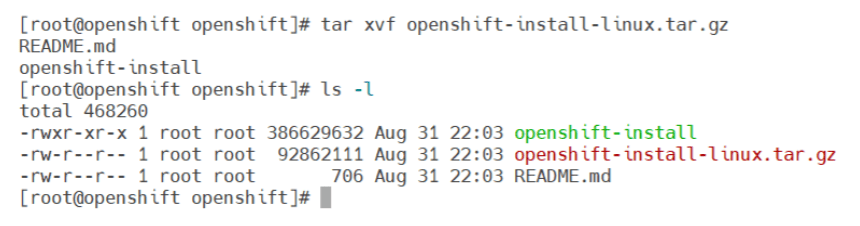
b) Extract the installation program.
$ tar xvf openshift-install-linux.tar.gz
$ ls
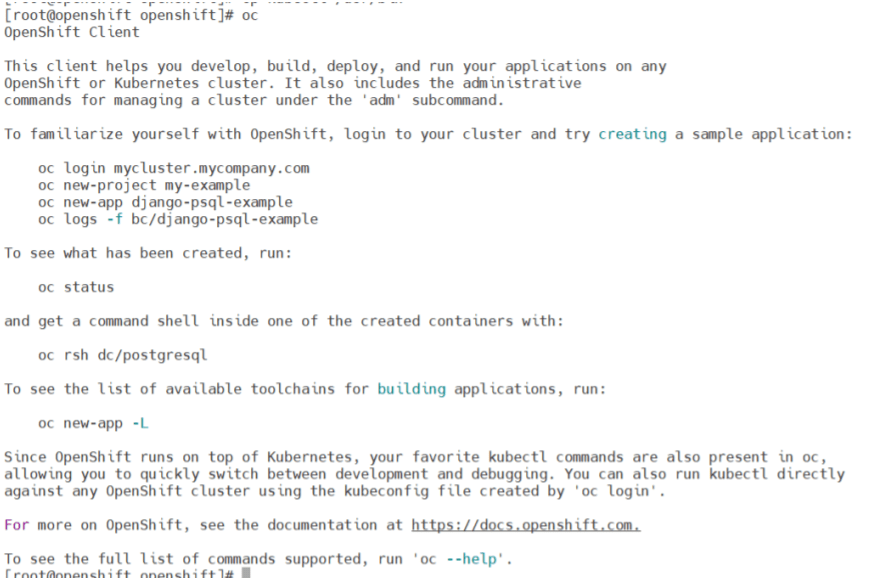
3. Install OpenShift CLI on Linux:
a) Download Now OpenShift v4.8 Linux Client entry and save the file.
$ cd /root/openshift
$ wget https://mirror.openshift.com/pub/openshift-v4/clients/ocp/stable/openshift-client-linux.tar.gz
b) Verify the client binary installed
$ oc
Note: Setup Openshift Cluster Using User Provisioned Infrastructure is covered in Section 8 of the guide (Download link below)
Also Read: Our blog post on Openshift Use Cases.
OPEN SHIFT CLUSTER INSTALLATION
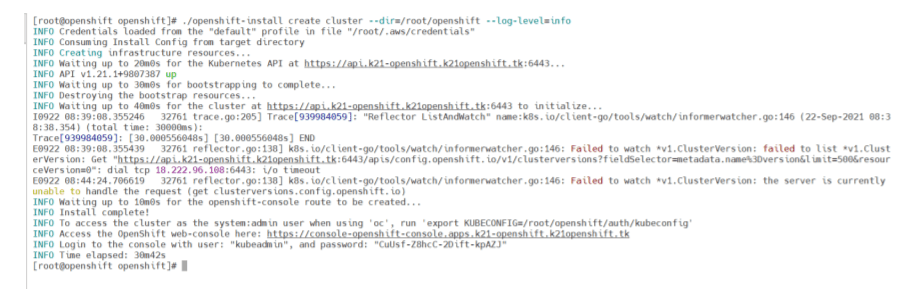
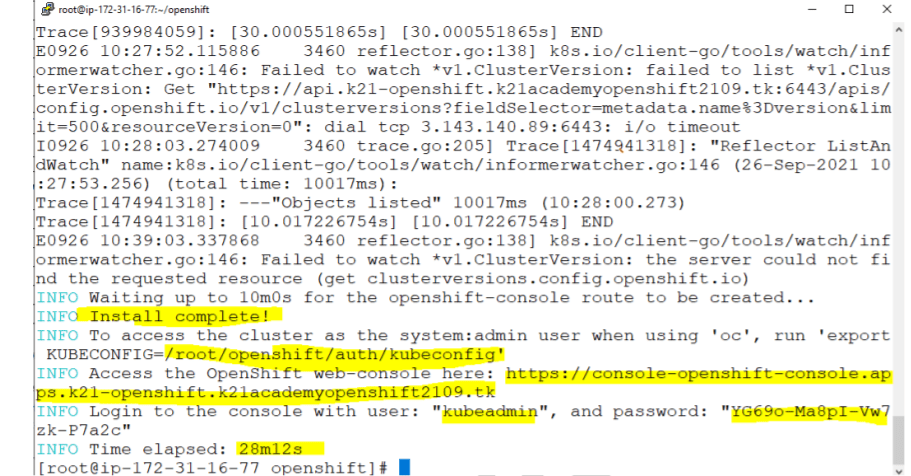
a) Start Openshift Cluster Installation
$ ./openshift-install create cluster --dir=/root/openshift --log-level=info
(This Cluster creation process will take 30-45 minutes)
Note: Setup Openshift Cluster Using User Provisioned Infrastructure is covered in Section 9 of the guide (Download link below)
LOGGING INTO CLUSTER
1. Logging in to the cluster using the Command Line (CLI):
a) Export the kubeadmin credentials from the root user
$ export KUBECONFIG=<installation_directory>/auth/kubeconfig
$ echo 'export KUBECONFIG=/root/openshift/auth/kubeconfig' >> $HOME/.bashrc
Note: Exit and login back to check the change.
b) To verify you can run oc commands successfully using the exported configuration:
$ oc get nodes

c) Verify you can run kubectl commands successfully using the exported configuration:
$ kubectl get nodes

2. Logging in to the cluster by using the Web Console (GUI):
a) List the OpenShift Container Platform web console route:
$ oc get routes -n openshift-console | grep console

b) Copy Portal URL from the output of installation command:
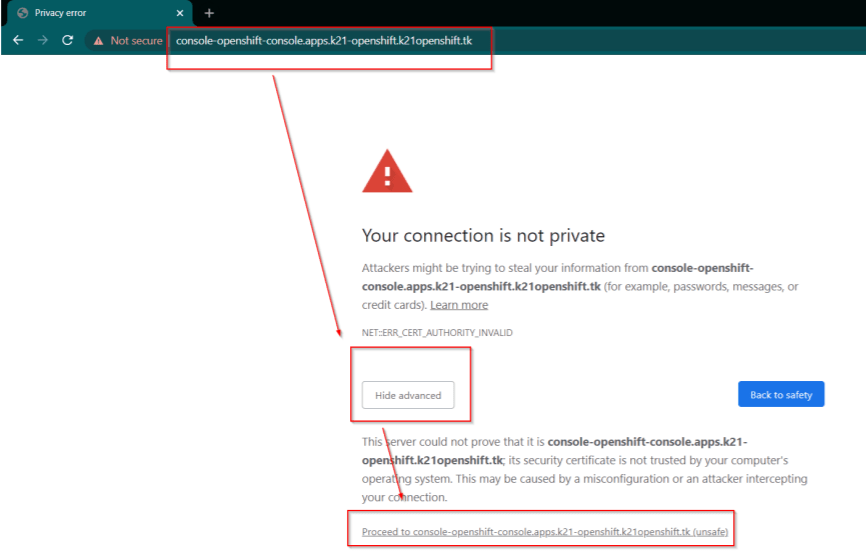
c) Login using username and password from the output:
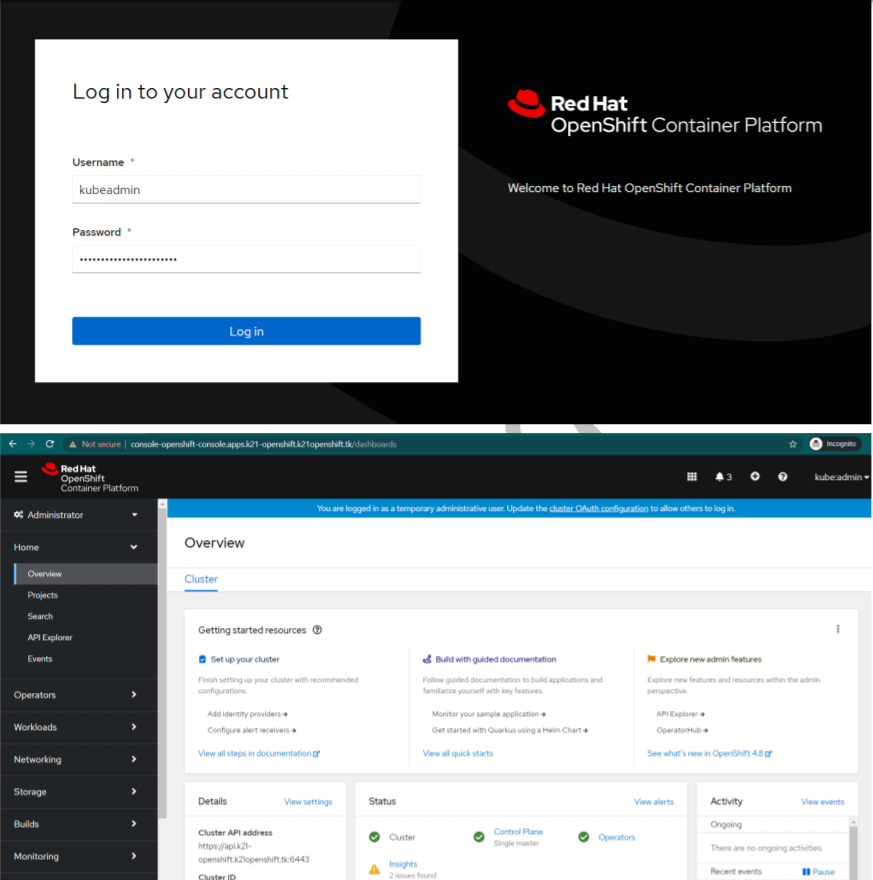
Note: Loggin Into Cluster is covered in Section 10 of the guide (Download link below)
Check Cluster Logs
You can review a summary of an installation in the OpenShift Container Platform installation log. If an installation succeeds, the information required to access the cluster is included in the log.
a) Review the .openshift_install.log log file in the installation directory on your installation host:
$ cat <install_dir>/.openshift_install.log
$ cat /root/openshift/.openshift_install.log
Note: Loggin Into Cluster is covered in Section 11 of the guide (Download link below)
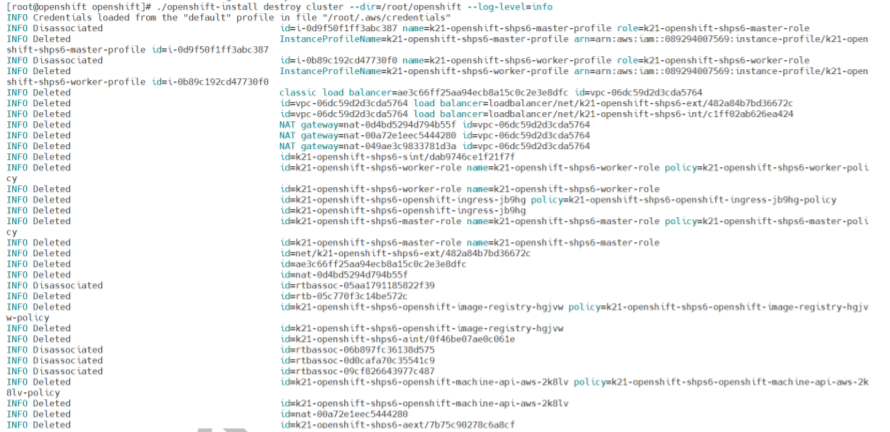
Delete Openshift Cluster
a) To delete the cluster please use the below commands:
$ sudo su –
$ cd /root/openshift
$ ./openshift-install destroy cluster --dir=/root/openshift --log-level=info
Conclusion
There are many ways to deploy an application on OpenShift. In this post, I discussed and showed some of the easiest methods on how to deploy an application on OpenShift OCP? If you already have all those tools that build and store images, then you can deploy applications using container images. Hence, OpenShift is a great tool for container-based applications over the cloud. We can build, test, deploy and maintain applications using it very easily.
Related/References
- Openshift vs Kubernetes: What is the Difference?
- Kubernetes for Beginners
- Red Hat OpenShift- What, Why, and How?
- OpenShift For Beginners: 30+ Hands-On labs You Must Perform | Step-by-Step
- Deploy Applications Using OpenShift: Step-by-Step
- Install Single Node OpenShift Cluster (OKD): Step By Step
- OpenShift Official Documentation
FREE Guide Download Here: Steps to Install & Configure Multi-Node Openshift (OCP) Cluster Using User Provisioned Infrastructure.
Next Task For You: Join Our FREE Class
Begin your journey towards becoming a Red Hat Certified Specialist in OpenShift Administrator and earning a lot more in 2021 by joining our Free Class.


![AWS DevOps [DOP-C02] Professional Step By Step Activity Guides (Hands-On Labs)](https://k21academy.com/wp-content/uploads/2023/02/DOP-C02-1.png)