


![]()
In this blog, we are going to cover a DevOps project on Azure which will cover step by step the successful deployment of project. This is deploy the Infrastructure as a Code using CI/CD, where we will be using Azure pipeline for CI/CD. So let’s get started to the details.
- Introduction
- Benefits of Automating Infrastructure deployments
- Pre-requisite
- Configure the Azure project
- Automate infrastructure deployments in the cloud with Terraform and Azure Pipelines
- Cleaning the Resources
- Conclusion
- FAQs
Introduction
Infrastructure as code (IaC) is a software development practice in which infrastructure is treated as code. This means that the infrastructure, like the application code, is described in code. This allows for the automation of infrastructure deployment and setup, which saves time and improves dependability.
Terraform is an open-source infrastructure-as-code tool that can be used to deploy infrastructure across several cloud platforms, including Azure. Azure Pipelines is a continuous integration and continuous delivery (CI/CD) platform for automating Terraform configuration deployment.
Benefits of Automating Infrastructure Deployments
There are several advantages to automated infrastructure installations, including:
- Improved dependability: Automated deployments can assist to guarantee that infrastructure is regularly and accurately installed. This can assist to lessen the likelihood of mistakes and outages.
- Increased efficiency: By automating the laborious tasks involved in deploying infrastructure, automated deployments can save time and effort. This allows developers to focus on other things.
- Improved visibility: Automated deployments can give more visibility into the infrastructure deployment process. This can assist you discover and troubleshoot problems more rapidly.
Pre-requisite
- You should have an active azure account, either paid subscription or free trial.
- An active Azure DevOps account.
Configure the Azure Project
Here we will setup a new project in our Azure DevOps account. This will eventually provide the resources or code which will be used to setup the deployment.
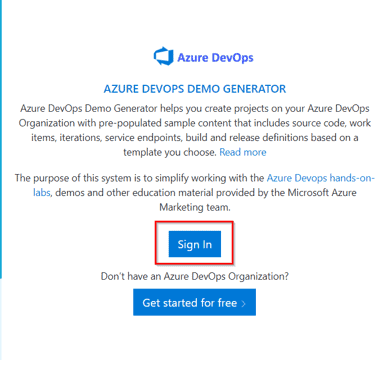
- Open web browser and browse to Azure DevOps Demo generator website.
 Now signin with your Azure account to which the DevOps account is linked on this website.
- Accept the permissions and then on Create New project page under New project name enter a suitable name for this project. Under select organisation select your organisation from drop down list.

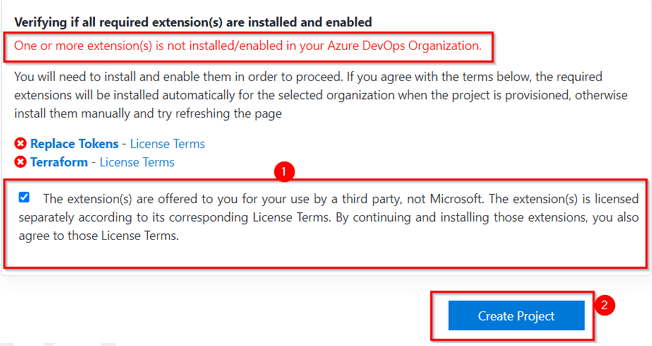
- Select the template of Terraform under DevOps Labs by clicking on choose template.
- If prompted to install a missing extension, select the checkbox below the Replace Tokens and Terraform labels and click Create Project.
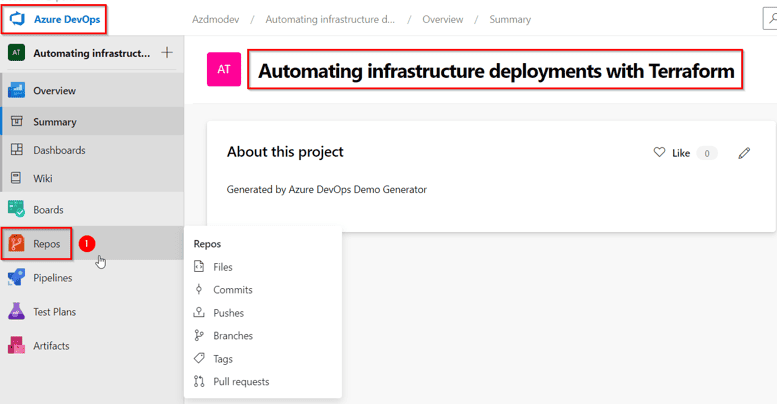
 Now wait for the project to get created, it will take about 2 minutes. Once project gets created click on Navigate project.
 Now signin with your Azure account to which the DevOps account is linked on this website.
 Now wait for the project to get created, it will take about 2 minutes. Once project gets created click on Navigate project.
Automate infrastructure deployments in the cloud with Terraform and Azure Pipelines
In this exercise, you will deploy Infrastructure as Code into Azure by using Terraform and Azure Pipelines:
1. Examine the Terraform configuration files
In this task, you will examine the use of Terraform in provisioning Azure Resources required to deploy PartsUnlimited website
- On the web browser window displaying the Azure DevOps portal with the project name here we are using Automating infrastructure deployments with Terraform project open, in the vertical menu bar at the far left of the Azure DevOps portal, click Repos

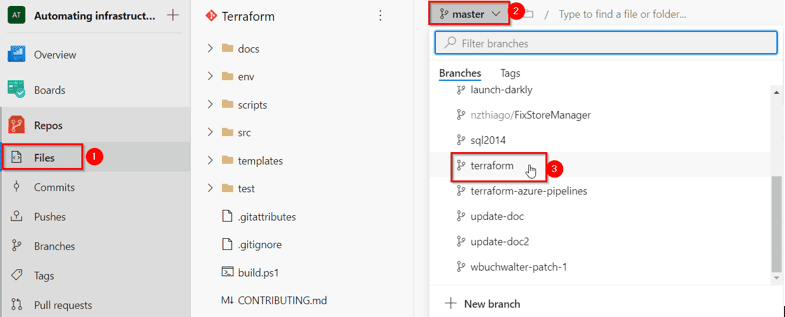
- On the Files pane, click the facing-down caret next to the master entry at the top and, in the dropdown list of branches, click the entry representing the terraform branch.

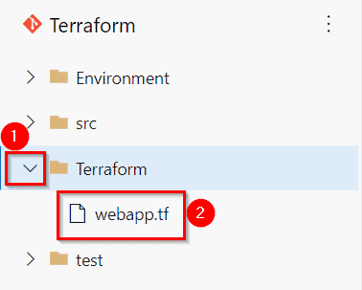
- Under terraform branch go under following file to review terraform file: Terraform folder -> webapp.tf . You can edit the content inside it by clicking edit

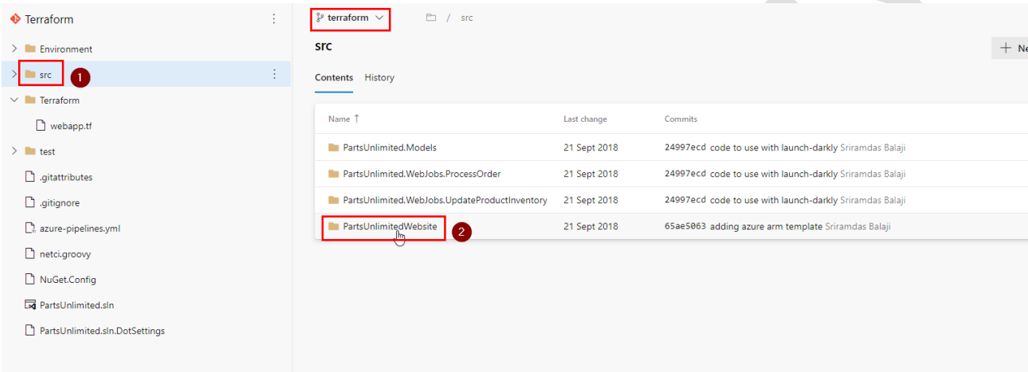
- Now on left pane of folder click on src, then click on PartsUnlimitedWebsite on right pane.

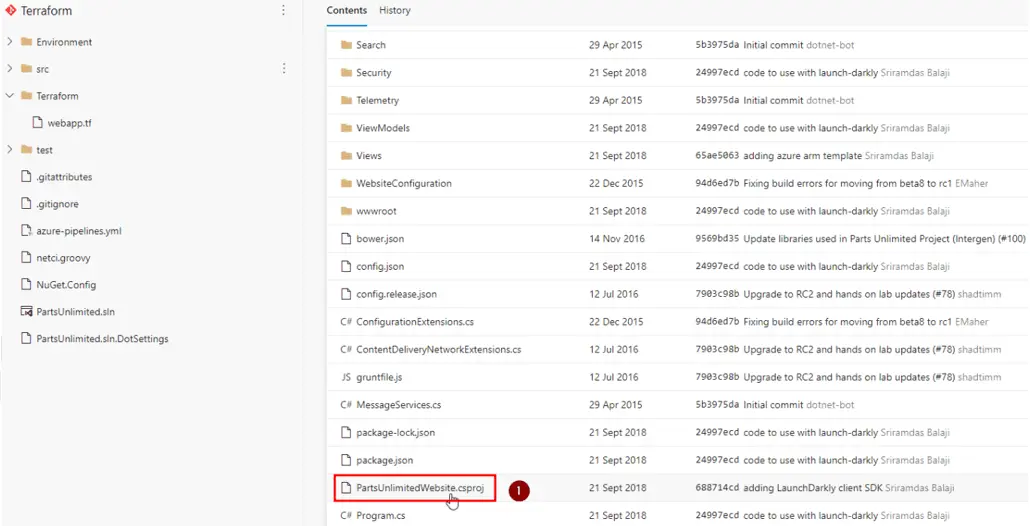
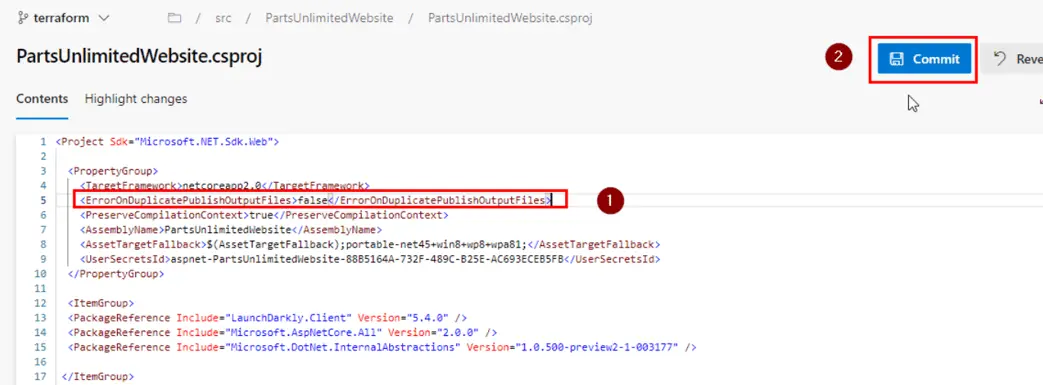
- Now scroll down and search for the file PartsunlimitedWebsite.csproj. Click on it to open

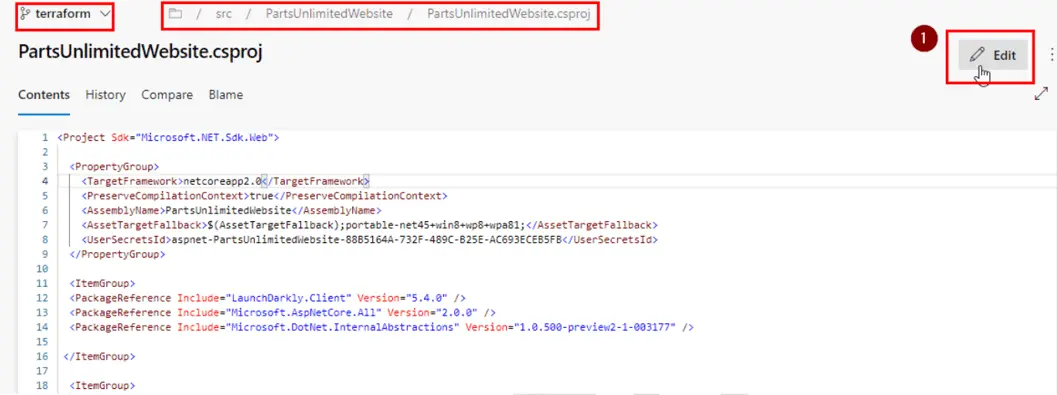
- Now click on edit to edit the file. Here we will make some changes in PartsUnlimitedWebsite.csproj file.

- Add the code inside <propertygroup> which is given below, then click commit.
<ErrorOnDuplicatePublishOutputFiles>false</ErrorOnDuplicatePublishOutputFiles>

- Click Commit again on commit pane.
2. Build your application using Azure CI Pipeline
In this task, you will build your application and publish the required files as an artifact called drop
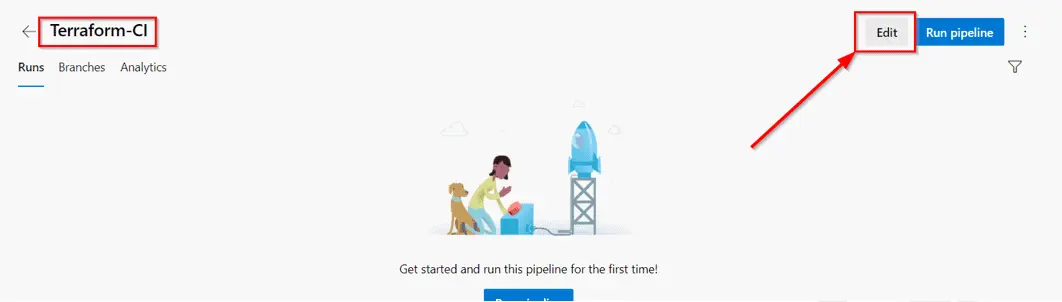
- In the Azure DevOps portal, in the menu bar at the left of the Azure DevOps portal, click Pipelines. Then, select Pipelines.

- On the Pipelines pane, click Terraform-CI to select it and, on the Terraform-CI pane, click Edit.

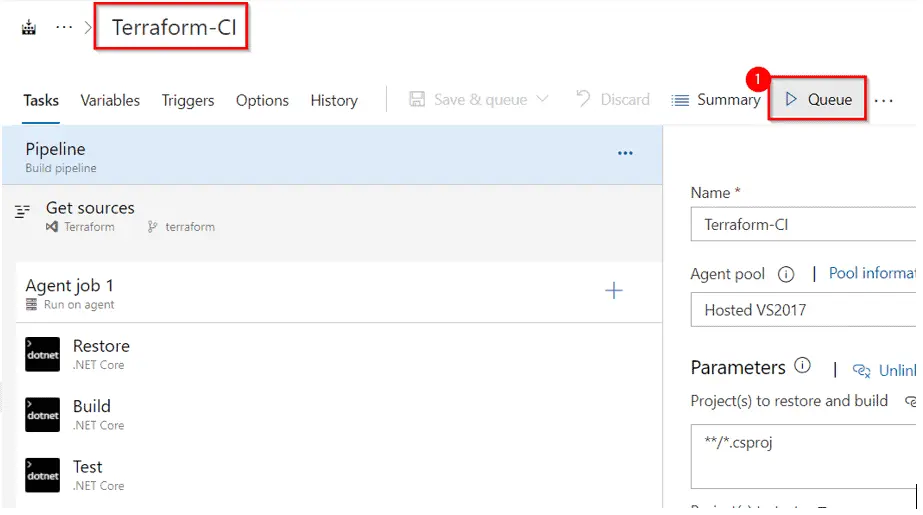
- Once you review the Tasks tab of the Terraform-CI pane, click Queue.

- On the Run pipeline pane, click Run to initiate the build.
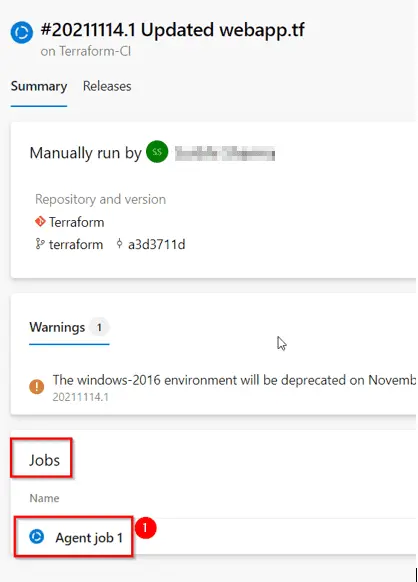
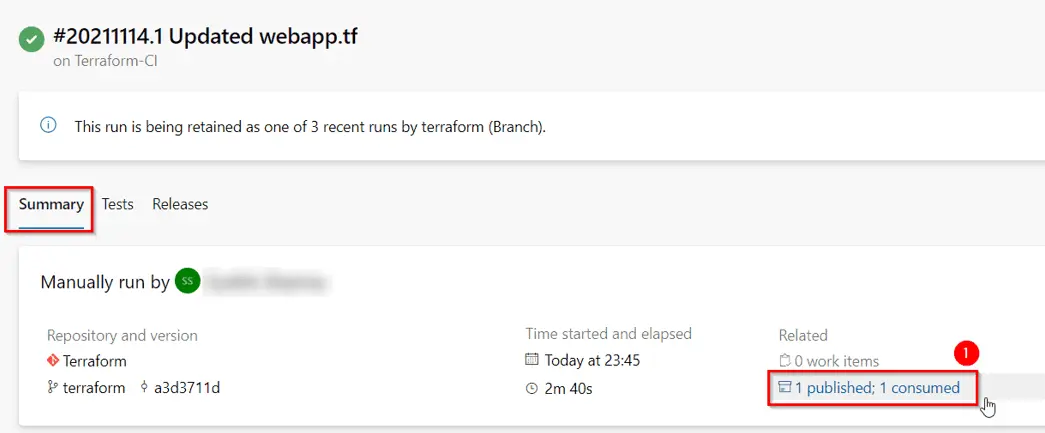
- On the Summary tab of the build run pane, in the Jobs section, click Agent job 1 and monitor the progress of the build process.

- Once the build succeeds, switch back to the Summary tab of the build run pane, in the Related section, click the 1 published, 1 consumed link. This will display the Artifacts pane


3. Deploy resources using Terraform (IaC) in Azure CD pipeline
In this task, you will create Azure resources using Terraform as part of your deployment pipeline and then deploy the PartsUnlimited application to an Azure app service web app provisioned by Terraform.
- In the Azure DevOps portal, in the vertical menu bar at the left of the Azure DevOps portal, in the Pipelines section, click Releases, ensure that the Terraform-CD entry is selected, and click Edit.

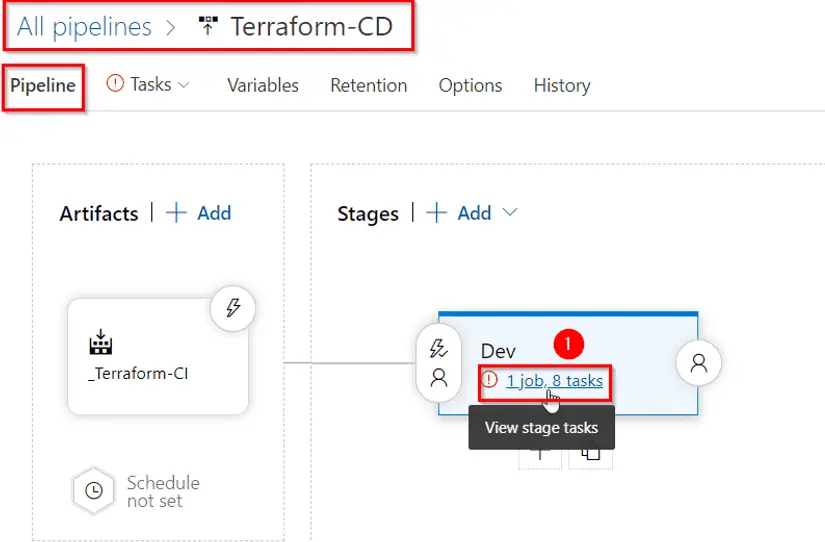
- On the All pipelines > Terraform-CD pane, in the rectangle representing the Dev stage, click the 1 job, 8 tasks link

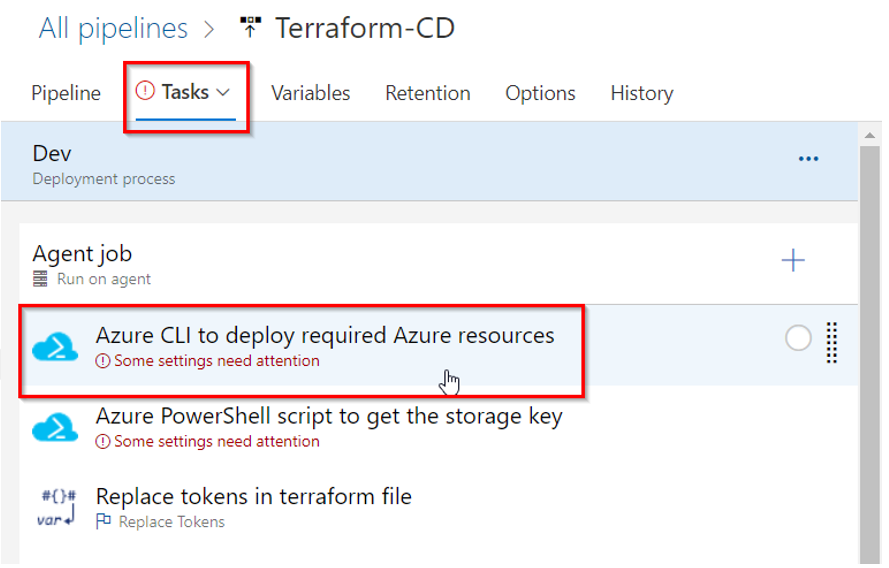
- In the list of tasks of the Dev stage, select the Azure CLI to deploy required Azure resources task as it require some action.

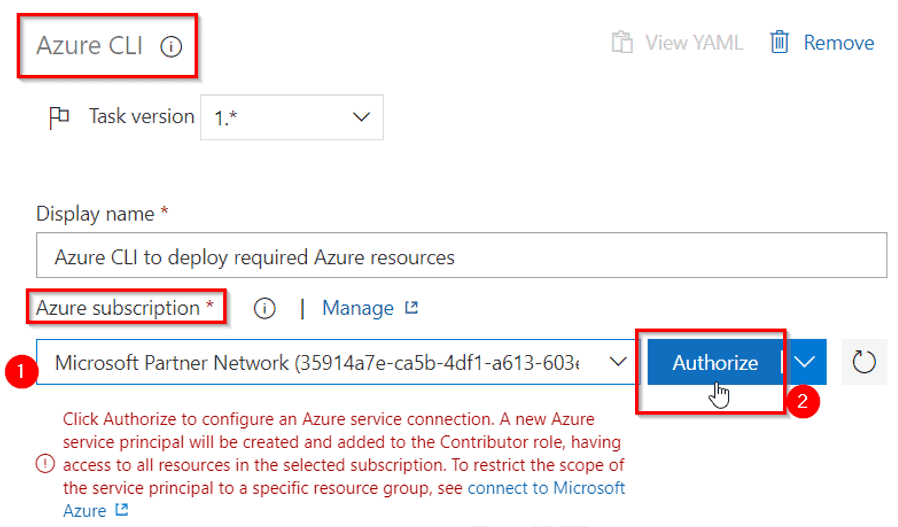
- In Azure subscription, select the right one from the dropdown and click authorize.

- If asked, sign in using the account with the active Azure subscription.
- Similarly setup for other tasks showing some settings needs attention too but with Azure service connection from drop down.
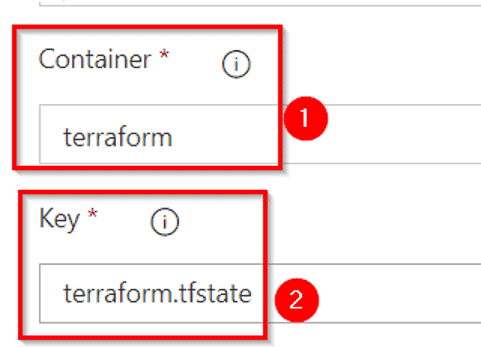
- In terraform:init pane after selecting Azure subscription as Service connection, go in Container drop down list type terraform and under Key parameter type terraform.tfstate

- In Terraform: plan, select azure subscription as Service connection from drop down. In Additional command arguments text box,enter -out=tfplan

- In Terraform: apply -auto-approve task, first select subscription as done in earlier task for service connection. Then under Additional command arguements enter -auto-approve tfplan by replacing -auto-approve
- Under task Azure app service deploy, select the Azure subscription as Service connection available in drop down.
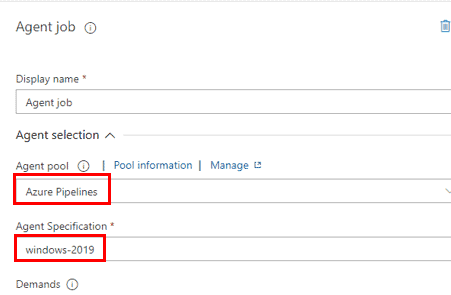
- In Agent job available on top of tasks, select Azure pipeline as Agent pool and windows-2019 as Agent specification.

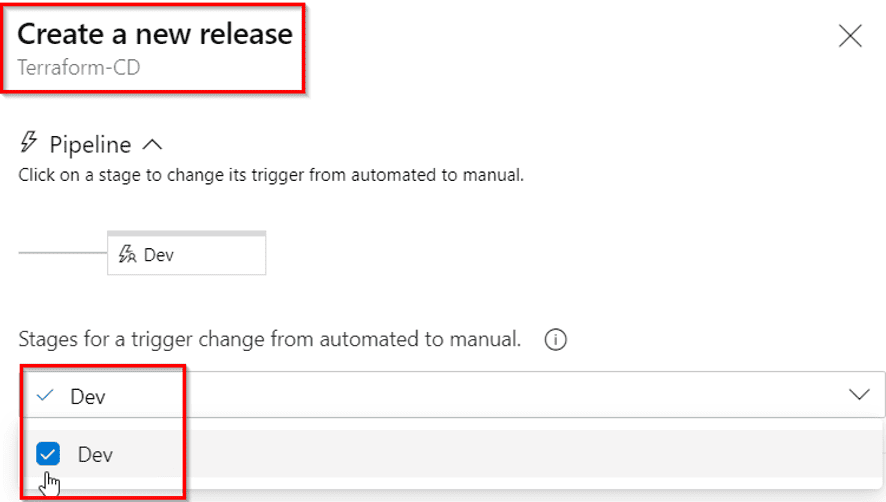
- Now click on Save button available on top right corner to save the tasks. Then click on Create release available next to Save button.
- Now a Create new release box will appear, under Stages for a trigger change from automated to manual dropdown list select dev.

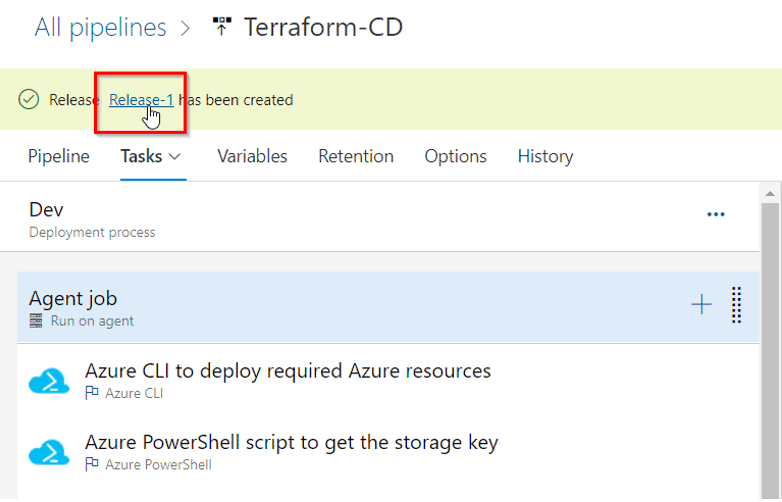
- Just below you will find artifacts section, under Version select the version from drop down.Click Create

- A Release entry will be shown on the same pane. Click on it to view the release.

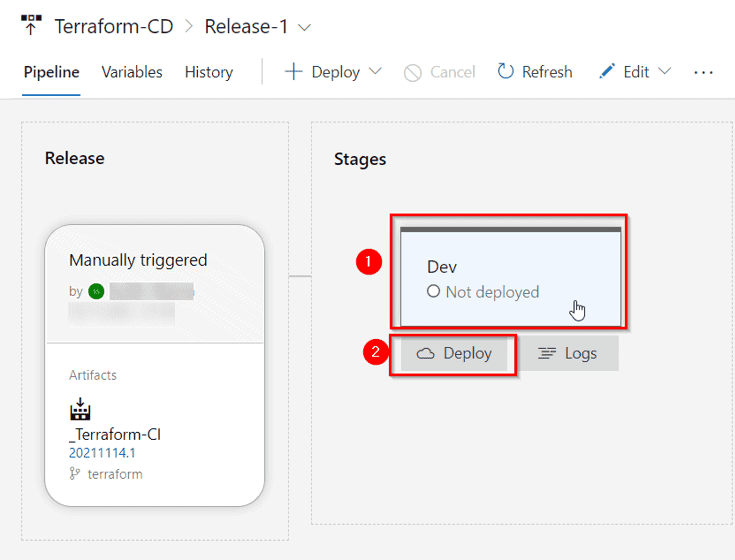
- On the Terraform-CD > Release-1 blade, click the rectangle representing the Dev stage, on the Dev pane, click Deploy and then click Deploy again

- Now this will be deployed after process is completed. You can Dev to monitor stages

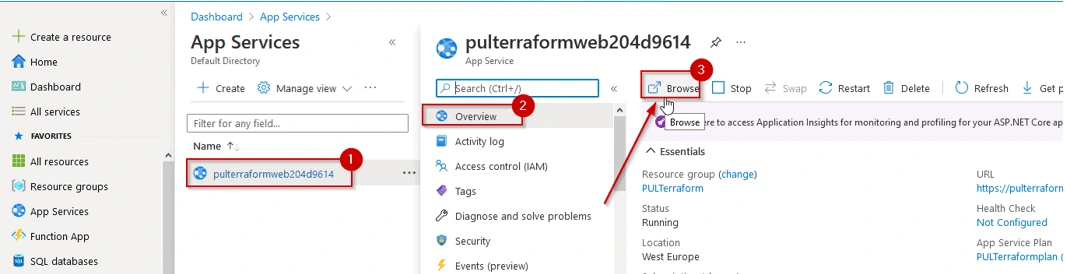
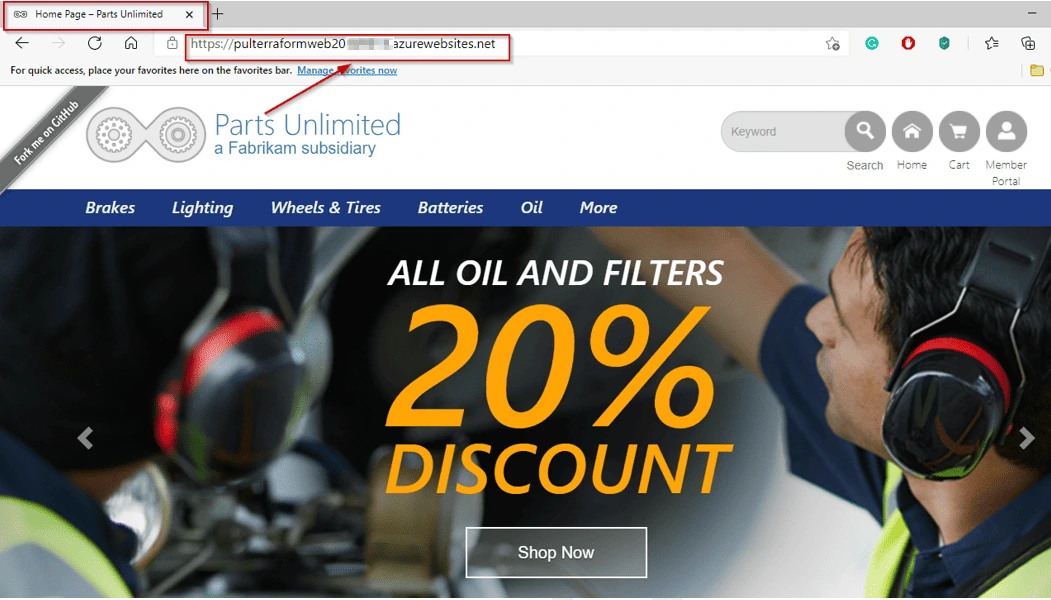
- Now to check your deployment is successful or not, Simply go to Azure portal, in the search bar search for App Services. Navigate to app service with name pulterraformweb. Click on browse to view the web page.


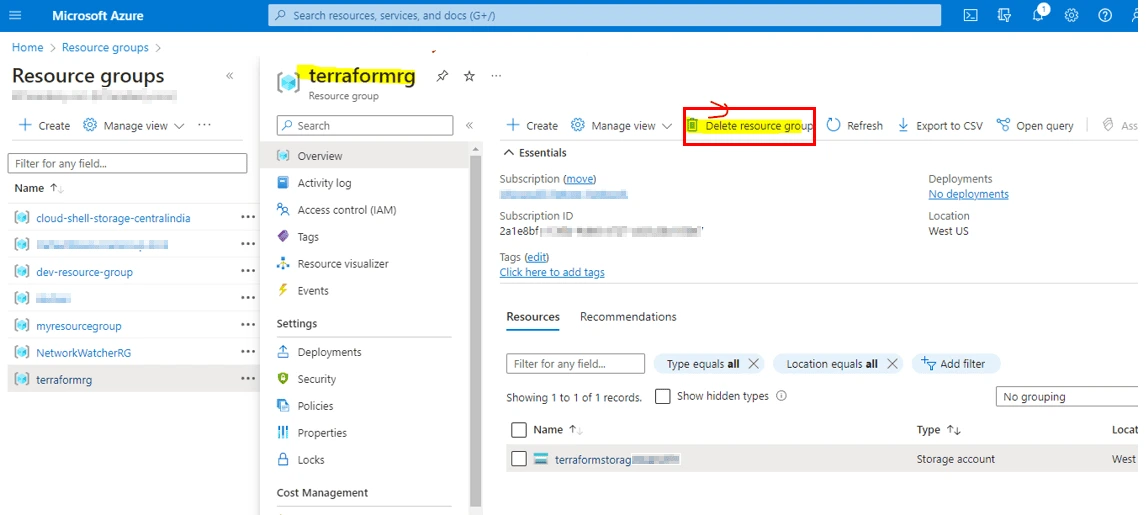
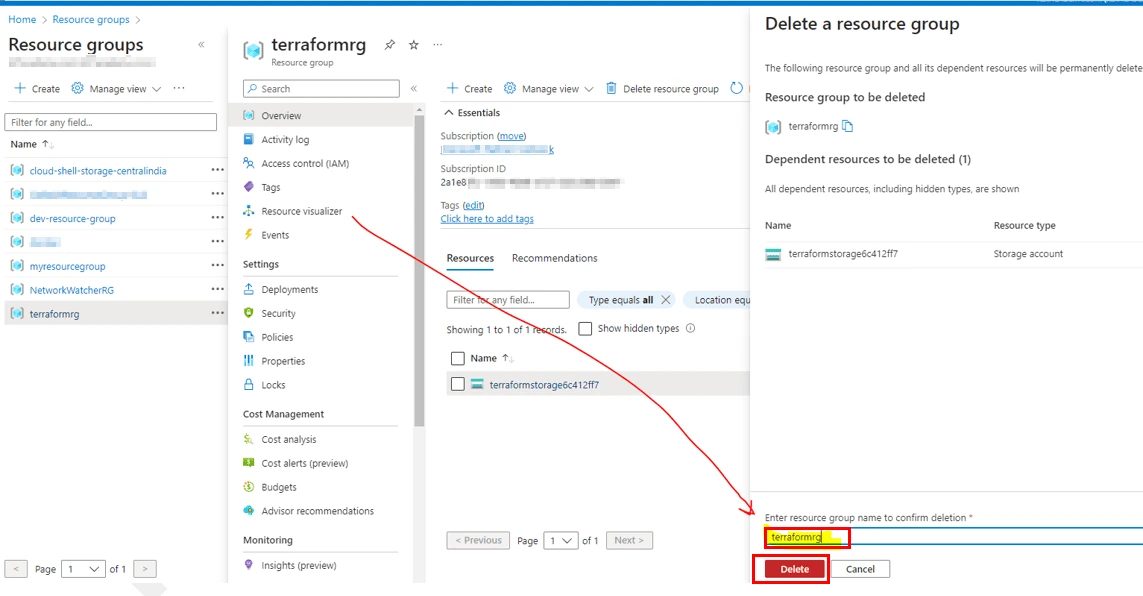
Cleaning the resources
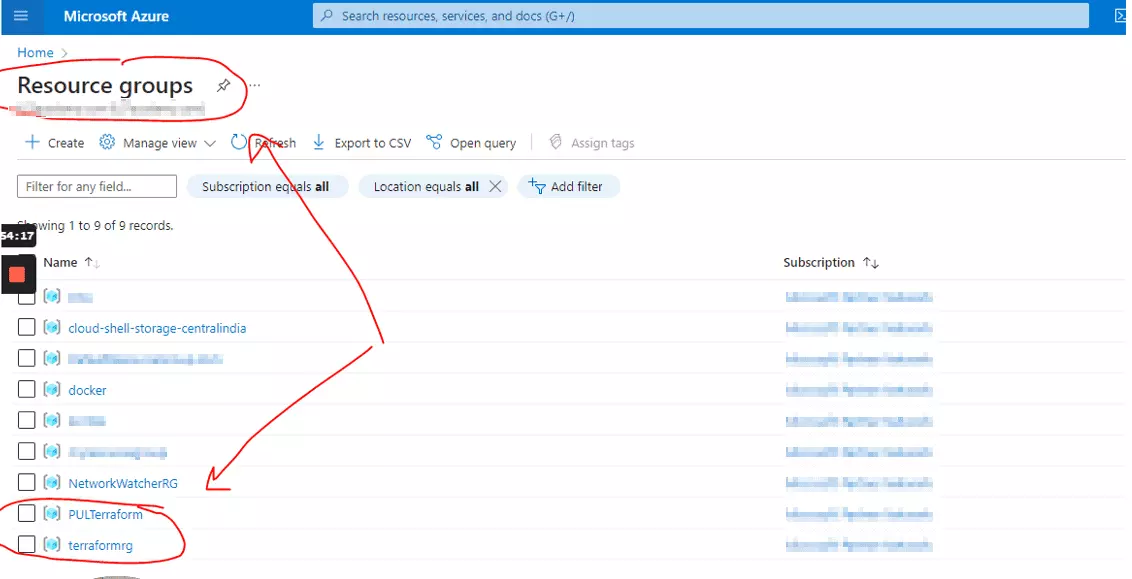
Since the resources are running so we need to clean them up so that it doesn’t eat up your credits. To clean the resources follow the steps below in your project:
- Search for Resource Group terraformrg & PULLTerraform and delete both of them.

- Select the resource groups, click on Delete resource group->Enter resource group name in the box->Delete


Conclusion
Automating infrastructure deployments with Terraform & Azure Pipelines can help to improve the reliability, efficiency, and visibility of your infrastructure deployment process. If you are looking for a way to automate your infrastructure deployments, I encourage you to check out Terraform & Azure Pipelines. So here we have learned how to deploy the Infrastructure as a code by automating the process. The automation process took place with the help of Azure CI/CD process.
FAQs
Q1. How do you Automate Terraform deployments?
To automate the terraform deployment we use CI/CD pipeline, here Azure pipeline. The deployment scripts are configured in pipeline tasks.
Q2. How do you deploy infrastructure using Terraform Azure?
Infrastruture as a Code is done under technology like Terraform, through which code is deployed. We can use CI/CD to automate the process, ere we are using Azure pipeline
Q3. What 2 types of pipelines can you create in Azure DevOps?
In Azure Pipeline, we can create CI pipeline and CD pipeline (also called release). These both CI/CD pipelines are covered inside Azure pipelines
Download the FREE Guide | Automate Infra Deployment on Azure with Terraform
Download the step-by-step hands-on guide and once you perform share your win on social media like Linkedin by tagging K21Academy.


![AWS DevOps [DOP-C02] Professional Step By Step Activity Guides (Hands-On Labs)](https://k21academy.com/wp-content/uploads/2023/02/DOP-C02-1.png)