


![]()
Microservices and containers are the foundation of modern cloud-native applications. In these environments, microservices need to communicate with each other dynamically without manual configuration. This is where service discovery comes into play.
In this blog, we’ll explore service discovery and how it functions in Kubernetes.
We will discuss the following topics:
- What is Service Discovery?
- Types of Service Discovery
- Kubernetes Service Discovery
- An Example of Kubernetes Service Discovery
- Conclusion
What is Service Discovery?
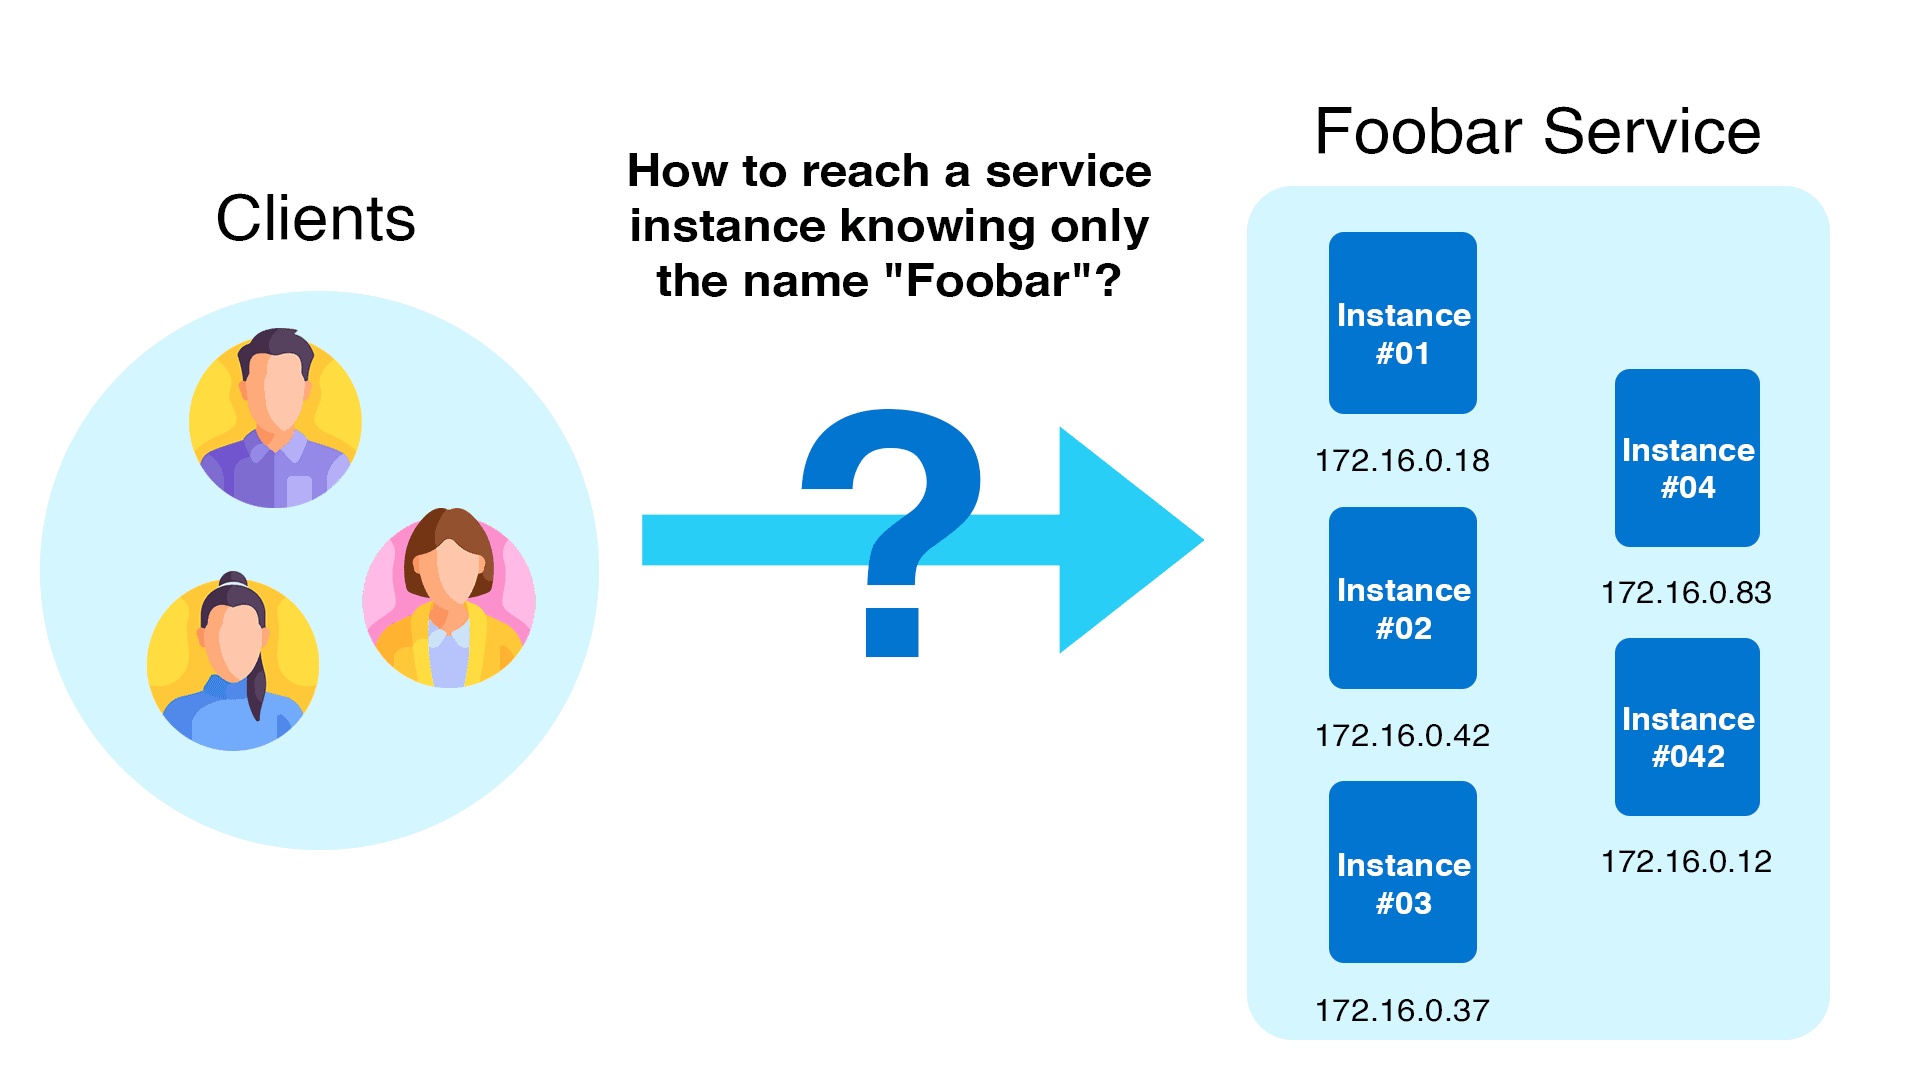
Service discovery is a method that enables services to find and connect with each other in real-time, without hardcoding IP addresses or setting up endpoints manually.
Microservices are used to build applications in cloud-native infrastructures like Kubernetes. For these applications to function properly, the different components within a microservices architecture must communicate. However, IP addresses and endpoints can change frequently.
Service discovery solves this problem by allowing services to automatically locate and interact with each other.
Types of service discovery
There are numerous types of service discovery. Let us look at the most popular ones.
Server-side service discovery
In order to identify server-side services, a load balancer (LB) is placed in front of the service and allowed to connect to service instances. This procedure removes client-side complexity. The client simply points to the load balance’s IP or DNS name.
This method facilitates client service discovery, but the LB becomes a single point of failure and bottleneck. Furthermore, the LB must implement service discovery logic in order to point to the proper instances of pods that are operating at any given time.

Service registry
Another way to service discovery is to eliminate the LB component and implement service discovery on the client side through the use of a centralized service registry.
The service registry stores details about service endpoints to which clients can send requests.
When compared to a server-side method, the key advantage of a service registry is that there is one fewer component to manage (no LB) and no bottleneck.
A service registry, on the other hand, complicates client-side reasoning. The client must provide logic to maintain the registry up to current in order for it to contain the most up-to-date information about the backend pods/containers.
Kubernetes Service Discovery
Now that we’ve covered the basics of service discovery, let’s dive into the intricacies of Kubernetes service discovery.
Kubernetes service discovery for API-aware clients
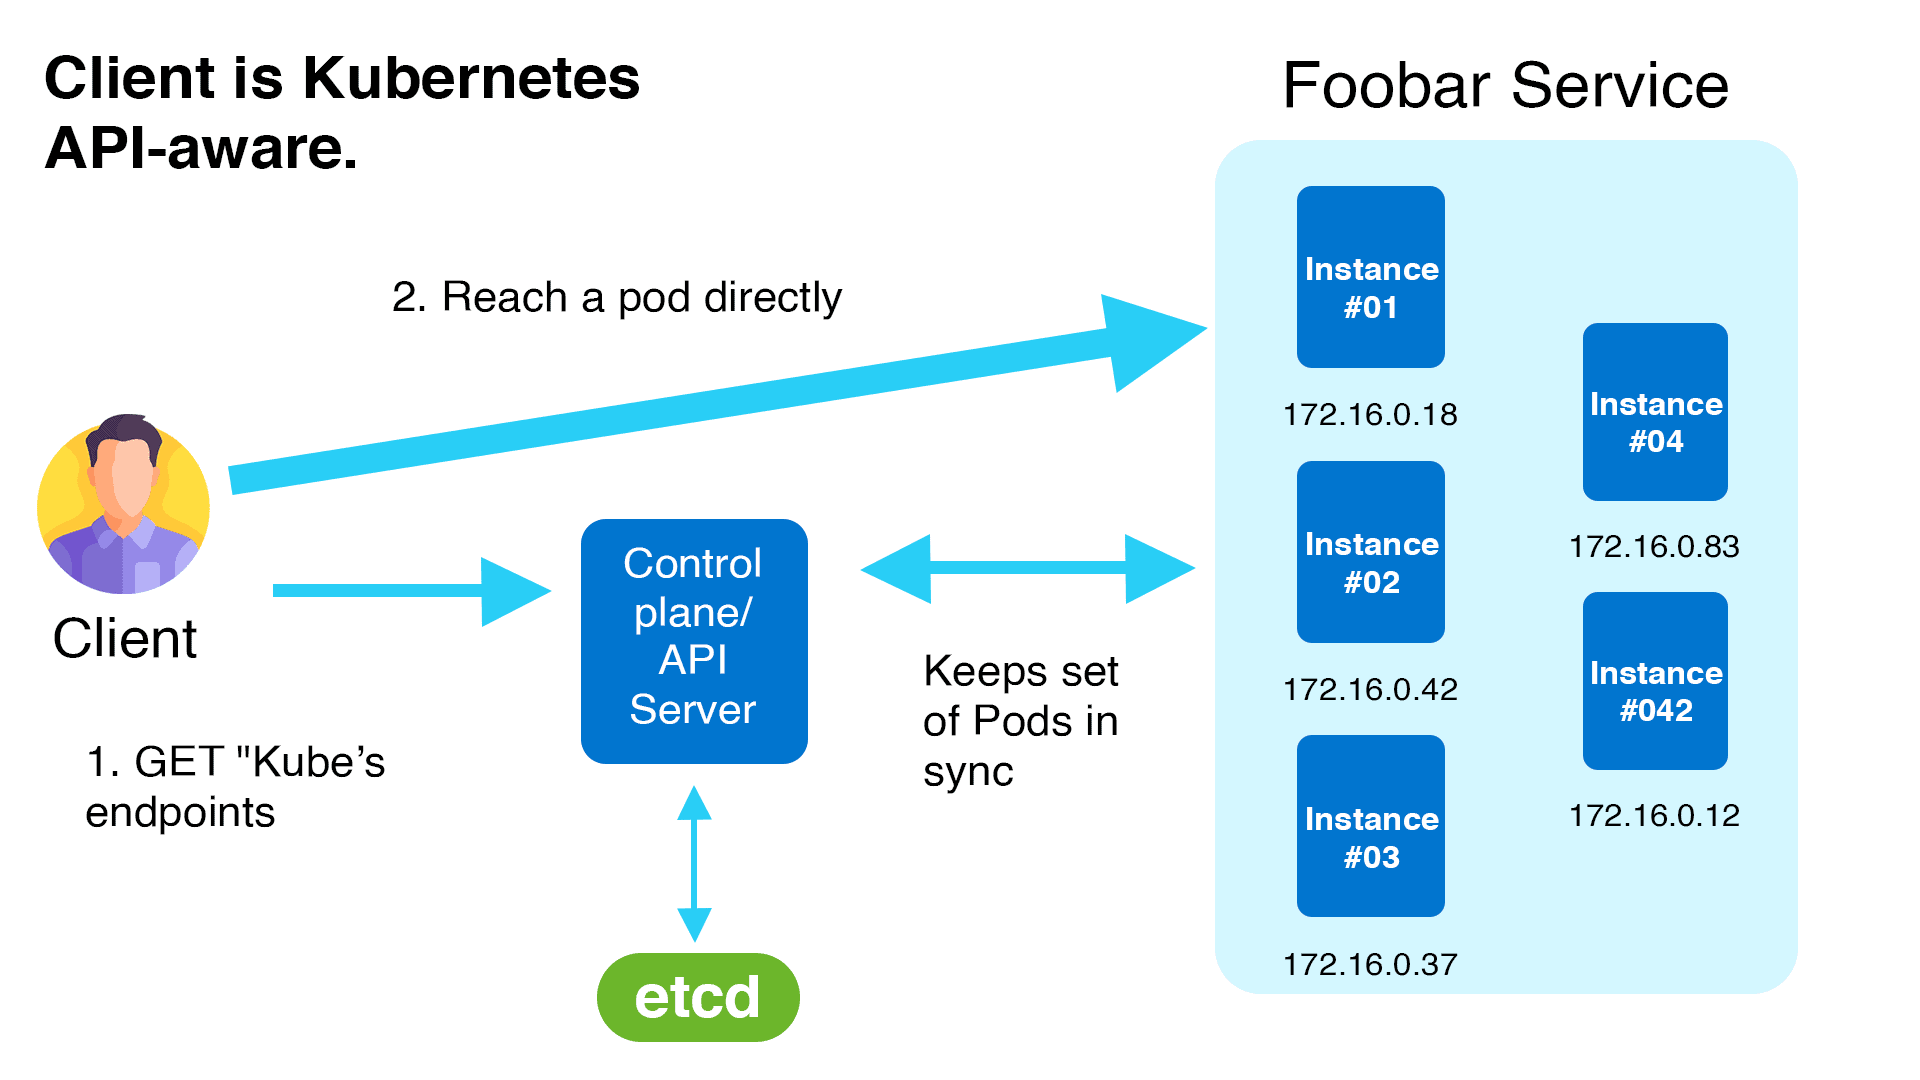
An application deployment in Kubernetes consists of a pod or set of pods. These pods are ephemeral, which means their IP addresses and ports are continually changing. In the Kubernetes world, this continual change makes service discovery a huge difficulty.
Kubernetes’ endpoints API is one method it supports service discovery. Client applications can use the endpoints API to discover the IP addresses and ports of pods in an application.
In the following example, the Kubernetes control plane ETCD serves as a service registry, where all endpoints are registered and kept up to date by Kubernetes. A service mesh, for example, can incorporate logic to leverage an API for service discovery. Kubernetes’ native service discovery is responsible for this procedure.
Kubernetes service discovery using service objects and kube-proxy
Not all clients support APIs. Fortunately, if the client does not use the API directly, Kubernetes supports service discovery in other methods.
A Kubernetes service object is a persistent endpoint that points to a collection of pods depending on label selectors. It uses labels and selectors to route requests to the backend pods.
Because pods can come and leave dynamically in Kubernetes, a service object ensures that the endpoint or IP address that points to the list of operating pods never changes. If numerous pods are operating in the same application, the requests are also load-balanced across a group of pods.
Clients can utilize the Kubernetes service’s DNS name. Kubernetes’ internal DNS manages service mapping.
The usage of DNS for name-to-IP mapping is optional, and Kubernetes can do so with environment variables. When you build a pod, some variables are automatically inserted into it to map the names to IP addresses. The fundamental implementation of Kubernetes Service is handled by a kube-proxy instance running on each worker node.

An example of Kubernetes service discovery
Let’s start using Kubernetes service discovery right away. Keep in mind that to follow along, you’ll need access to a Kubernetes cluster.
👉 To Create a K8s cluster Click Here
We’ll demonstrate a sample application deployment below and show how Kubernetes DNS automatically maps the service names. Also revealed will be the automatic injection of service discovery-related environment variables into the pods. This allows the application developer the option of connecting to additional services via environment variables or Kubernetes DNS domains.
Let’s get started.
Create a namespace named K21Demo:
$ kubectl create ns k21demo
Create an nginx deployment:
$ vi nginx-deployment.yaml
Paste the below content and save it.
apiVersion: apps/v1
kind: Deployment
metadata:
  name: nginx-deployment
spec:
  selector:
    matchLabels:
      app: nginx
  replicas: 2
  template:
    metadata:
      labels:
        app: nginx
    spec:
      containers:
      - name: nginx
        image: nginx
        ports:
        - containerPort: 80
Now create the deployment by running the below command.
$ kubectl -n k21demo apply -f nginx-deployment.yaml
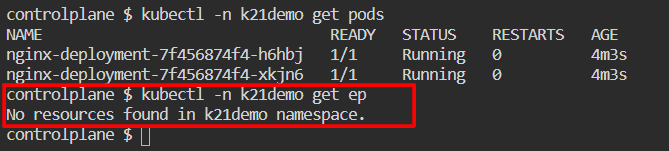
Afterward, check to verify if the pods are operational and validate that the endpoints are accessible.
The absence of the ends will be apparent. This is because a service object has not yet been created.
$ kubectl -n k21demo get pods
$ kubectl -n k21demo get ep
Create a Service.
$ kubectl -n k21demo expose deployment/nginx-deployment
Now, check the endpoints.
$ kubectl -n k21demo get ep

With the following command, you can view the service definition produced by the expose command:
$ kubectl -n k21demo get svc nginx-deployment -o yaml
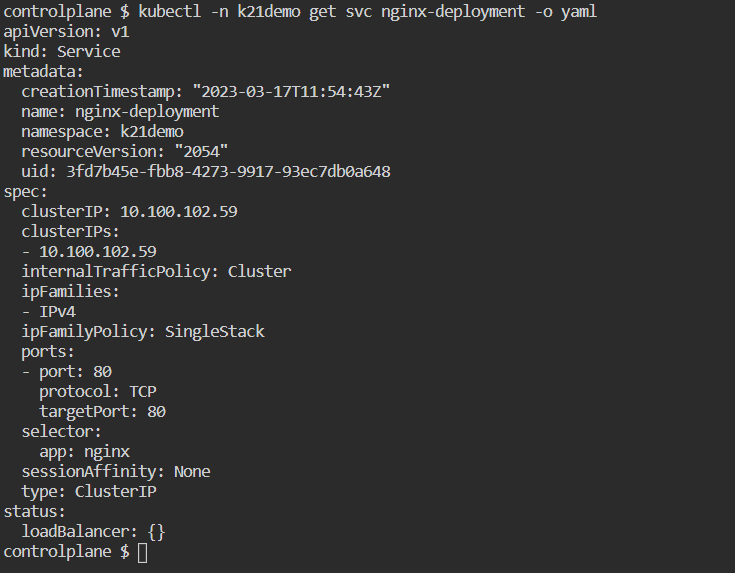
Take note of the service’s IP address. DNS automatically maps it. Also, as we can see below, Kubernetes automatically adds environment variables to the service name for service discovery.
$ kubectl -n k21demo get svc

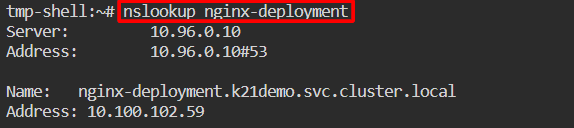
Create a client pod now so that it may connect to the application deployment. By performing a nslookup on the service name, we can check the automatically generated environment variables relevant to service discovery.
$ kubectl -n k21demo run tmp-shell --rm -i --tty --image nicolaka/netshoot --
$ nslookup nginx-deployment
Now, let’s access the nginx app by the service name.
$ curl nginx-deployment

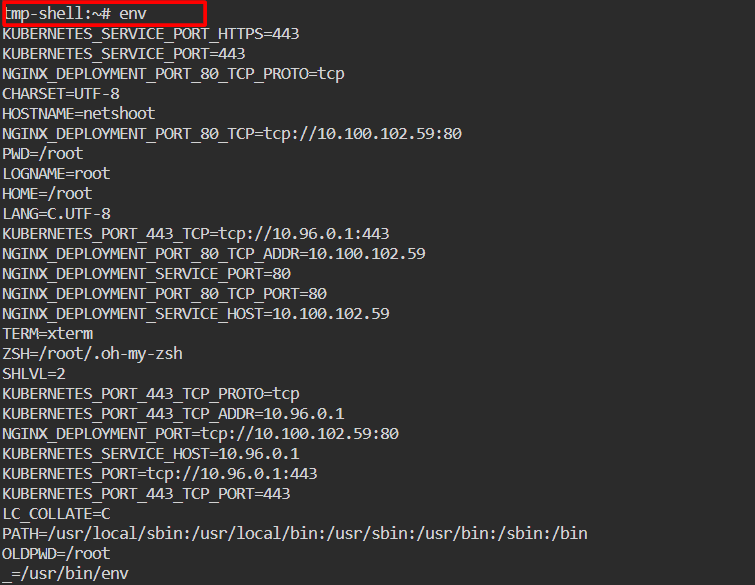
Check the pod’s environment variable related to the service discovery.
$ env
The result shown above demonstrates how the DNS automatically generated the service name to IP address mapping for the service that the client pod can use to contact the nginx. The successful curl operation serves as proof that the mapping is accurate.
Also, we observed that the variables relevant to service discovery are automatically populated in the pod environment. These parameters can be used by the client pod to connect to the nginx service.
Finally, now that we’re done with the example and its implementation, we can clean up all the resources just by deleting the k21demo namespace.
$ kubectl delete ns k21demo
Conclusion
Kubernetes simplifies the transition from old virtual or bare metal systems to containers and provides an out-of-the-box solution for service discovery and load balancing. A Kubernetes service object (implemented on Kubernetes nodes using kube-proxy) provides a consistent endpoint or IP address that routes requests to a set of pods that serve an application or microservice.
An application can connect to other services by using DNS names, Kubernetes Service, or environment variables available within the pods, rather than worrying about the number of pods operating and their IP addresses or port numbers.
Frequently Asked Questions
What is Service Discovery in Kubernetes?
Service Discovery in Kubernetes refers to the mechanism that enables Pods to locate and communicate with each other or with external services using DNS names or environment variables. This is crucial for maintaining connectivity in a dynamic environment where Pods and Services can frequently change.
How does Kubernetes Service Discovery work?
Kubernetes uses the internal DNS service to provide service discovery. When a Service is created, Kubernetes automatically assigns it a DNS name in the format service-name.namespace.svc.cluster.local. Pods can use this DNS name to reach the Service. Additionally, Kubernetes sets environment variables for each Service in Pods, which include the Service's cluster IP and port.
How do Pods discover Services?
Pods discover Services primarily through DNS. Kubernetes provides a DNS server that Pods can query to resolve Service names into IP addresses. This is done automatically by Kubernetes DNS (CoreDNS or kube-dns).
How does Kubernetes handle Service IP changes?
Kubernetes Services have a stable IP address and DNS name that do not change, even if the underlying Pods or their IP addresses change. Kubernetes manages the Service's endpoints to ensure that the Service's IP remains consistent.
What is the role of CoreDNS in Service Discovery?
CoreDNS is the default DNS server in Kubernetes clusters. It provides DNS-based Service Discovery by resolving Service names into IP addresses and is essential for enabling Pods to find Services using DNS queries.
Related/References
- Visit our YouTube channel “K21Academy”
- Certified Kubernetes Administrator (CKA) Certification Exam
- (CKA) Certification: Step By Step Activity Guides/Hands-On Lab Exercise & Learning Path
- Certified Kubernetes Application Developer (CKAD) Certification Exam
- (CKAD) Certification: Step By Step Activity Guides/Hands-On Lab Exercise & Learning Path
- Create AKS Cluster: A Complete Step-by-Step Guide
- Container (Docker) vs Virtual Machines (VM): What Is The Difference?
- How To Setup A Three Node Kubernetes Cluster For CKA: Step By Step
Join FREE Masterclass of Kubernetes
Discover the Power of Kubernetes, Docker & DevOps – Join Our Free Masterclass. Unlock the secrets of Kubernetes, Docker, and DevOps in our exclusive, no-cost masterclass. Take the first step towards building highly sought-after skills and securing lucrative job opportunities. Click on the below image to Register Our FREE Masterclass Now!


![AWS DevOps [DOP-C02] Professional Step By Step Activity Guides (Hands-On Labs)](https://k21academy.com/wp-content/uploads/2023/02/DOP-C02-1.png)