



This post covers the AWS Free Tier Account Overview. Amazon Web Services (AWS) is providing Free Tier accounts to new subscribers to get hands-on experience with all the AWS cloud services.
Important Note:
- When attempting to create a Free AWS account, there is a high likelihood of encountering issues or facing restrictions if the same email, phone number, IP address, or other identical details have been used in previous registrations.
- To ensure a smooth experience and prevent any potential complications, we recommend opting for a Pay-As-You-Go account.
- With a Pay-As-You-Go account, you will only be charged for the services you use, providing greater flexibility and eliminating the risk of account limitations.
- To avoid incurring unnecessary charges, we advise you to delete any resources that are no longer needed after completing your labs or tasks. This will help you manage your account efficiently while avoiding additional costs.
In this AWS Free Tier account, Amazon is giving a number of different services with some limitations to get hands-on practice and more knowledge on AWS Cloud services, as well as regular business use. The AWS Free Tier is mainly designed to give hands-on experience with AWS Cloud Services for customers free of cost for 6 Months. With the AWS Free Tier account, all the services offered have a limit on what we can use without being charged.

Read: What is AWS Console
Important:
When attempting to create an AWS account, there is a high likelihood of encountering issues or facing restrictions if the same email, phone number, IP address, or other identical details have been used in previous registrations.
To ensure a smooth experience and prevent any potential complications, we recommend opting for a Pay-As-You-Go account.
With a Pay-As-You-Go account, you will only be charged for the services you use, providing greater flexibility and eliminating the risk of account limitations.
To avoid incurring unnecessary charges, we advise you to delete any resources that are no longer needed after completing your labs or tasks. This will help you manage your account efficiently while avoiding additional costs.
Get started with your Pay-As-You-Go account here: Upgrading To a Paid Plan To Use All Services

How to Create an AWS Free Tier Account
AWS Free Tier allows eligible new customers to explore AWS services and build projects using free usage offers and credits. Follow the steps below to create your account using the updated AWS sign-up experience.
Note: AWS is gradually rolling out its new sign-up experience, so the screens and order of steps may differ from those shown below. Some users may see the advanced sign-up flow instead. AWS Account Management
Step 1: Open the AWS Free Tier page
Open your web browser and visit the AWS Free Tier page.
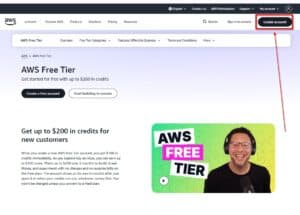
Click Create a free account or Create account to begin.
Step 2: Choose how to sign up
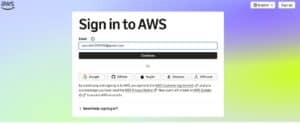
Enter the email address you want to use for your AWS account and click Continue.
Depending on the options displayed, you may also be able to sign up using an existing Google, GitHub, Apple, or Amazon account. If you choose one of these options, follow the prompts to sign in with that provider. AWS Account Management
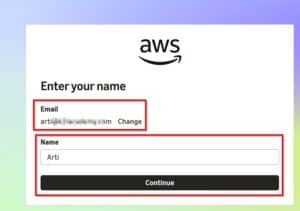
Step 3: Enter your name
Enter your name and click Continue.
AWS may use this name to identify you when you collaborate with other users on AWS projects.
Step 4: Verify your email address
Check your email inbox for a verification code from AWS.
Enter the code on the verification screen and click Continue.
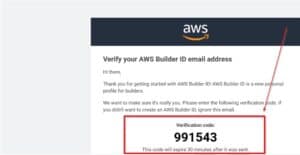
If you do not receive the code, check your spam or junk folder, confirm that your email address is correct, and request another code if the option is available.
Step 5: Create a password
Create a strong password for your account and click Continue. If AWS asks you to confirm the password, enter it again.
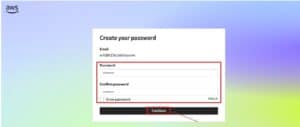
If you signed up using an existing account from another provider, follow the prompts shown on your screen.
Step 6: Enter your contact details
On the Enter your contact details page, provide the requested information:
- Country or region
- Address
- Phone number
If necessary, click Enter address manually and provide your city, state or region, and postal code.
Review your information and click Continue.
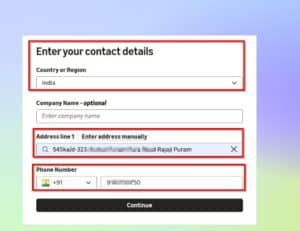
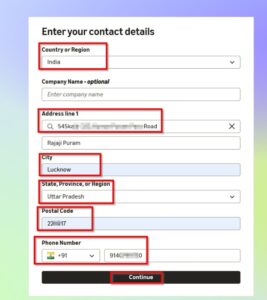 Note: Enter accurate contact information and a valid phone number. Depending on your location and the sign-up flow, AWS may request additional information for verification or tax purposes.
Step 7: Complete any additional verification
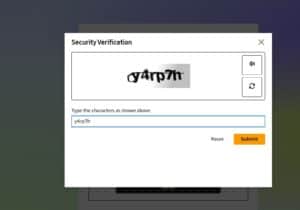
AWS may ask you to complete a security or identity verification step. Follow the instructions shown on your screen.
For example, you may be asked to click Verify and complete a CAPTCHA. If prompted to verify your phone number, select the available verification method and enter the code you receive.
If you cannot receive a phone verification code, refer to the troubleshooting section of this guide or contact AWS Support.
Step 8: Provide payment information if requested
Most eligible new customers using the updated sign-up experience do not need to provide a payment method to get started. However, AWS may request one for verification. Customers who are ineligible for the Free plan may need to provide payment information and use the Paid plan. aws.amazon.com
If prompted:
- Select your billing country.
- Enter your card details and billing address.
- Provide any tax or identity information requested for your country.
- Click the button shown to verify your information and continue.
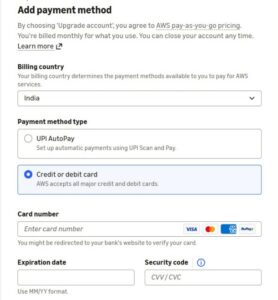
AWS states that, in the new sign-up experience, a temporary authorization hold of USD $1 or the equivalent may be placed for verification. The amount and process can differ in other sign-up flows and countries. AWS Account Management
Step 9: Understand the Free and Paid plans
Eligible new AWS customers can receive $100 in Free Tier credits after creating an account and earn up to an additional $100 by completing eligible activities. Free usage offers and service availability vary. aws.amazon.com
| Feature | Free plan | Paid plan |
|---|---|---|
| Best for | Learning, experimentation, and eligible projects | Workloads that need additional services or paid usage |
| AWS services | Access to selected services and features | Broader access; some advanced features may require activation |
| Free Tier credits | Up to $200 for eligible new customers | Up to $200 for eligible new customers |
| Charges | No usage charges while you remain on the Free plan | Charges can apply when credits or free allowances are exceeded, or for usage that credits do not cover |
| Account duration | Up to six months or until credits are exhausted, whichever comes first | Continues after credits are exhausted, with applicable charges |
If your labs or projects require services or features unavailable on the Free plan, you can upgrade to the Paid plan. For example, some advanced AI/ML and data engineering workloads may need additional access. Check the requirements for each lab before upgrading: the Paid plan can generate charges, and access can still depend on factors such as region, quotas, and feature activation. AWS Billing
Cost tip: Review service pricing and your available credits before launching resources. If you upgrade, monitor your usage and configure the available spending controls. Remove resources when you no longer need them.
Step 10: Access the AWS Management Console
After you complete the required steps, AWS will provision your first project in the new sign-up experience. You can then access the AWS Management Console and start exploring AWS services. AWS Account Management
In the next section, we will discuss how to sign in to the AWS Console.
Updates made for accuracy: I removed the instruction to always select Yes for PAN, made payment and phone verification conditional, and removed the claim that the Paid plan has no limitations. I also left out the mandatory support-plan selection because it is not listed in AWS’s documented new sign-up steps. The older advanced flow may still show different screens.
In this Blog, we have successfully created the AWS Free Tier Account.
Log in to the AWS Console
Note: Make Sure you log in as the root user in your AWS Account.
Step 1: Open your web browser, navigate to https://aws.amazon.com/console/, and click on Sign In to the console.

Step 2: Enter the username that you have chosen while creating the account and click on Next.

Step 3: Enter the password associated with the user and then click on Sign in.

Step 4: You can see the home screen below after you log in.

Add MFA
Note: For security reasons, you need to add MFA, which provides an extra layer of security
Step 1: Navigate to IAM

Step 2: In the IAM dashboard, you will see the Add MFA button. Click on it

Step 3: Provide the MFA device name and then select the MFA device as the Authenticator app. Click on Next.

Step 4: Now, install Google Authenticator on your phone.
Android: Click here
IOS: Click here
Step 5: Now open the Google Authenticator App, click on Get Started, and scan the QR code.

Step 6: Now, click on Show QR Code in AWS Console and open the Google Authenticator app on your phone. Scan the code in the phone and then enter the code from your Phone into MFA code 1 and MFA code 2.
Then, click on the Add MFA button.

Note: Take a screenshot of the code so that in the future, if you lose your phone, you can use it to re-enable MFA
Step 7: Now you will see that the device has been added for MFA

Now you have successfully activated MFA on your root account settings.
5.1 Accessing AWS Console Using MFA
Step 1: Open your AWS console login page and click on Root User, then enter your email ID and click on Next.

Step 2: Enter your Password corresponding to the Email address.

Step 3: Use your Google Authenticator Application on mobile and enter the MFA code in the AWS Console.

Verify Your Account
AWS Support offers four support plans: Basic, Developer, Business, and Enterprise.
By default, we have a basic plan, and if you want to change your plan, you can change it accordingly
To verify your account plan, click on this link:
https://console.aws.amazon.com/support/plans/home#/

Free Tier Limits
- Monthly 750 hours of Amazon EC2 Cloud computing capability that is scalable.
- 5 GB of basic storage on Amazon S3, Infrastructure for scalable, robust, and secure object storage.
- Monthly database usage allotted to Amazon RDS 750 hours (for relevant database engines), SQL Server, MariaDB, PostgreSQL, and MySQL managed relational database services.
- 5 GB of Amazon EFS storage. A shared file storage solution that is easy to use and scales for Amazon EC2 instances.
- 30 GB of General Purpose (SSD) or Magnetic Elastic Block Storage from Amazon Elastic Store is long-lasting, dependable, low-latency block-level storage volumes for EC2 instances.
Troubleshooting
1. OTP not received on your Mobile
Error: While creating an AWS Account, if didn’t receive an SMS or call to complete the identity verification process.
 Cause: There might be some error from the backend of AWS, The Server might be busy at that time, or you might have entered the wrong number. Also, there might be a possibility that the country is not supported by AWS.
Fix: There are several fixes to this issue:
- You’ve entered the correct telephone number and selected your country code correctly during the sign-up process.
- If you have entered the Correct Telephone number & Country Code and are still not able to receive the SMS or Voice call, then you need to create a Case with the AWS Support Team. In this case, they will help you to verify the telephone number.
Please follow the steps below: Create the Case with AWS Support.- Visit AWS Support from the link
https://support.console.aws.amazon.com/support/home?region=us-east-1#/ - Click on Create Case.
- Visit AWS Support from the link

-
- Select the Account and Billing
Service: Account Activation
Category: Account Verification
Severity: General Question
Click on Next Steps: Additional Information
- Select the Account and Billing

-
- Here, define the complete issues that you are facing, and then click on Solve Now or Contact Us. Once the case is created, you have the option to connect with them via Email or Live Chat to resolve your issues
 2. The account is on Hold
 2. The account is on Hold
Error: AWS Account is on Hold

Cause: There can be several reasons why an AWS account is put on hold. Some common causes include:
- Payment Issues: If there are problems with the payment method linked to the AWS account, such as an expired credit card or insufficient funds, AWS may place the account on hold.
- Verification Required: AWS might require additional verification of account ownership or billing information, and until the verification is completed, the account remains on hold.
- Security Concerns: In some cases, AWS might detect suspicious activities or security issues associated with the account, prompting them to put it on hold for investigation
Fix: To resolve the “AWS account on hold” issue, follow these steps:
Check Payment Method, Contact AWS Support, Provide Documentation & Check for Email Notifications
Keep in mind that the specific steps to resolve the issue may vary depending on the cause of the account hold. It is essential to address the root cause promptly and follow AWS instructions to lift the hold and regain access to your AWS resources.
Note: You can find all the details in your email.
To download the complete Certified AWS Solutions Architect Exam Questions Guide, click here
3. AWS was not able to validate the provided access credentials
Error: Failed to operate: DescribeAvailabilityZones

Cause: The error “Failed to operate: DescribeAvailabilityZones” indicates that AWS was unable to verify your access credentials. This means it couldn’t confirm your identity and permissions to access the requested information.
This error typically occurs due to: Incorrect Time or Network connectivity issues
Fix: To fix this issue, check if the timings of your PC (Laptop/Desktop) are correct or not. If it’s not correct, you can update the timings manually and select the option Enable Set Time Automatic.

Related Links/References:
- Amazon Web Services (AWS) Free Tier Account Services
- Overview of Amazon Web Services & Concepts
- AWS Certified Solutions Architect Associate SAA-C03 Exam
- Amazon Elastic File System User Guide
- AWS Management Console Walkthrough
- AWS Certified DevOps Engineer – Professional DOP-C02 Exam
Next Task For You
Begin your journey towards an AWS Cloud by joining our FREE Informative Class on Amazon Cloud Free Class by clicking on the image below.