![]()
This post covers How To Create a Database on Oracle’s Gen2 Cloud (OCI) on VM Database.
Every Oracle Cloud learner must know how to create a Database. It is surely a must know & important topic.
But, before that let me tell you about the different types of Databases in Oracle Cloud and the deployment topology.
Types of Databases in Oracle Cloud
There are different types of DB systems in the Oracle Cloud.
- VMDB: Virtual Machine DB Systems
- BMDB: Bare Metal DB Systems
- ExaCS: Exadata Cloud Service
- ExaCC: Exadata Cloud at Customer
- Autonomous (ADW): Autonomous Data Warehouse
- ATP: Autonomous transaction processing
- Oracle MySQL HeatWave
- Oracle NoSQL Database Service.
Note: There are different types of DB systems in the Oracle Cloud which you can check here Oracle Cloud Database Deployment Options (VMDB, BMDB, ExaCS, ExaCS, Autonomous (ADW, ATP), MySQL DB & NoSQL DB.
Note: In this video, we’re going to create a database on VMDB: Virtual Machine DB Systems.
Deployment Topology
Now, in order to create your Database, you first need to select a region & domain you are going to create the database.
Region is a geographical location in which the Oracle Cloud exists.
Read more about the difference between Region Availability Domain (AD) & Fault Domain (FD)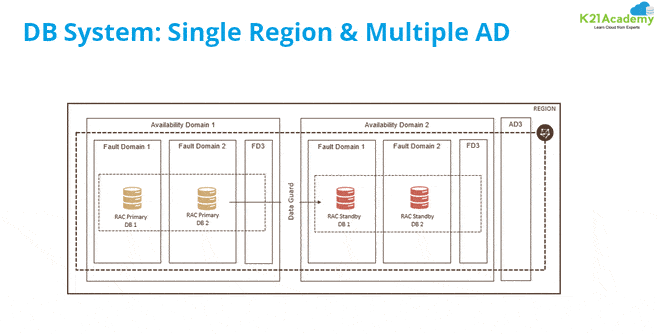
Database Deployment
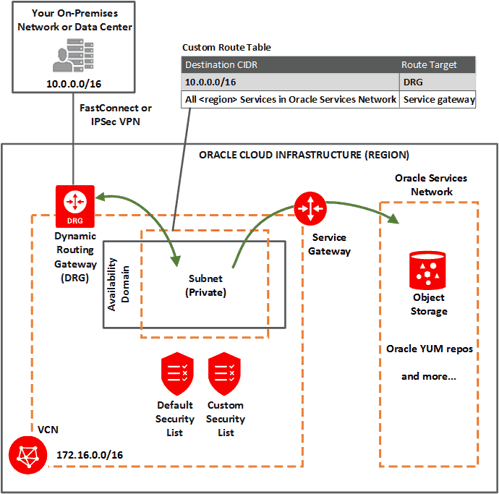
In Oracle Cloud, there are two deployment models in User-Managed Database i.e., Database in Public Subnet or Database in Private Subnet where Subnet is a part of VCN
Check this blog to know more about VCN, Subnet, Firewall (Security List), IGW, DRG & how to create it.
1) Database Deployed Inside Private Subnet
Database Host on a private subnet listen on a Private IP, We recommend the Deploying database on a private subnet & you will be able to access the database within the Virtual Cloud Network. You can access it from the on-premises network via DRG (Dynamic Routing Gateway) using either FastConnect or IPSec VPN
2) Database Deployed Inside Public Subnet
A database running on Public Subnet will get both Private IP & Public IP, you will be able to access it via Public IP & Internet Gateway is required for connectivity.
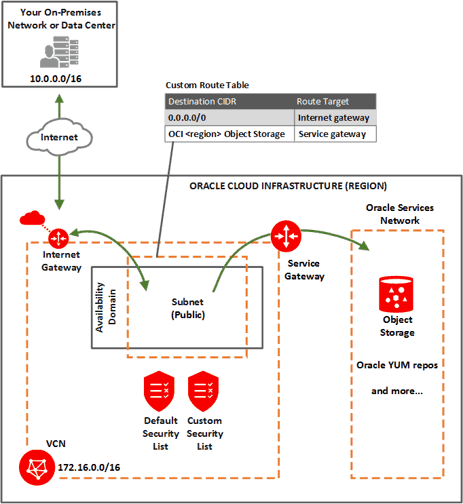
We only recommend creating a database on the public subnet only when you are using this database for testing purposes or if you want to expose your database to the internet.
Network Topology
When you’re creating the Databases, you’ll also need to have Network Topology. Within the Virtual Cloud Network (VCN), you can either have a public subnet or a private subnet.
Note: In this video, we’re going to create a Database after creating VCN with a public subnet.
Create Database On Oracle Cloud: Step By Step
1) Register & Log in to the Oracle Cloud account.
Note: First, you should have an Account at Oracle Cloud and if you don’t have one, then you can register FREE using my step-by-step video & guide that I covered in episode 30.
2) Configure Network: Next, as we want to access the database over the internet, so we’ll create it in the Public Subnet and assign Public IP in addition to configuring Internet Gateway on VCN.
Note: If you are not familiar with VCN, Subnet, or Internet Gateway then learn about them in one of my previous episodes on networking.
3) Generate SSH Keys: Once you are done with creating VCN & Public Subnet, then you also need one more thing i.e. SSH Keys Pair that you generate using Puttygen, so that you can access the Autonomous Linux using SSH private key.
Note: If you are new to SSH Keys or don’t have one, check the steps here to create SSH keys
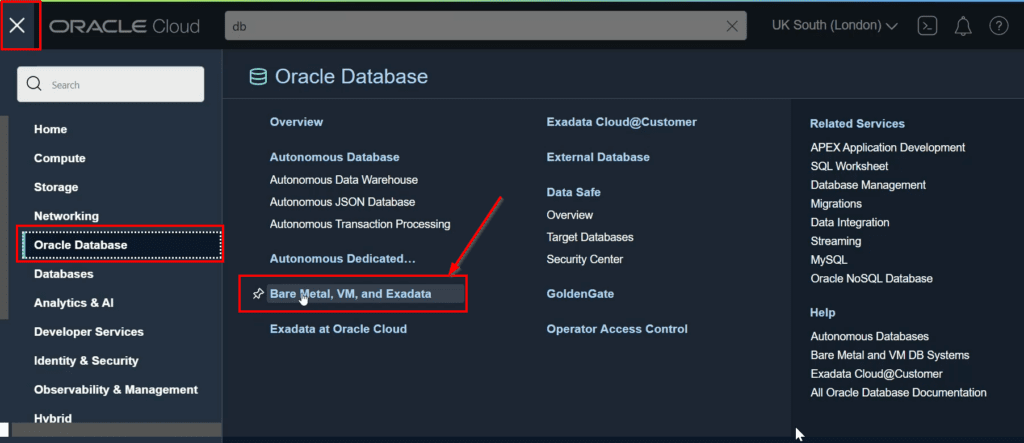
4) Sign In: Once you have all the things sorted, sign in to Oracle Cloud Account, and you will land on the OCI Console.
5) Create Database Instance: Click on the hamburger menu on the top left side, select Bare metal, VM & Exadata & then Click on Create DB System.
6) First, select the Compartment in which you want to create the Database.
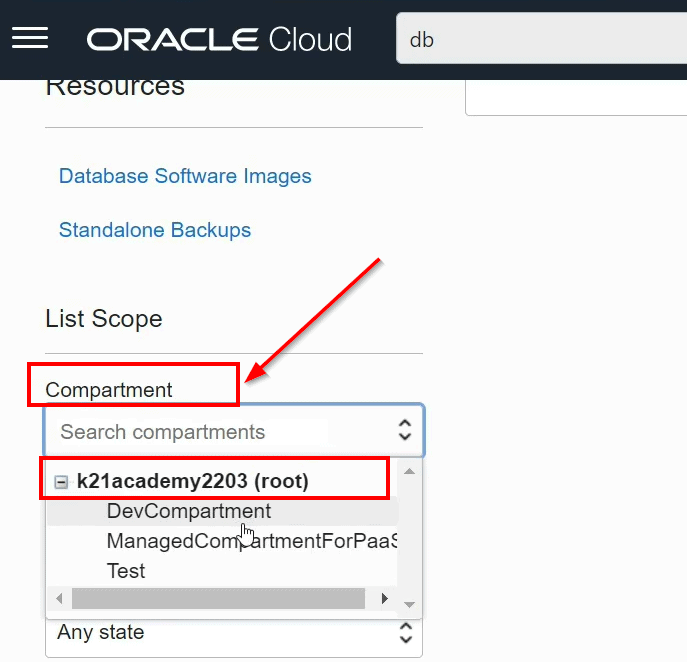
Note: Read more about the Compartments and Policy.
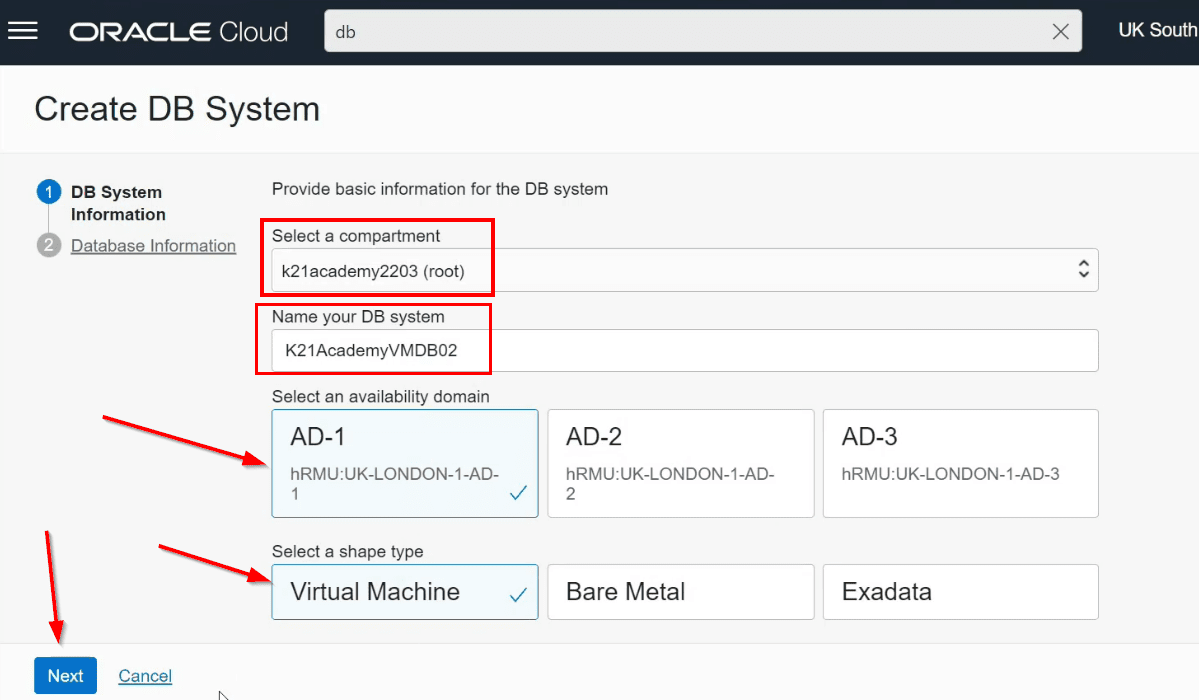
7) Click on “create DB System”
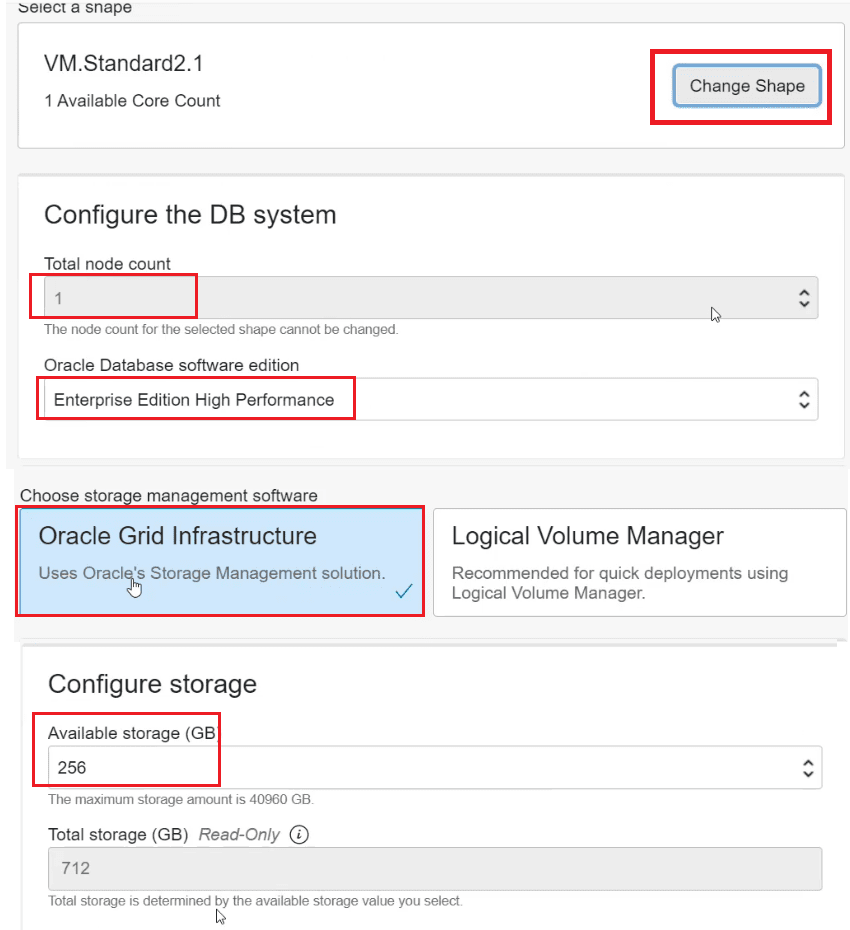
Choose the compartment, enter the name of the DB System, Then choose Availability Domain inside which you want to create the Instance, If you want higher CPU & higher memory, then click on “Change Shape“.
Note: Know more about Region & Availability Domain in OCI.
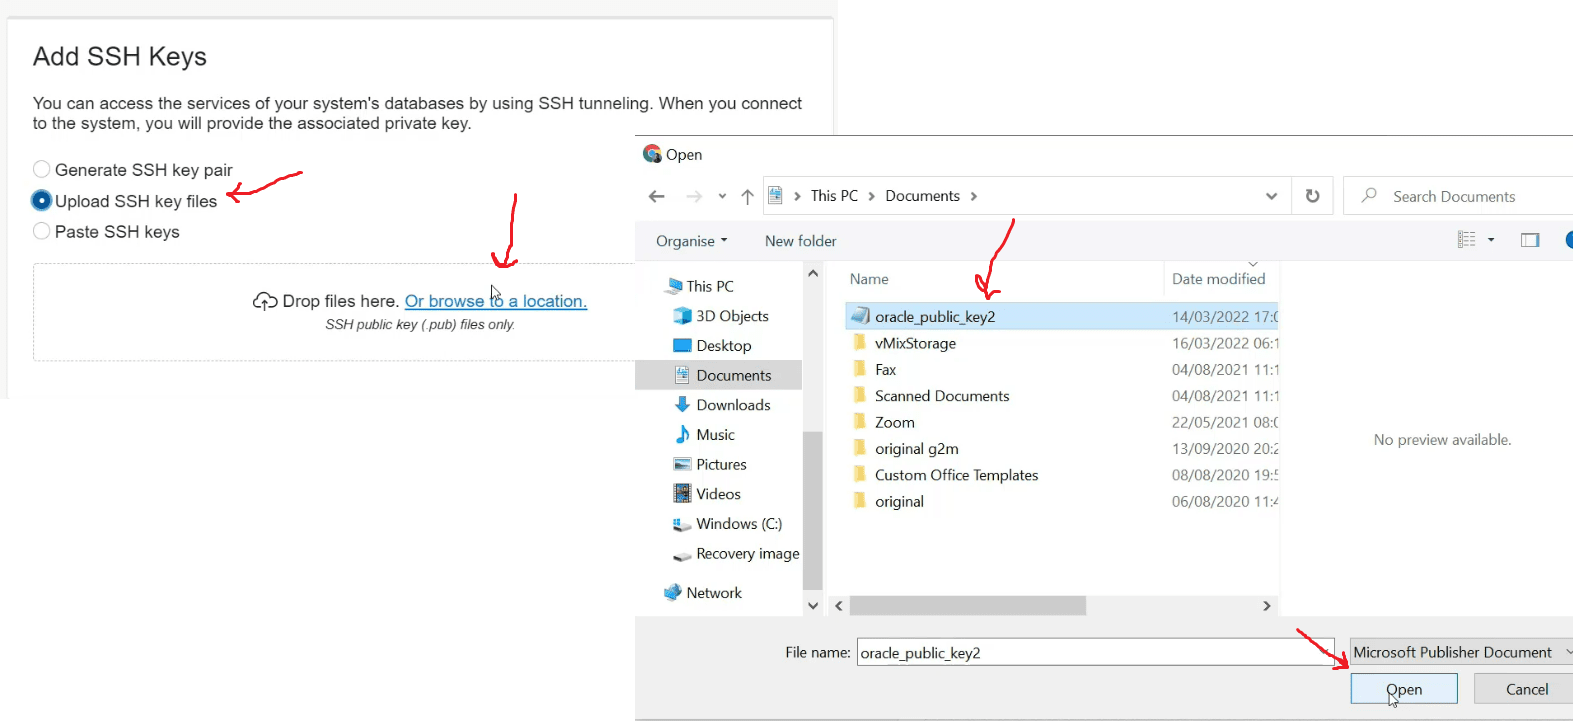
8) Under “Add SSH key”, click on “Upload the SSH Keys files” and browse the location where the public key is stored.
Note: If you are new to SSH Keys or don’t have one, check the steps here to create SSH keys
9) Choose License type, click on License included, if you want to choose your own license then click on BYOL (Bring your own license)
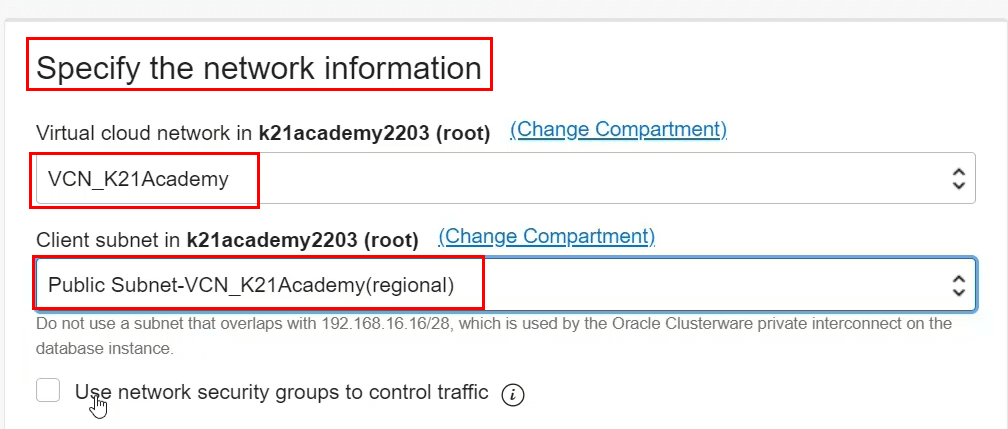
10) Select the VCN & Public Subnet, leave other options default, Click on Next
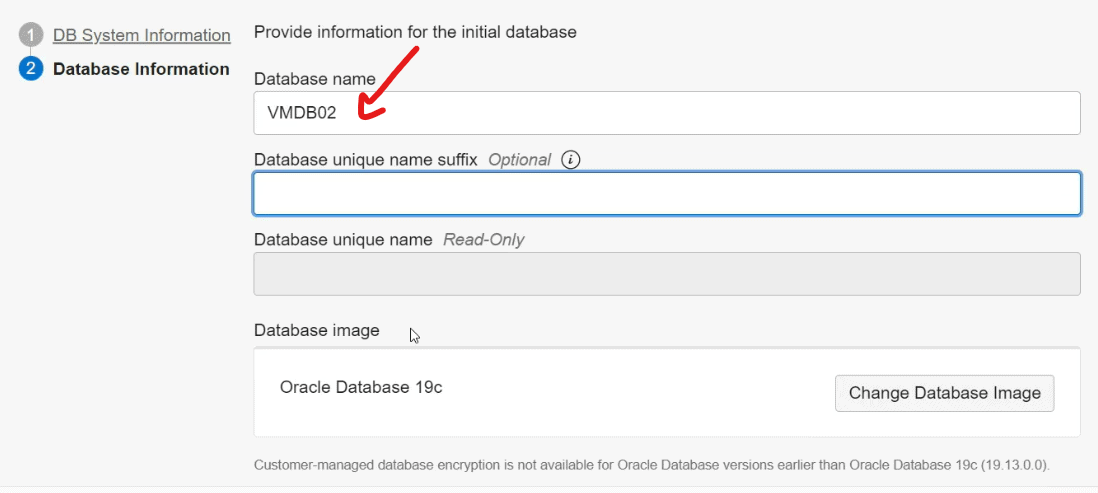
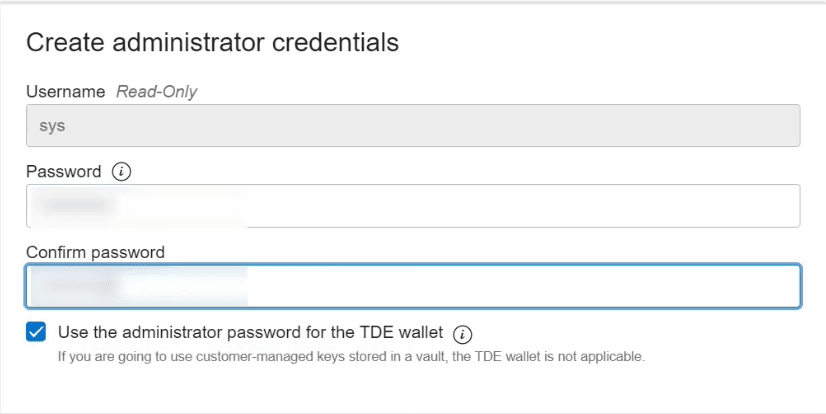
11) Enter the DB Name, & select the Database version (We have selected 19c, you can select upon your requirement). Create the SYS admin password (make sure you remember the password)
Click on Create DB System.
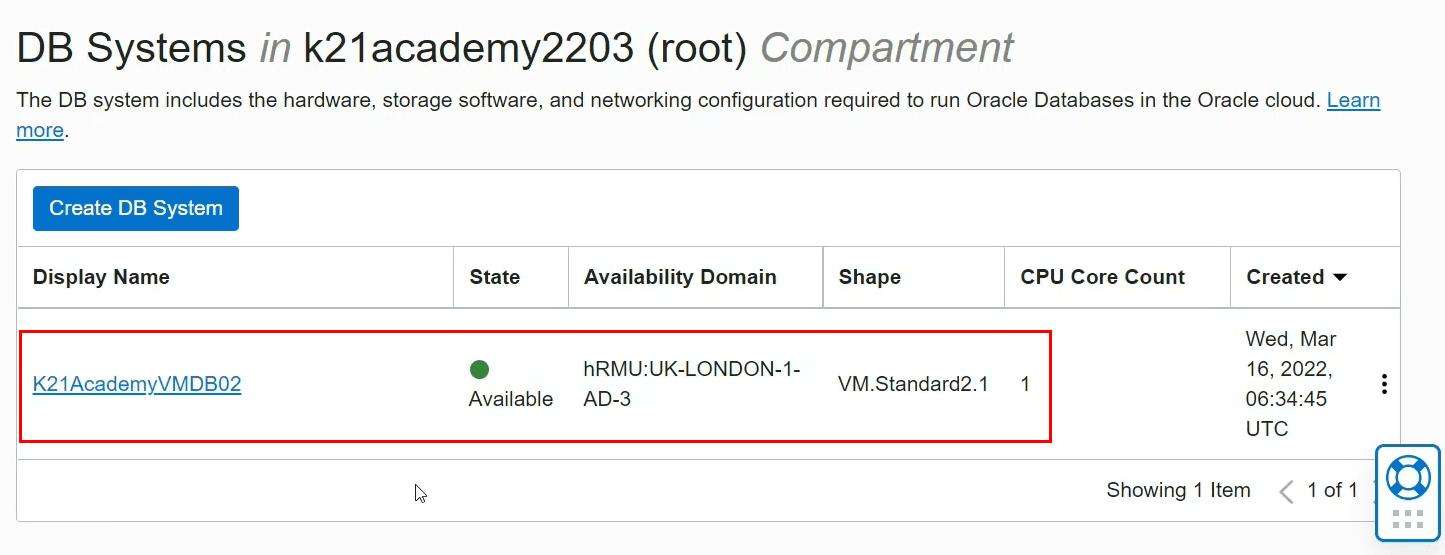
12) When the database creation is complete, the status changes from Provisioning to Available
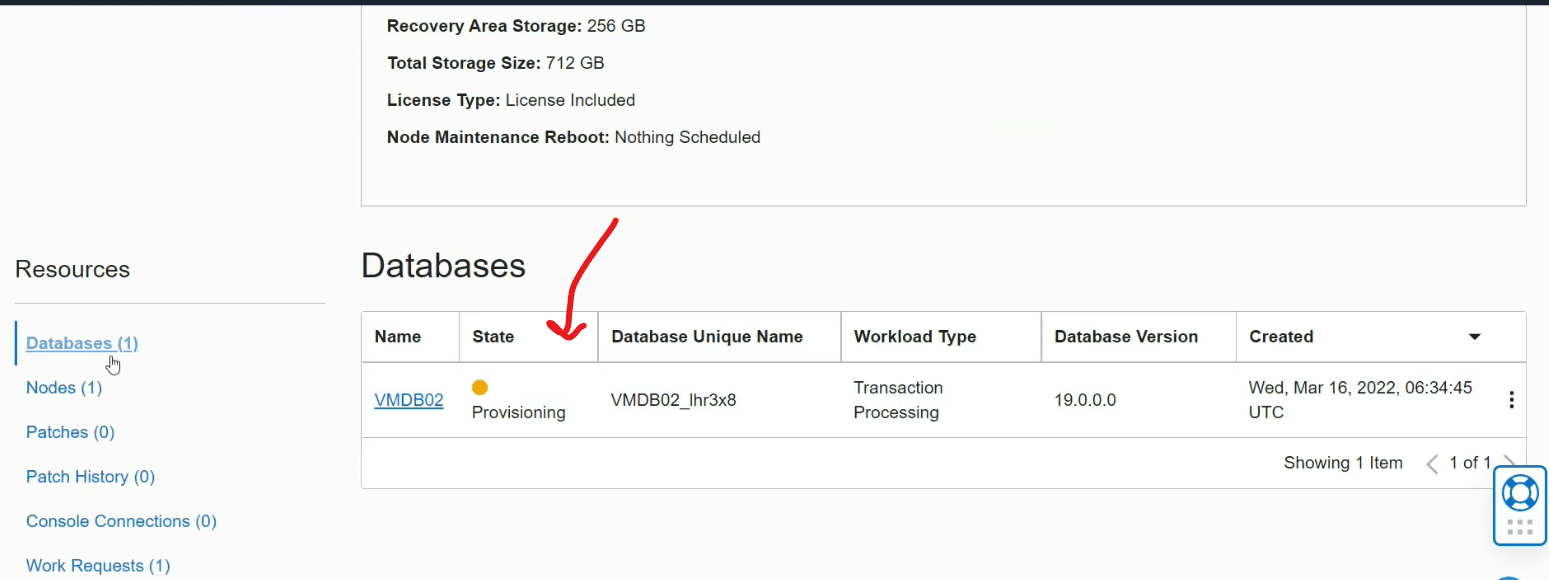
Note: It will take 30 minutes to make your Database up & Running
How To Connect
1) In order to connect to Database Host deployed in Oracle Gen2 Cloud (OCI), you need to open port 22, which is an SSH port and you will be able to connect to your database Instance and In case you want to connect to database listener port you have to open port 1521 so that your application will be able to talk to the database or other services over the internet.
Note: When you create VCN using default options various resources are by default created by Oracle (Security List, IGW, Route Table).
Check this video blog to learn how to create a security list and open port in Oracle Gen2 Cloud
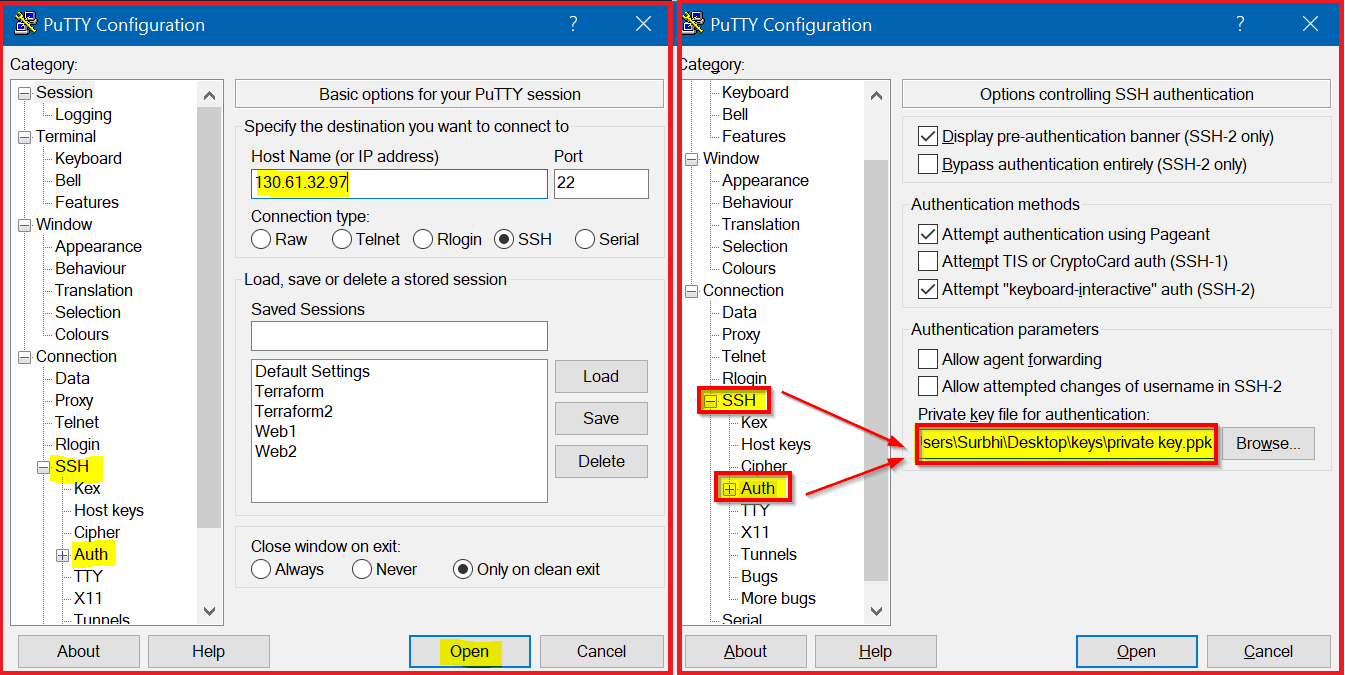
2) To connect to the Instance you will need the Public IP of the Instance & the PuTTY Software

Note: know how to get the Public IP of the Database
Enter the Public IP Address in the Hostname, then add the SSH Private key (That we created before) under SSH & then Auth. Click on “Open”
Troubleshooting
So that’s all how you can create and provision a Database on OCI. Now, some of you might face issues while connecting the instances.
There could be multiple reasons for Instance Connectivity issues in OCI like:
- Issue 1: In the Security List SSH port 22 (Linux) is not open.
- Issue 2: Internet Gateway (IG) is not configured.
- Issue 3: SSH Public key you generated was not uploaded properly while creating the instance (or you are not using Private Key Properly in Putty).
- Issue 4: You have forgotten to add the Private key under SSH->Auth
- Issue 5: It could be a typo issue for the username
For the Fixes of the above issue, you can check our previous post [Troubleshooting] Compute (Linux/Windows) & Database Instance Connectivity Issue in Oracle Cloud (OCI)
Related/Further Readings
- Oracle Cloud Database Services Specialist 2021 Certification[1Z0-1093-21]: All You Need To Know About
- Oracle Cloud: Create VCN, Subnet, Firewall (Security List), IGW, DRG: Step By Step
- Oracle Cloud Database Options (VMDB, BMDB, ExaCS, ExaCS & Autonomous (ADW, ATP)
- How to Get Public IP of Database In Oracle Gen 2 Cloud (OCI)
- [Video] Oracle Autonomous Data Warehouse Cloud Service 18c Now on OCI
- [Troubleshooting] Compute (Linux/Windows) & Database Instance Connectivity Issue in Oracle Cloud (OCI)
Begin Your Cloud Journey
Begin your journey towards becoming an Oracle Cloud Expert and earn a lot more in 2024 by joining our FREE CLASS. You will also know more about the Roles and Responsibilities, Job opportunities for OCI Architects, Admins in the market, and what to study Including Hands-On labs you must perform to get the Higher Paying jobs.
Click on the below image to Register for Our FREE Class on MASTERING ORACLE CLOUD FOR DBAs, APPs DBAs, ARCHITECTS & SYS ADMINS


Good Blog, well descrided, Thanks for sharing this information.
Oracle Fusion Financials Online Training
Hi,
I have some questions, please …If i don´t remember the sys password, can I change it?
It´s ok to use alter user sys indentified by….
It´s mandatory to update the sys password inside wallet after I change the password?
thanks
Hi Priscila,
Yes you can change your password and also yes, it is mandatory to update the sys password inside wallet once you have updated the password.
Thanks & Regards,
Megha
Team K21