


![]()
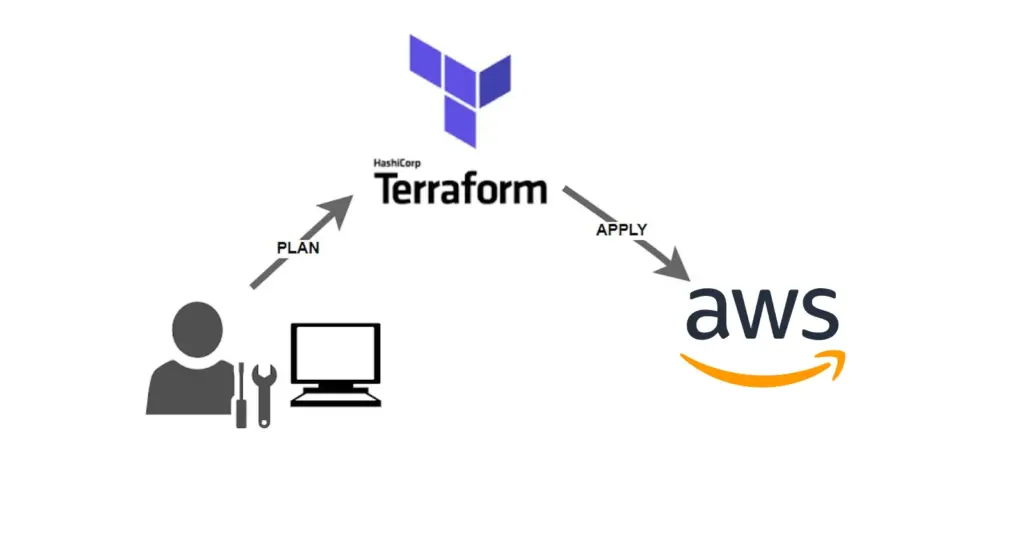
In today’s rapidly evolving technological landscape, building and managing cloud infrastructure is a critical skill. Amazon Web Services (AWS) is a popular choice for cloud solutions, and Terraform is an excellent tool for infrastructure as code. In this guide, we will take you through the steps to create a small AWS infrastructure using Terraform. By the end of this article, you’ll be well-equipped to set up your AWS environment seamlessly.
In this article, we will cover
- Understanding AWS and Terraform
- Step 1: Set Up AWS Credentials
- Step 2: Install and Configure Terraform
- Step 3: Define Your Infrastructure
- Step 4: Initialize and Apply
- Step 5: Review Infrastructure
- Step 6: Destroying the Infrastructure
- FAQs
- Conclusion
Understanding AWS and Terraform
What is AWS?
Amazon Web Services (AWS) is a leading cloud computing platform that provides a wide range of cloud services. These services include computing power, storage options, and databases, among others. AWS offers flexibility, scalability, and security, making it a go-to choice for many organizations.
What is Terraform?
Terraform is an open-source infrastructure as code (IAC) tool that allows you to define and provision infrastructure using a high-level configuration language. It supports various cloud providers, including AWS, and enables you to create, modify, and manage infrastructure resources efficiently.
Prerequisites
Before we begin, make sure you have the following:
- An AWS account
- Terraform installed on your local machine
- AWS CLI installed and configured
Step 1: Set Up AWS Credentials
The first step in building an AWS infrastructure with Terraform is to configure your AWS credentials. This is crucial for Terraform to interact with your AWS account.
To set up your AWS credentials, follow these steps:
- Open the AWS Management Console.
- Go to the IAM (Identity and Access Management) dashboard.
- Create a new IAM user and assign the necessary permissions.
- Generate an access key and secret access key for the IAM user.
Step 2: Install and Configure Terraform
To use Terraform, you need to install it on your local machine. Follow these steps to install and configure Terraform:
- Download Terraform from the official website.
- Install Terraform according to your operating system.
- Verify the installation by running
terraform --version. - Configure your AWS credentials by running
aws configure.
Step 3: Define Your Infrastructure
Now that your environment is set up, it’s time to define the infrastructure you want to create. This involves writing Terraform configuration files (usually with a .tf extension) that describes the AWS resources you want to provision.
For example, to create an AWS EC2 instance, you can create a main.tf file with the following content:
- Create a VPC using the below syntax, and add this code in the main.tf
resource "aws_vpc" "vpc" {
   cidr_block = "10.0.0.0/16"
}
2. Create and Internet Gateway using the below syntax, and add it to the main.tf file.
resource "aws_internet_gateway" "igw" {
    vpc_id = aws_vpc.vpc.id #refrencing vpc id
 }
3. Create a Route Table using the below syntax, and paste it into the main.tf file too.
resource "aws_route_table" "route-table" {
   vpc_id = aws_vpc.vpc.id
   route {
     cidr_block = "0.0.0.0/0"
     gateway_id = aws_internet_gateway.igw.id
   }
   route {
     ipv6_cidr_block = "::/0"
     gateway_id      = aws_internet_gateway.igw.id
   }
   tags = {
     Name = "Prod RT"
   }
 }
Note: Make sure you use the resource name that you have assigned.
4. Now, we need to create a subnet on which our web server will reside. Add the below code in main.tf
resource "aws_subnet" "subnet" {
  vpc_id            = aws_vpc.vpc.id
  cidr_block        = "10.0.1.0/24"
  availability_zone = "us-east-2a"

  tags = {
    name = "Prod Subnet"
  }
}
5. After creating a subnet and route table, we need to associate subnet with the route table. To achieve the connection, add a new resource called aws_route_table_association.
resource "aws_route_table_association" "connection-RT-subnet" {
  subnet_id      = aws_subnet.subnet.id
  route_table_id = aws_route_table.route-table.id
}
6. Add Security Group, using the resource aws_security_group. Add the below code for aws_security_group
resource "aws_security_group" "sg" {
   name        = "security_group"
   description = "Allow Web inbound traffic"
   vpc_id      = aws_vpc.vpc.id
   ingress {
     description = "HTTPS"
     from_port   = 443
     to_port     = 443
     protocol    = "tcp"
     cidr_blocks = ["0.0.0.0/0"]
   }
   ingress {
     description = "HTTP"
     from_port   = 80
     to_port     = 80
     protocol    = "tcp"
     cidr_blocks = ["0.0.0.0/0"]
   }
   ingress {
     description = "SSH"
     from_port   = 22
     to_port     = 22
     protocol    = "tcp"
     cidr_blocks = ["0.0.0.0/0"]
   }
   egress {
     from_port   = 0
     to_port     = 0
     protocol    = "-1"
     cidr_blocks = ["0.0.0.0/0"]
   }
   tags = {
     Name = " security_group"
   }
 }
7. We will now Create a network interface with an ip in the subnet that was created in step 5. Add the below code for setting up nic in main.tf
resource "aws_network_interface" "server-nic" {
  subnet_id       = aws_subnet.subnet.id
  private_ips     = ["10.0.1.50"]
  security_groups = [aws_security_group.sg.id]
}
Note: You can assign more than 1 private ip.
8. Now we need to assign an elastic IP to the network interface created in step 7.
resource "aws_eip" "one" {
   vpc                       = true
   network_interface         = aws_network_interface.server-nic.id
   associate_with_private_ip = "10.0.1.50"
   depends_on                = [aws_internet_gateway.igw]
 }
Note: EIP may require IGW to exist before association. Use depends_on to set an explicit dependency on the IGW. So, we will add a depends_on flag
9. Now we need to add an instance for our Ubuntu server.
resource "aws_instance" "server-instance" {
  ami               = "ami-0a63f96e85105c6d3"
  instance_type     = "t2.micro"
  availability_zone = "us-east-2a"
  key_name          = "accesskey"

  network_interface {
    device_index         = 0
    network_interface_id = aws_network_interface.server-nic.id
  }
}
Note: Make sure you enter the correct ami as the ami differs from region to region and the availability zone of both subnet and instance are the same.
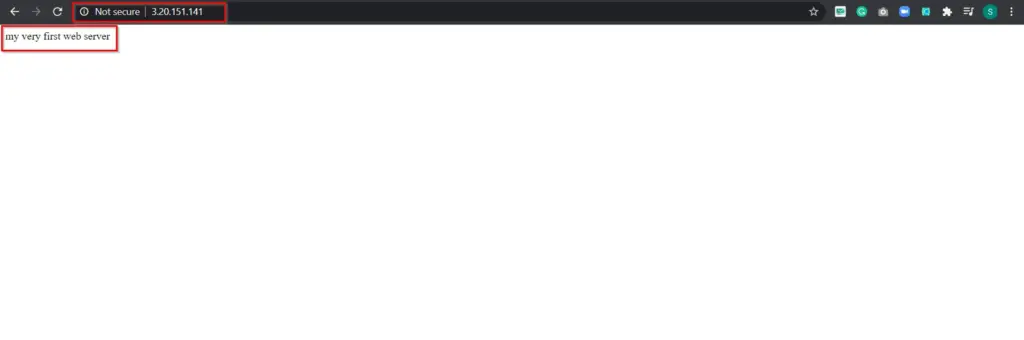
10. After the creation of the instance, we need to run a few commands on our instance to install the Apache server.
  user_data = <<-EOF
                #!/bin/bash
                sudo apt update -y
                sudo apt install apache2 -y
                sudo systemctl start apache2
                sudo bash -c echo my very first web server > /var/www/html/index.html'
                EOF

  tags = {
    Name = "my-web-server"
  }
}
Note 1: These commands should be in the resource block & I have added a name tag to the server.
Note 2: You can find the complete configuration file from this GitHub URL to avoid indentation:
https://github.com/k21academyuk/terraform/blob/main/Building%20A%20Small%20Infrastructure
Note 3: Change the Availability zone and key-file according to your configuration
Step 4: Initialize and Apply
Once your configuration files are ready, you need to initialize your working directory and apply the configuration to create the infrastructure. Navigate to your Terraform project folder and run the following commands:
terraform init
terraform apply
This will initialize Terraform and create the specified AWS resources.
Step 5: Review Infrastructure
After applying your configuration, Terraform will provide you with information about the created resources. Review this information and ensure everything is as expected.
Go to the AWS console to check if the instance is created and copy the public IP of the instance.

Open the IP in your Web Browser.
Step 6: Destroying the Infrastructure
Always remember to destroy the resources you have created while doing hands-on to avoid any unwanted costs.
Go to the VS code editor and run the terraform destroy command to destroy the resources that we have created in this hands-on. You can also use terraform destroy -auto-approve to not get the yes prompt.
FAQs
Can I use Terraform to manage AWS resources in multiple regions?
Yes, Terraform supports managing AWS resources in multiple regions. You can specify the region in your configuration files using the provider block.
Is Terraform the only tool for managing AWS infrastructure?
No, there are other tools like AWS CloudFormation and AWS CDK, but Terraform is widely used due to its flexibility and support for multi-cloud infrastructure.
How can I secure my AWS credentials when using Terraform?
You should never hardcode your AWS credentials in Terraform files. Instead, use environment variables or an IAM role with the necessary permissions.
Can I use Terraform for non-AWS cloud providers?
Yes, Terraform supports various cloud providers like Google Cloud, Microsoft Azure, and more.
Where can I find more Terraform modules and configurations for AWS?
You can explore the Terraform Registry, where you'll find a vast collection of pre-built modules and configurations for AWS and other cloud providers.
Conclusion
Congratulations! You’ve successfully learned how to build a small AWS infrastructure with Terraform. This skill is invaluable in today’s cloud-focused world, whether you’re an IT professional, a developer, or just someone looking to expand your knowledge.
Remember that practice makes perfect, so experiment with different AWS resources and configurations to hone your skills further.
Related/References
- HashiCorp Infrastructure Automation Certification: Terraform Associate
- HashiCorp Certified Terraform Associate-Step By Step Activity Guides
- Hashicorp: Terraform Certified Associate – Tricks & Tips Of Terraform
- Install Terraform in Linux, Mac, Windows
- Why Terraform? Not Chef, Ansible, Puppet, CloudFormation?
- Terraform Variables – Terraform Variable Types
Join FREE Class
🚀 Master Terraform & DevOps to get High-Paying Jobs! 🔥 Join our EXCLUSIVE Free class! 🚀
Get your hands dirty with lots of projects and labs based on Terraform and DevOps in our Program.Click on the below image to Register for Our FREE Class Now!


![AWS DevOps [DOP-C02] Professional Step By Step Activity Guides (Hands-On Labs)](https://k21academy.com/wp-content/uploads/2023/02/DOP-C02-1.png)