





Microsoft Azure Storage Explorer is a standalone software for Windows, macOS, and Linux that makes working with Azure Storage data simple.
You’ll learn how to connect to and manage your Azure storage accounts in this blog.
What Is Microsoft Azure Storage Explorer?
You can use it to connect and manage your Azure storage service accounts and resources across subscriptions. In Azure Storage, Azure Cosmos DB, and Data Lake Storage, you can create, delete, view, and update resources.
Storage Explorer also allows for local development using the Azurite emulator, enabling you to develop storage-oriented codes offline and without any active internet connection. This makes development cost-effective. It is based on Azure’s standard security architecture that includes Entra ID authentication and role-based access control.
How To Install Microsoft Azure Storage Explorer?
To get a free copy of Storage Explorer, simply go to Azure Storage Explorer – cloud storage management | Microsoft Azure. After you’ve installed it, you’ll need to connect it to an active Azure account and link your storage resources to it before you can start manipulating files, querying tables, and so on.

How To Use Azure Storage Explorer?
Storage Explorer can be used to connect to storage accounts as well as other Azure services in various ways. You may connect your Storage Explorer application to your Azure storage accounts in a few different ways.
To access your Azure storage account, you’ll need two types of permissions: management plane and data plane. Storage Explorer, on the other hand, can be used with simply the data-layer permission. The data layer requires that the user be given at least a read data role. It is advisable to choose the particular read or write role depending on the data being stored in the storage account, whether it is read-only or read/write. Blobs, containers, and other data resources are accessed through the data layer.
The management role allows you to view a list of all of your storage accounts, containers, and service endpoints.
Connection Types
There are various means by which you can associate an instance of the Azure Storage Explorer with your Azure assets, such as
- Use a connection string
- Add resources by using Entra ID
- Use a shared access signature URI
- Attach to a local emulator
- Use a name and key
- Attach to Azure Data Lake by using a URI
- Attach to Azure Cosmos DB through a connection string
In this blog, we will discuss the two most widely used techniques: Entra ID and Shared Access Signature (SAS) in detail. Keep an eye out for an upcoming blog on other connection types.
Add An Azure Account By Using Entra ID [earlier Azure Active Directory]
When the user has access to the data layer, use this connection type. Only an Azure Data Lake blob container or a normal blob container can be created with it. Using Azure AD to connect to Azure Storage takes more configuration than the other methods. To access the target resources, the account you use to connect to Azure must have the appropriate permissions and authorization.
To add a resource using Entra ID, follow these steps:
1) Open Storage Explorer.
2) Sign in to Azure using the Add an Azure Account option.
3) Select Blob container, ADLS Gen2 container, or Queue in the Connect to Azure Storage dialog’s Select Resource panel.
4) Next, select Sign in using Entra ID.
5) Choose an Azure account as well as a tenant. The Storage resource you wish to attach must be accessible to both the account and the tenant. Select Next.
6) Give your connection a display name and the resource’s URL. Select Next.
7) In the Summary panel, look over your connection information. Select Connect if the connection information is valid.
Shared Access Signature (SAS) Connection String
A connection string with a Shared Access Signature can be used to connect to a storage account in Storage Explorer (SAS).
1) In the Select Resource panel Select Storage account in the Connect to Azure Storage.
2) Select Shared access signature (SAS) from the drop-down menu and then Next.
3) Give your connection a name and the SAS connection string for the storage account. Select Next.
4) In the Summary panel, look over your connection information. Select Connect if the connection information is valid.
Connect To A Storage Account
1) Select View > Account Management or the Manage Accounts icon in Storage Explorer.

2) ACCOUNT MANAGEMENT now shows all of the Azure accounts to which you have access. Select Add an account to connect to another account.
3) The prompt for connecting to Azure Storage appears. Select Subscription from the Select Resource panel.
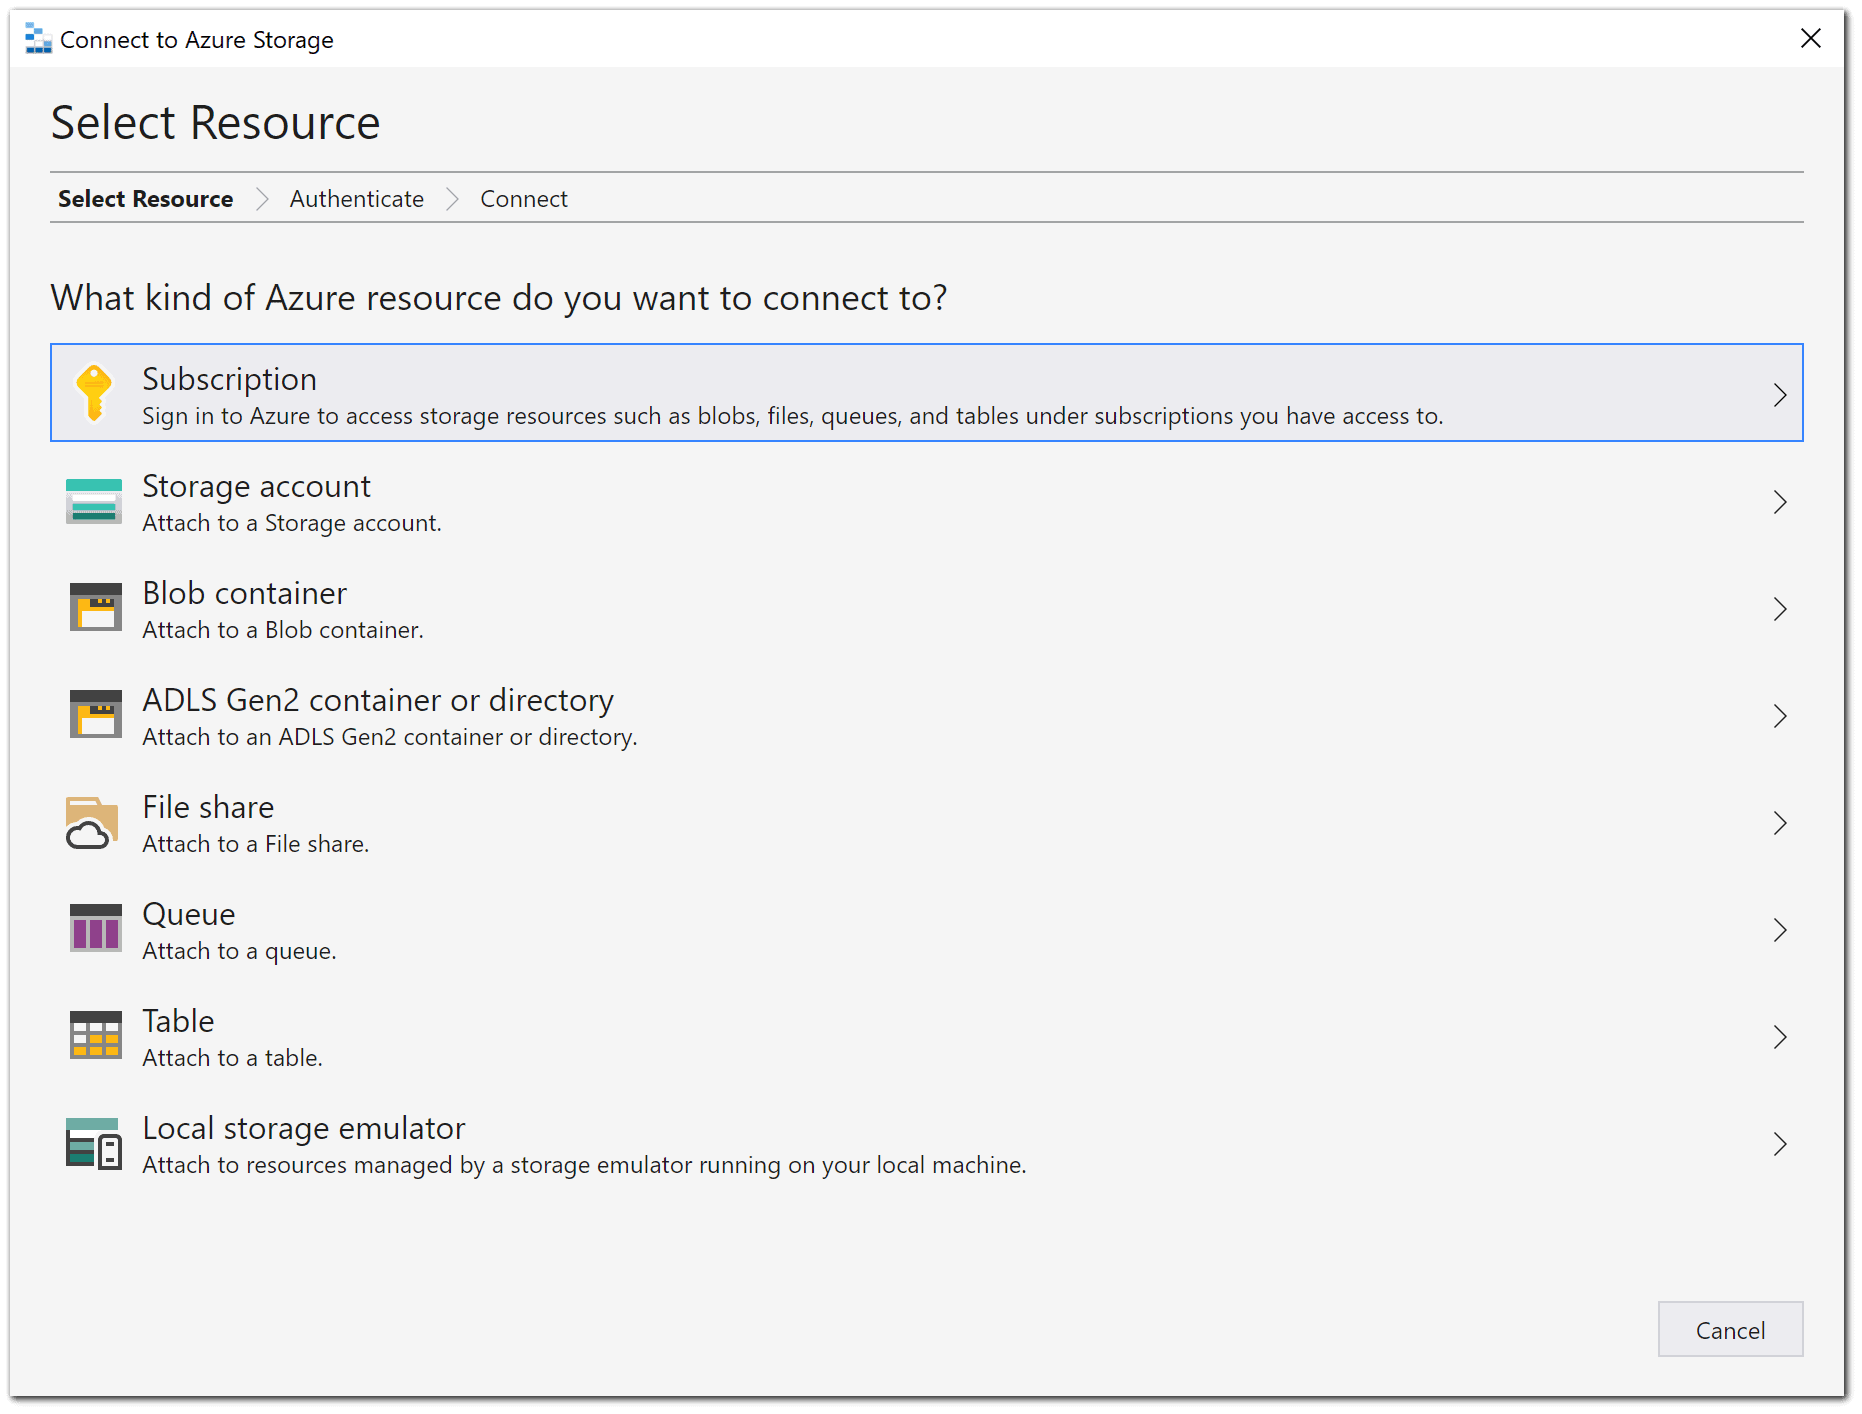
4) Select an Azure environment to sign in to in the Select Azure Environment screen. You can sign in to an Azure Stack instance, a national cloud, or a global Azure account. Then choose Next.

5) Storage Explorer will take you to a sign-in page.
6) The account and any Azure subscriptions linked with it appear under ACCOUNT MANAGEMENT after you successfully login in using an Azure account. Select the Azure subscriptions you’d like to use, and then click Apply.

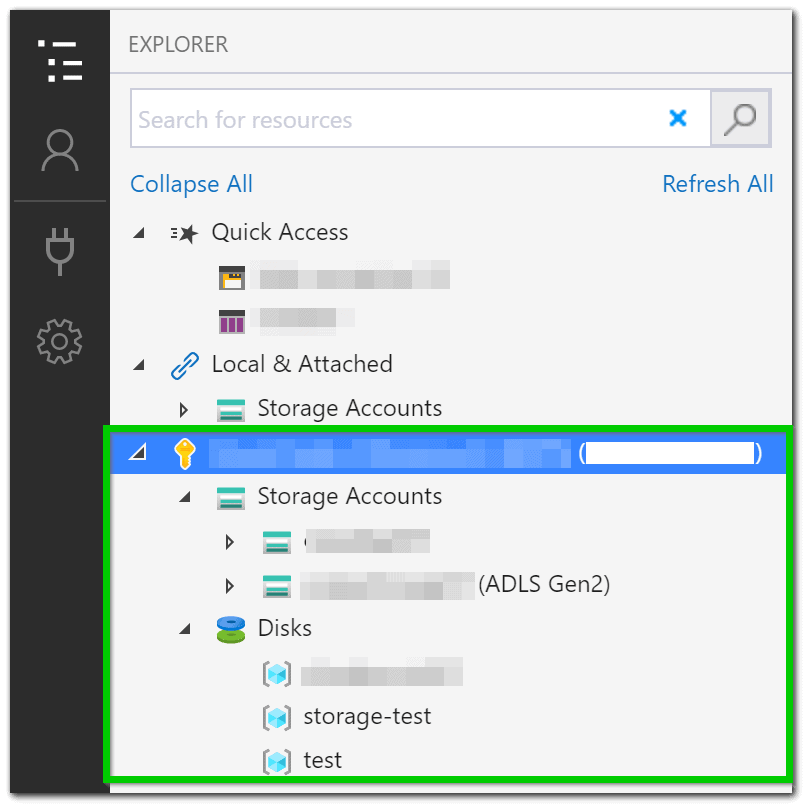
7) The storage accounts linked with the selected Azure subscriptions are displayed in EXPLORER.
Contact us if you have any questions about ASE, Azure storage options, or any other Azure product or service.
Frequently Asked Questions (FAQs)
Q: Is Microsoft Azure Storage Explorer available for Linux operating systems?
A: Yes, Microsoft Azure Storage Explorer is available for Linux operating systems. You can download the Linux version from the official Microsoft website and install it on your Linux machine.
Q: Can I perform bulk operations on storage resources using Microsoft Azure Storage Explorer?
A: Yes, Microsoft Azure Storage Explorer provides functionality for performing bulk operations on storage resources. You can perform bulk uploads, downloads, deletions, and other operations by selecting multiple files or objects and applying the desired action.
Q: Does Microsoft Azure Storage Explorer have any command-line interface (CLI) options?
A: No, Microsoft Azure Storage Explorer doesn't have its own command line interface, but there is no need to create one, since there is no need for command line interface in this application. You can automate your tasks by using AzCopy and Azure CLI, that offer most of the functionalities of Azure Storage Explorer in a command line interface form.
Q: How can I connect Microsoft Azure Storage Explorer to my Azure Storage account?
A: To connect Microsoft Azure Storage Explorer to your Azure Storage account, you need to provide the connection string or use Azure Active Directory (Azure AD) authentication. The connection string contains the necessary information to establish a connection, including the storage account name and account key or Azure AD credentials.
Q: Does Microsoft Azure Storage Explorer support managing both Azure Blob Storage and Azure Data Lake Storage?
A: Yes, Microsoft Azure Storage Explorer supports managing both Azure Blob Storage and Azure Data Lake Storage. You can easily navigate and work with both types of storage resources within the application.
Related/References
- Microsoft Certified Azure Data Engineer Associate | DP 203 | Step By Step Activity Guides (Hands-On Labs)
- Exam DP-203: Data Engineering on Microsoft Azure
- Azure Data Lake For Beginners: All You Need To Know
- Batch Processing Vs Stream Processing: All You Need To Know
- Introduction to Big Data and Big Data Architectures
Next Task For You
In our Azure Data Engineer training program, we will cover 28 Hands-On Labs. If you want to begin your journey towards becoming a Microsoft Certified: Azure Data Engineer Associate by checking out our FREE CLASS.