


![]()
This blog post covers a brief overview of the topics covered and some common questions asked on Day 3 Live Interactive training on Docker and Kubernetes Certification i.e. CKA / CKAD .
This will help you to learn Docker & Kubernetes and prepare you for these certifications and get a better-paid job in the field of Microservices, Containers and Kubernetes.
In the Day 1 & Day 2 CKA Live session we covered an overview of Monolithic v/s Microservice, Docker Installation & Container lifecycle, Image). And in this week, Day 3 we covered Docker Storage, Docker Networking. We also performed labs.
Docker Storage
Containers don’t write data permanently to any storage location. Docker storage must be configured if you would like your container to store data permanently. The data doesn’t prevail when the container is deleted (using the remove command); this happens because when the container is deleted, the writable layer is also deleted. If the data is stored outside the container, you can use it even if the container no longer exists.
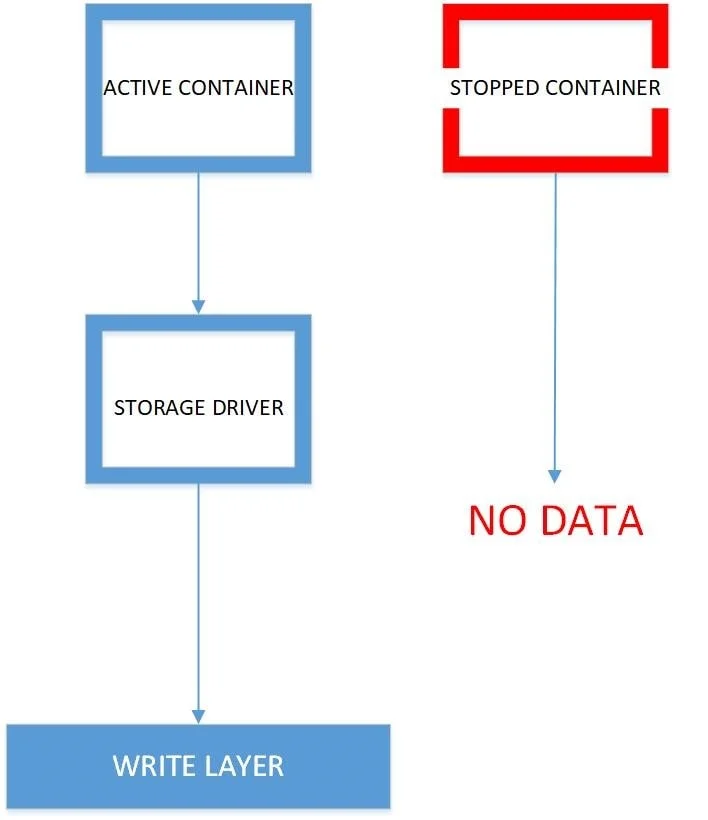
If a container crashes and can’t be restored/restarted the data is gone! But normally containers can be restarted and continued – in that case, the data is not lost. So, it’s always advisable moreover mandatory to mount the data outside the container.
For instance, the following sequence from the docker docs illustrates how container start-up work. Note that the data is not lost here until the container is removed. Whenever you execute a docker run the command you start a new container with fresh data. The data is based on the image you provide and that data is consistent unless you rebuild the image.
If you are wondering why can’t containers just hold all the data, it is because the containers are designed to be small, run quickly, with all backend storage outside the container. When defined without Docker storage, containers store their data in so-called layers for which they need a storage driver. However, it’s possible to preserve the condition of the container in 3 ways.
Q/A’s asked in sessions are:
Q) What are different Docker Storage types?
Ans: Docker storage distinguishes three storage types. Two types are permanent: Docker volumes and bind Mounts and the third way of writing data is tmpfs. From the container perspective, it doesn’t know what sort of storage is in use.
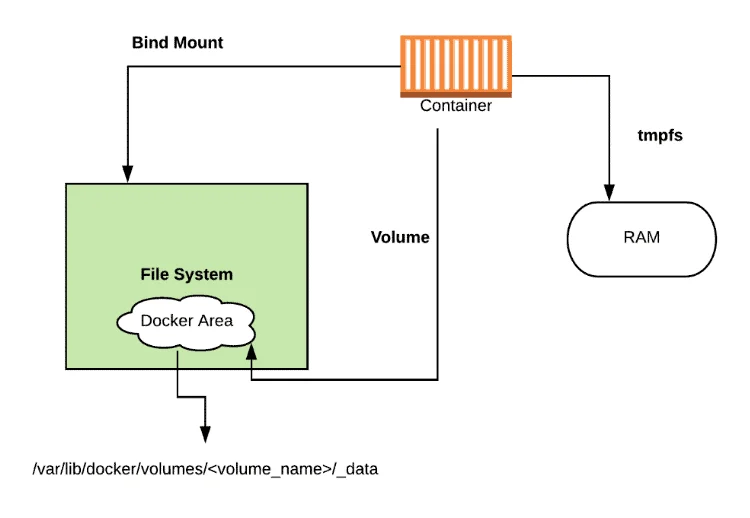
The difference between these is, volumes have a dedicated filesystem on the host (/var/lib/ docker/volumes) and are directly controlled through the Docker CLI. On the other hand, bind mounts use any available host filesystem. Whereas tmfs, uses the host memory.
Q) What is Docker Volume?
Ans: Docker volume is the most commonly used for the permanent storage of container data. Docker volume is managed by Docker itself and has a dedicated filesystem on the host, doesn’t depend upon the filesystem structure on the host. Docker volumes are explicitly managed via the Docker command line and can be created alone or during container initialization. The command used is docker volume create. When stopping or deleting a container, Docker volume remains permanently stored. The volumes are often manually deleted with the docker volume prune command. Multiple containers can be connected to the same Docker volume.
Q) What is Use Cases of Docker Volume?
Ans:
- To share data between multiple containers.
- Backup and restore data.
- Connect to a remote location (cloud).
- Dedicated container-only filesystem
Q) What is Docker Bind Mount?
Ans: Docker bind mount is the second permanent storage option but with more limited options than Docker volume. It can’t be managed via Docker CLI and is totally dependent on the availability of the filesystem of the host. A host filesystem can be created when running a container. Bind mounts are a sort of superset of Volumes (named or unnamed).
Q) What is Use Cases of Bind Mount?
Ans: A good use case for bind mount is linking development folders to a path in the container. Any change in host folder will be reflected in the container. Another use case for bind mount is keeping the application log which is not crucial like a database
Q) What is command to create bind mount?
Ans: bind mount: note that the host path should start with ‘/’. Use $(pwd) for convenience.
$ docker container run -v /host-path:/container-path image-name
Q) What is command to create unnamed volume?
Ans: unnamed volume: creates a folder in the host with an arbitrary name
$ docker container run -v /host-path:/container-path image-name
Q) What is command to create named volume?
Ans: named volume: should not start with ‘/’ as this is reserved for bind mount. ‘volume-name’ is not a full path here. the command will cause a folder to be created with path “/var/lib/docker/volume-name” in the host.
Q) What is tmpfs Mounts ?
Ans: tmpfs is a third storage option that is not permanent like Docker volume or bind mount. The data is written directly on to the host’s memory and deleted when the container is stopped. Very useful when it involves sensitive data that you simply don’t want to be permanent. A really significant difference is that containers can’t share tmpfs space unless they’re running on Linux OS. Two flags are used when creating tmpfs volume: tmpfs and mount. Mount flag is newer and supports multiple options during container startup. Temporary filesystems are written to RAM (or to your swap file if RAM is filling up) and not to the host or the container’s own filesystem layer at Docker.com: Docker tmpfs.
Commands:
$ docker run -d --name tmptest --mount type=tmpfs,destination=/app nginx:latest
$ docker run -d --name tmptest --tmpfs /app nginx:latest
Q) What should I use?
Ans: What you want to use comes mostly down to either preference or your management. If you want to keep everything in the “docker area” (/var/lib/docker) you can use volumes. If you want to keep your own directory-structure, you can use binds. Docker recommends the use of volumes over the use of binds, as volumes are created and managed by docker and binds have a lot more potential of failure (also due to layer 8 problems). If you use binds and want to transfer your containers/applications on another host, you have to rebuild your directory-structure, where as volumes are more uniform on every host.
Q) What is difference between -v and –mount behavior
Ans: If you use -v or –volume to bind-mount a file or directory that does not yet exist on the Docker host, -v creates the endpoint for you. It is always created as a directory. If you use –mount to bind-mount a file or directory that does not yet exist on the Docker host, Docker does not automatically create it for you, but generates an error
Docker Networking
Here we highlighted the importance how docker container and the outside world to communicate with Docker Host. We also touched upon type of networking in Docker.
Q/A’s asked in sessions are:
Q) What is Docker Networking?
Ans: Docker networking enables a user to link a Docker container to as many networks as he/she requires. Docker Networks are used to provide complete isolation for Docker containers. Note: A user can add containers to more than one network.
Q) What is the difference between docker network pruneand docker network rm?
Ans: Docker network prune is used to remove all unused networks and docker network rm is used to remove one or more networks.
Q) What is iptable?
Ans: iptables is a firewall program that is used in containers. It will monitor traffic from and to your server using tables.
Q) Can containers have multiple networks?
Ans: Docker allows you to build different networks and connect containers to one or more of them. Containers can interact with one another across networks but not through networks. A container with network attachments can communicate with any of the containers on any of those networks.
Q) What is the use of the netstat command.
Ans: It is used to display the network status. Using netstat we can display the status of TCP and UDP endpoints in a table format, routing table information, and interface information.
Q) What is a Bridge network?
Ans: A bridge network is a default network created automatically when you deploy a container. Bridge network uses a software bridge that allows containers connected to the same bridge network to communicate. Bridge networks used on containers that are running on the same Docker daemon host. The bridge network creates a private internal isolated network to the host so containers on this network can communicate.
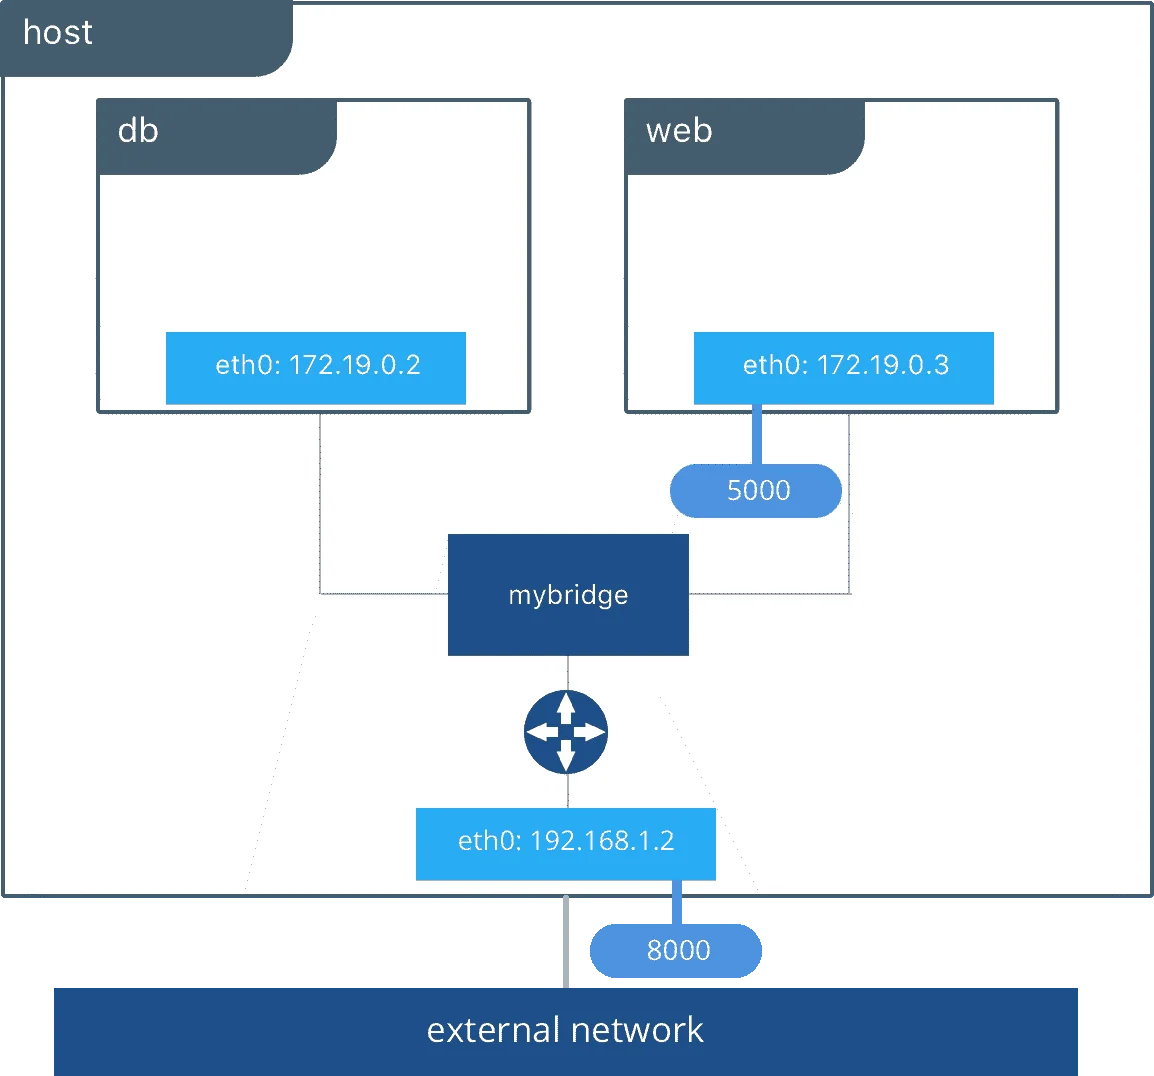
We can create a bridge network using the docker network create command as follows:
$ docker network create –driver bridge bridge_network
When we execute the above command, it returns an id that identified the bridge network we just created. For example, this is shown in the screenshot below.

As seen from the above screenshot, we specify the type of network (bridge in this case indicated by a red circle) in the command. Then command returns the id for the network created (yellow rectangle), indicating successful execution of the command.
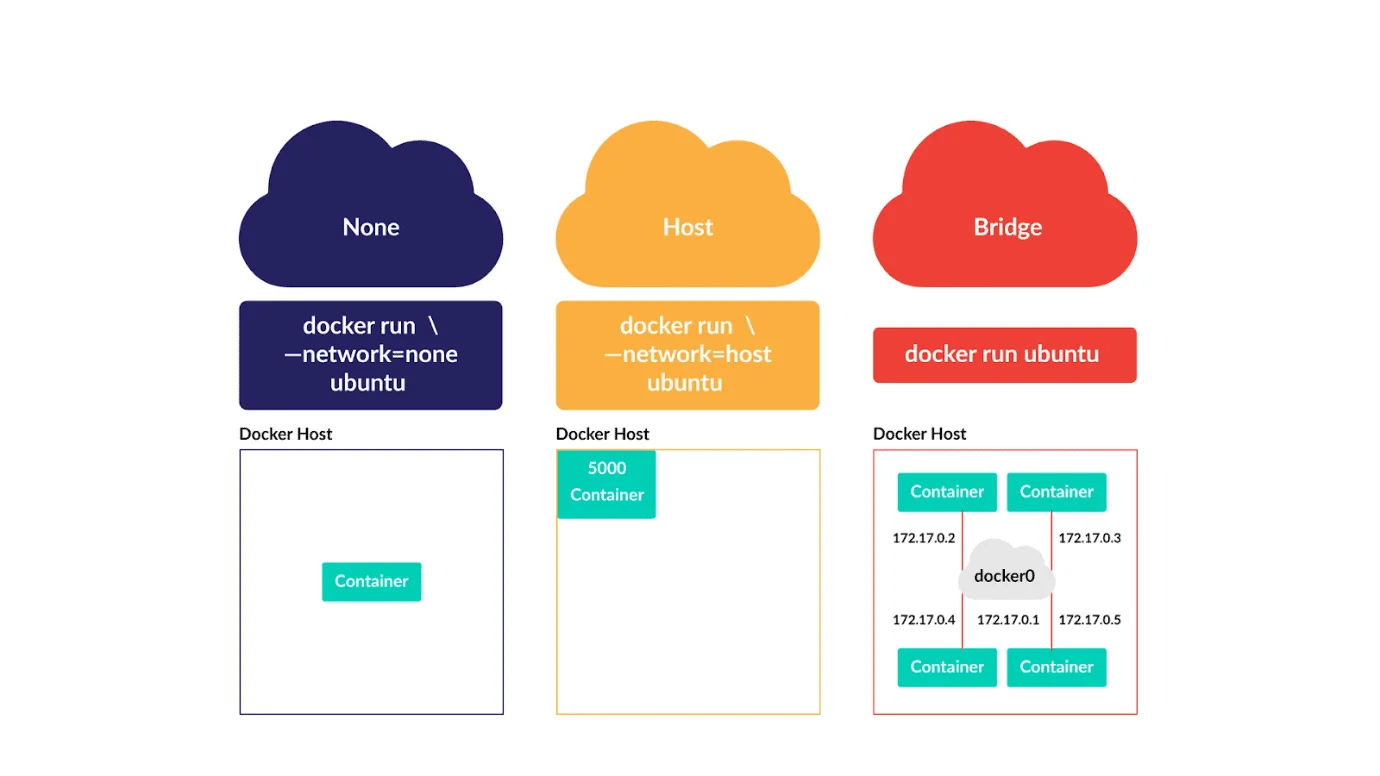
Q) What is Host Networking?
Ans: This takes out any network isolation between the docker host and the docker containers. Host mode networking can be useful to optimize performance. It does not require network address translation (NAT). The Host network driver removes network isolation between Docker host and docker containers.
From the above diagram, we can see that containers can directly use the host’s networking once this isolation is removed. However, we cannot run multiple web containers on the same host or the same port in a host network because now the port is common to all containers in the host network.
Q) What is None Networking?
Ans: In this network driver, the Docker containers will neither have any access to external networks nor will it be able to communicate with other containers. This option is used when a user wants to disable the networking access to a container. In simple terms, None is called a loopback interface, which means it has no external network interfaces.
When the network driver is ‘None‘, the containers are not attached or associated with any network. The containers also do not have access to any other container or external network. The following diagram shows a Docker host with a ‘None‘ network.
So when can we use this type of network? When we want to completely disable the networking stack on a particular container and have a loopback device, we use this ‘None‘ network driver. Note that the ‘None‘ network driver is not available on Swarm devices.
Q) What is Overlay Networking ?
Ans: Overlay networking is used if container on node A wants to talk to node B then to make communication between them we use Overlay networking. Overlay networking uses VXLAN to create an Overlay network. This has the advantage of providing maximum portability across various cloud and on-premises networks. By default, the Overlay network is encrypted with the AES algorithm.
Q) What are advantages of Docker Networking
Ans: Some of the major benefits of using Docker Networking are:
- They share a single operating system and maintain containers in an isolated environment.
- It requires fewer OS instances to run the workload.
- It helps in the fast delivery of software.
- It helps in application portability.
Q) How Does Docker Networking Work?
Ans: For a more in-depth understanding, let’s have a look at how Docker Networking works. Below is a diagrammatic representation of the Docker Networking workflow:
- Docker File builds the Docker Image.
- Docker Image is a template with instructions, which is used to build Docker Containers.
- Docker has its own cloud-based registry called Docker Hub, where users store and distribute container images.
- Docker Container is an executable package of an application and its dependencies together.
Q/A’s on Docker Networking Commands:
Let’s discuss some of the important networking commands that are widely used by the developer teams.
Q) List down the Networks associated with Docker
$ docker network ls
The above command displays all the networks available on the Docker ecosystem
Q) Connect a Running Container to a Network
$ docker network connect multi-host-network container
In the command shown above, You can also use the docker network option to start a container and immediately connect it to multiple host networks.
Q) Specify the IP Address that you want to assign to the Container
$ docker network connect --IP 10.10.36.122 multi-host-network container
In the above command, a user can specify the IP address (for example, 10.10.36.122) that he/she wants to assign to the container interface.
Q) Create a Network alias for a Container
$ docker network connect --alias db --alias mysql multi-host-network container2
In the above command, we have specified Aliases to define new commands and to rectify incorrect input
Q) Disconnect a Container from a Network
$ docker network disconnect multi-host-network container1
In the above command, the disconnect option is used to stop the running docker containers on multiple host network
Q) Remove a Network
$ docker network rm network_name
In the above command, the rm option is used to remove a network from the Docker ecosystem
Q) Remove Multiple Network
$ docker network rm 3695c422697f network_name
The above command can be used when a user wants to remove multiple networks at a time
Q) Remove all Unused Networks
$ docker network prune
The above ‘prune’ command can be used when a user wants to remove all unused networks at a time
Q) Inspecting a Docker network
$ docker network inspect networkname
networkname − This is the name of the network you need to inspect.
Now let’s run a container and see what happens when we inspect the network again. Let’s spin up an Ubuntu container with the following command −
$ sudo docker run –it ubuntu:latest /bin/bash
Now if we inspect our network name via the following command, you will now see that the container is attached to the bridge.
$ sudo docker network inspect bridge
Q) Creating Your Own New Network
One can create a network in Docker before launching containers. This can be done with the following command −
$ docker network create –-driver drivername name
Options
- drivername− This is the name used for the network driver.
- name− This is the name given to the network.
Return Value: The command will output the long ID for the new network.
$ sudo docker network create –-driver bridge new_nw
You can now attach the new network when launching the container. So let’s spin up an Ubuntu container with the following command −
$ sudo docker run –it –network=new_nw ubuntu:latest /bin/bash
And now when you inspect the network via the following command, you will see the container attached to the network.
$ sudo docker network inspect new_nw
Q) Obtaining container ports: You can get the container’s port using the port command:
$ docker port cotainer_name/id
Related Post
- Kubernetes for Beginners
- How To Setup A Three Node Kubernetes Cluster For CKA: Step By Step
- Check out and Subscribe to our YouTube channel on “Docker & Kubernetes.”
- Certified Kubernetes Administrator (CKA) Certification Exam
- Certified Kubernetes Administrator (CKA) Certification: Step By Step Activity Guides/Hands-On Lab Exercise
Next Task For You
Discover the Power of Kubernetes, Docker & DevOps – Join Our Free Masterclass. Unlock the secrets of Kubernetes, Docker, and DevOps in our exclusive, no-cost masterclass. Take the first step towards building highly sought-after skills and securing lucrative job opportunities. Click on the below image to Register Our FREE Masterclass Now!


![AWS DevOps [DOP-C02] Professional Step By Step Activity Guides (Hands-On Labs)](https://k21academy.com/wp-content/uploads/2023/02/DOP-C02-1.png)