

![]()
We are back again with some quick tips, including Q/A and blog posts on the topics covered in the Day 9 Live sessions, which will help you clear Kubernetes Certifications [CKA/D] and get a better-paid job in the field of Microservices, Containers, DevOps & Kubernetes.
Cluster Node Maintenance
If any node is facing any performance issue or needs to apply kernel upgrade that required some node downtime then we can drain a node, which indicates that all of the pods have been safely evicted and scheduled to another node, and the node is marked as unschedulable.
In Kubernetes, while performing a Maintenance activity, sometimes it is needed to remove a k8s node from the service. To do this, one can DRAIN the node. In this process containers running on the node(to be drained) will be gracefully terminated(& potentially rescheduled on another node).
Draining can be performed on a Control Plane node as well as a worker node.
Command to Drain a Kubernetes node:
kubectl drain <node-name> — ignore-daemonsets
’ignore-daemonsets’ is used because there may be some daemonset pods that are tied to the node, so the user may want to ignore them while executing the draining.
Uncordoning: After the Draining process is completed & all the Maintenance tasks are done, the user may want to run containers on that node once again. That’s where Uncordoning comes into play. Uncordoning means that the Node is ready to run the pods once again.

Here you will find recipes that deal with both app-level and cluster-level maintenance. We cover various aspects of troubleshooting, from debugging pods and containers to testing service connectivity, interpreting a resource’s status, and node maintenance.
Q) How to enable Autocomplete for kubectl?
Ans: It is cumbersome to type full commands and arguments for the kubectl command, so you want an autocomplete function for it.
Enable autocompletion for kubectl. For Linux and the bash shell, you can enable kubectl auto-completion in your current shell using the following command:
$ source <(kubectl completion bash)
Q) You have an internal service that is causing you trouble and you want to test that it is working well locally without exposing the service externally.
Ans. Use a local proxy to the Kubernetes API server with kubectl proxy. Let’s assume that you have created a deployment and a service as described in Removing a Pod from a Service. You should see an Nginx service when you list the services:
$ kubectl get svc
NAME         TYPE        CLUSTER-IP     EXTERNAL-IP   PORT(S)   AGE
nginx        ClusterIP   10.109.24.56   <none>        80/TCP    22h
This service is not reachable outside the Kubernetes cluster. However, you can run a proxy in a separate terminal and then reach it on localhost. Start by running the proxy in a separate terminal:
$ kubectl proxy
Starting to serve on 127.0.0.1:8001
Backup And Restore Etcd In Kubernetes
Etcd is a consistent and highly available key-value store used as Kubernetes’ backing store for all cluster data. If your Kubernetes cluster uses etcd as its backing store, make sure you have a backup plan for those data.
All Kubernetes objects are stored on etcd. Periodically backing up the etcd cluster data is important to recover Kubernetes clusters under disaster scenarios, such as losing all control plane nodes. The snapshot file contains all the Kubernetes states and critical information. In order to keep the sensitive Kubernetes data safe, encrypt the snapshot files.
Backing up your Kubernetes cluster data by backing up etcd is of crucial importance. etcd is the backend storage solution for the deployed Kubernetes cluster. All the K8s objects, applications & configurations are stored in etcd.
- Backing up ‘etcd’ data is done using etcd command-line tool: etcdctl
ETCDCTL_API=3 etcdctl --endpoints $ENDPOINT snapshot save <filename>
- Restoring etcd can be done from a backup using the etcdctl snapshot restore command:
ETCDCTL_API=3 etcdctl snapshot restore <filename>
The steps are as follows:
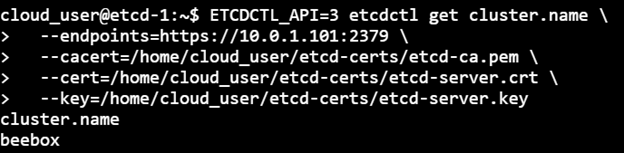
1) Execute the etcdctl command to check the Cluster name. Lookup for the cluster.name in the etcd cluster:
ETCDCTL_API=3 etcdctl get cluster.name \
> --endpoints=https://10.0.1.101:2379 \
> --cacert=/home/cloud_user/etcd-certs/etcd-ca.pem \
> --cert=/home/cloud_user/etcd-certs/etcd-server.crt \
> --key=/home/cloud_user/etcd-certs/etcd-server.key
What does each mean:
- endpoint -> instructing etcdctl how to reach out to etcd serve
- cacert -> public certificate for certificate authority
- cert -> the client certificate
- key -> certificate key
2) Snapshot save will save the backup with the name supplied as an argument:
ETCDCTL_API=3 etcdctl snapshot save /home/cloud_user/etcd_backup.db \
> --endpoints=https://10.0.1.101:2379 \
> --cacert=/home/cloud_user/etcd-certs/etcd-ca.pem \
> --cert=/home/cloud_user/etcd-certs/etcd-server.crt \
> --key=/home/cloud_user/etcd-certs/etcd-server.key

3) Now, stop etcd, Delete etcd data dir. Reset etcd by removing all the existing etcd data:

4) Snapshot restore on the etcd data will restore the data back as a temporary etcd cluster. This command will spinup a temp etcd cluster, saving the data from the backup file to a new data dir in the same location where the previous data dir was:
sudo ETCDCTL_API=3 etcdctl snapshot restore /home/cloud_user/etcd_backup.db \
> --initial-cluster etcd-restore=https://10.0.1.101:2380 \
> --initial-advertise-peer-urls https://10.0.1.101:2380 \
> --name etcd-restore \ > --data-dir /var/lib/etcd

5) Since I executed the operation as Root, I will have to make etcd as the user. Set ownership on the new directory & start etcd:
sudo chown -R etcd:etcd /var/lib/etcd
sudo systemctl start etcd
6) Verify the restored data by looking up the value for the key cluster.name again:
ETCDCTL_API=3 etcdctl get cluster.name \
> --endpoints=https://10.0.1.101:2379 \
> --cacert=/home/cloud_user/etcd-certs/etcd-ca.pem \
> --cert=/home/cloud_user/etcd-certs/etcd-server.crt \
> --key=/home/cloud_user/etcd-certs/etcd-server.key cluster.name beebox
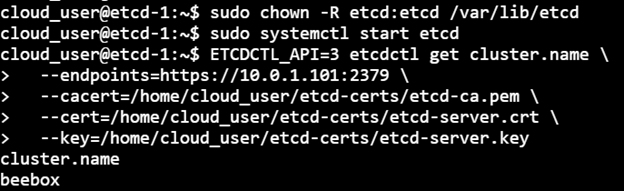
At this point, this can be said that our etcd database is properly restored.
Also Check: Our blog post on Kubernetes Statefulset.
Upgrade Kubernetes Cluster [Master & Worker Nodes]
To upgrade a Kubernetes cluster is very important to keep up with the latest security features and bug fixes, as well as benefit from new features being released on an ongoing basis. This is especially important when we have installed a really outdated version or if we want to automate the process and always be on top of the latest supported version.
Here, we demonstrate Draining & Uncordoning by upgrading the kubeadm, kubectl & kubelet on the Control Plane node & Worker node in our Kubernetes set up one by one:
Control Plane Upgrade Steps:
a) Upgrade kubeadm on the Control Plane node
b) Drain the Control Plane node
c) Plan the upgrade (kubeadm upgrade plan)
d) Apply the upgrade (kubeadm upgrade apply)
e) Upgrade kubelet & kubectl on the control Plane node
f) Uncordon the Control Plane node
Worker Node Upgrade Steps:
a) Drain the node
b) Upgrade kubeadm on the node
c) Upgrade the kubelet configuration (kubeadm upgrade node)
d) Upgrade kubelet & kubectl
e) Uncordon the node
Starting with the Control node, the following is the configuration:
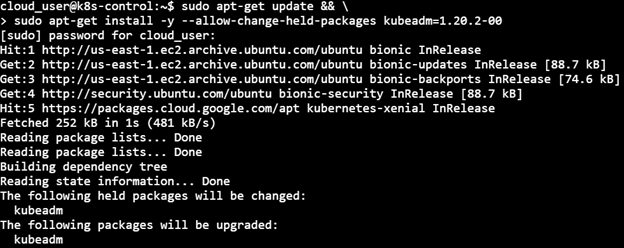
1) Upgrade kubeadm
sudo apt-get update && \
> sudo apt-get install -y — allow-change-held-packages kubelet=1.20.2–00 kubectl=1.20.2–00

2) Drain the Control node
kubectl drain k8s-control --ignore-daemonsets

3) Plan the upgrade
sudo kubeadm upgrade plan v1.20.2

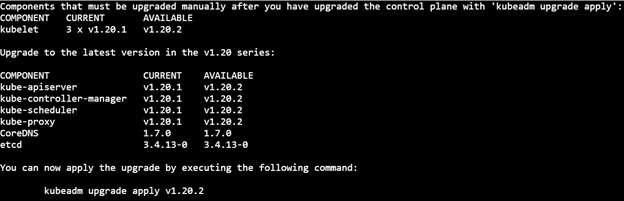
4) Apply the upgrade
sudo kubeadm upgrade apply v1.20.2


5) Upgrade kubelet & kubectl
sudo apt-get install -y --allow-change-held-packages kubelet=1.20.2-00 kubectl=1.20.2-00

6) Uncordon the node
Note: It may be possible that the upgrade may change the kubelet unit file, so daemon-reload is executed in order that systemctl sees the new kubelet unit file. Next restart the kubelet
sudo systemctl daemon-reload
sudo systemctl restart kubelet
kubectl uncordon k8s-control

Finally, the latest version of the components of the Control node can be checked on executing ‘kubectl get nodes’:

Steps for the Worker node:
1) Drain the Worker node (from the Control node console)
kubectl drain k8s-worker1 --ignore-daemonsets --force

2) Upgrade kubeadm
sudo apt-get update && \
> sudo apt-get install -y --allow-change-held-packages kubeadm=1.20.2-00


3) Upgrade the kubelet configuration
sudo kubeadm upgrade node

4) Upgrade kubelet & kubectl
sudo apt-get update && \
> sudo apt-get install -y --allow-change-held-packages kubelet=1.20.2-00 kubectl=1.20.2-00

5) Restart kubelet & Uncordon the Worker node
sudo systemctl daemon-reload
sudo systemctl restart kubelet

6) Uncordon the Worker node (from the control node console)
kubectl uncordon k8s-worker1
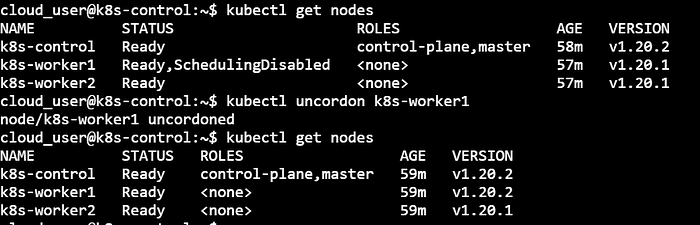
Till this point, our Kubernetes setup has a Control plane node & Worker node-1 in an upgraded and functional state. The same set of steps will be followed for Worker node-2 to have it in the upgraded state.
Quiz Time (Sample Exam Questions)!
With the CKA training program, we will cover 100+ sample exam questions to help you prepare for CKA certification. Check out the questions and see if you can solve this.
Ques) What is the command-line tool for backing up ‘etcd’ data?
A. systemctl
B. etcdctl
C. kubectl
D. None of the above
Comment down your answers.
The correct answer will reveal in next week’s blog.
Ques) Which of the below are part of the Helm Package?
A. Chart
B. Repository
C. Release
D. All of the above
Feedback
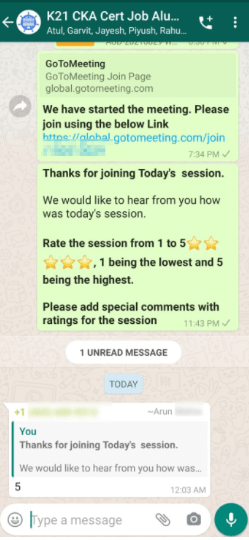
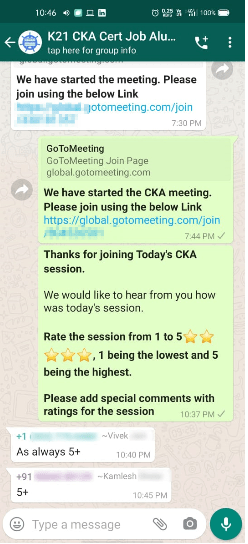
We always work on improving and being the best version of ourselves from the previous session hence constantly ask feedback from our attendees. Here’s the feedback that we received from our trainees who had attended the session…
Related Post
- [Recap] Day 7 – K8s Security, RBAC, Kube-Config, Admission Controller, Network Policies
- How To Setup A Three Node Kubernetes Cluster For CKA: Step By Step
- CKA Certification Exam (Certified Kubernetes Administrator)
- Multi Container Pods In Kubernetes
- Kubernetes Architecture: An Introduction to Kubernetes Components
- Kubernetes Ingress Controller Examples with Best Option
Join FREE Class
Begin your journey towards becoming a Certified Kubernetes Administrator [CKA] from our Certified Kubernetes Administrator (CKA) training program. To know about the Roles and Responsibilities of a Kubernetes administrator, why learn Docker and Kubernetes, Job opportunities for Kubernetes administrator in the market, Hands-On labs you must perform to clear the Certified Kubernetes Administrator (CKA) Certification exam by registering for our FREE class.


![Microsoft Certified Operationalizing Machine Learning and Generative AI Solutions [AI-300] Exam Guide](https://k21academy.com/wp-content/uploads/2026/04/How-to-prepare-for-AI-300-certification-1.png)