![]()
This blog provides a basic overview of Azure Pipelines integration with ServiceNow change management to enhance collaboration between development and IT teams.
The technologies that are covered in this blog are a part of the Azure DevOps environment. If it’s something in which you have an interest or you want to learn, then you can visit our previous blog to know more about the [AZ-400] Microsoft Azure DevOps certification.
In this blog we will be covering:
- Configure the ServiceNow instance
- Set up the Azure DevOps organization
- Configure a release pipeline
- Add a task to update the change request
- Running an Azure release
By including change management in CI/CD pipelines, teams can reduce the risks associated with changes and follow service management methodologies such as ITIL, while gaining all DevOps benefits from Azure Pipelines.
ServiceNow is a software-as-a-service (SaaS) provider of IT service management (ITSM) software, including change management. Specific change management subprocesses include change risk assessment, change schedule, change approvals, and oversight. With change management, your organization can reduce the risks associated with change, while speeding up the deployments with Azure Pipelines.

Configure The ServiceNow Instance
Step 1: Install the Azure Pipelines application on your ServiceNow instance, we require credentials to complete the installation.
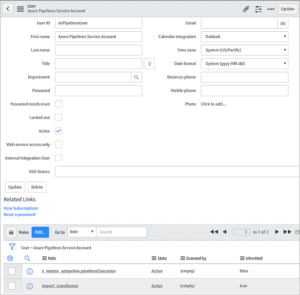
Step 2: Create a new user in ServiceNow and grant them x_mioms_azpipeline.pipelinesExecution role.
Set Up The Azure DevOps Organization
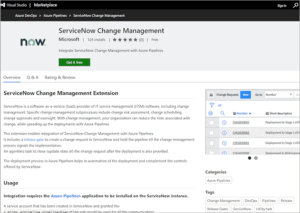
Step 1: Install the ServiceNow Change Management extension on your Azure DevOps organization.
Step 2: This extension enables the integration of ServiceNow Change Management with Azure Pipelines. Follow the instructions to “Get it Free”
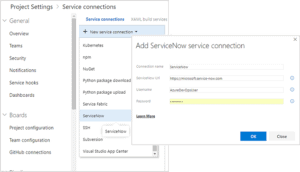
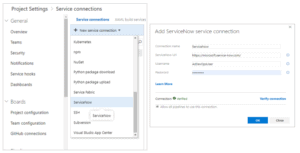
Step 3: Create a new ServiceNow service connection in the Azure DevOps project used for managing your releases. Enter the user name and password for the service account created in ServiceNow.
Also Check: Our blog post on Veracode. Click here
Basic Authentication
This needs a service account (user) to be created in ServiceNow. Provide username and password for the service account configured for basic auth.
Use Verify connection before using it in the gate or task.
OAuth2 Authentication
In addition to granting a role to a user in ServiceNow, Azure DevOps should be registered in ServiceNow as an OAuth app.
Register your OAuth configuration in Azure DevOps Services
Step 1: Sign in to Azure DevOps Services.
Step 2: Add OAuth configuration from Organization settings>Oauth configurations

Create an OAuth configuration using the OAuth application details obtained while registering Azure DevOps as an OAuth app in ServiceNow.
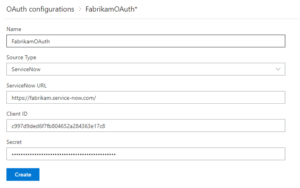
Create OAuth service connection for ServiceNow
Use the OAuth configuration created above and provide the ServiceNow instance Url.
Check Out: What is Ansible? Click here
Configure A Release Pipeline
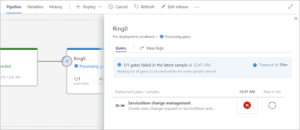
Step 1: In your release pipeline, add a pre-deployment gate for ServiceNow Change Management.
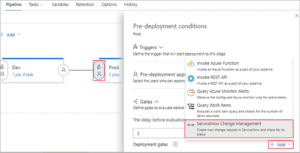
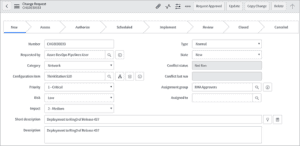
Step 2: Select the ServiceNow service connection you created earlier and enter the values for the properties of the change request.
Gate can be configured to create a new change request for every run of the pipeline or use an existing request. Inputs provided in the gate are used as properties for the new change request in ServiceNow, if applicable.
Inputs for Gate:
- ServiceNow connection: Connection to the ServiceNow instance used for change management.
- Action: Gate on status of new change request or an existing change request.
- Change type: Type of the change request.
- Standard change template: Change the template name for the change request.
- Short description: A summary of the change.
- Change query criteria: Criteria for querying change requests. Must uniquely identify the change request. Gate would fail if multiple matching change requests are found.
- Query string/Change request number: Change request to use.
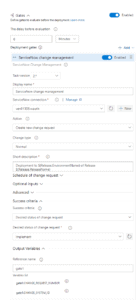
Additional properties can be set in the created change request using the following inputs. Note: Available inputs change based on the selected change type.
- Description: A detailed description of the change.
- Category: The category of the change eg. Hardware, Network, Software.
- Priority: Priority of the change.
- Risk: The risk level for the change.
- Impact: The effect that the change has on business.
- Configuration Item: Configuration item (CI) that the change applies to.
- Assignment group: The group that the change is assigned to.
- Schedule of change request: Schedule of the change as honored by the ServiceNow workflow. Date and time should be in UTC and format should be
yyyy-MM-ddTHH:mm:ssZ. eg. 2018-01-31T07:56:59Z. - Additional change request parameters: Additional properties of the change request to set. Name must be field name (not label) prefixed with ‘u_’
eg. u_backout_plan. Value must be a valid, accepted value in ServiceNow. Invalid entries are ignored.
Gate Success Criteria :
- Desired state of change request: The gate would succeed and the pipeline continues when the change request status is same as the provided value.
- Advanced: Specifies an expression that controls when this gate should succeed. The change request is captured as
root['result']in the response from ServiceNow. Example –and(eq(root['result'].state, 'New'),eq(root['result'].risk, 'Low')). Learn more.
Gate Output Variables :
ServiceNow gate produces output variables. You must specify the reference name to be able to use these output variables in the deployment workflow. Gate variables can be accessed by using "PREDEPLOYGATE" as a prefix in an agentless job in the workflow. For eg. when the reference name is set to ‘gate1’, then the change number can be obtained as $(PREDEPLOYGATE.gate1.CHANGE_REQUEST_NUMBER).
- CHANGE_REQUEST_NUMBER: Number of the change request.
- CHANGE_SYSTEM_ID: Sys Id of the change request.
Add A Task To Update The Change Request
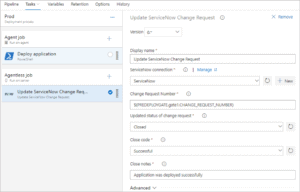
Inputs for Update change request task:
- ServiceNow connection: Connection to the ServiceNow instance used for change management.
- Change request number: Number of the change request to update.
- Update status: Select this option to update the status of the change request.
- Updated status of change request : Status to set for the change request. This input is available if
Update statusis selected. - Close code and notes: Closure information for the change request.
- Work notes: Work notes for the change request.
- Additional change request parameters: Additional properties of the change request to set.
The update task would fail if none of the fields in the change request are updated during the execution of the task. ServiceNow ignores invalid fields and values passed to the task.
Also Read: Our blog post on Azure DevOps Environment Setup. Click here
Running An Azure Release
Step 1: Create a new release from the configured release pipeline in Azure DevOps
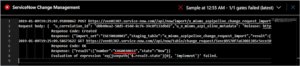
Step 2: After completing the Dev stage, the pipeline creates a new change request in ServiceNow for the release and waits for it to reach the desired state.
Step 3: The values defined as gate parameters will be used. You can get the change number that was created from the logs.
Step 4: The ServiceNow change owner will see the release in the queue as a new change.
Step 5: The release that caused the change to be requested can be tracked from the Azure DevOps Pipeline metadata section of the change.

Step 6: The change goes through its normal life cycle: Approval, Scheduled, and more until it is ready for implementation.
Step 7: When the change is ready for implementation (it is in the Implement state), the release in Azure DevOps proceeds. The gates status will be as shown here:
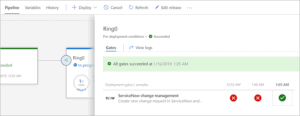
After the deployment, the change request is closed automatically.
Related/References
- [AZ-400] Microsoft Azure DevOps Certification Exam: Everything You Need To Know
- [AZ-400] Azure DevOps Certification Path
- [AZ-400] Azure DevOps Services for Beginners
- [AZ-400] Designing and Implementing Microsoft DevOps Solutions [Official Page]
- SonarCloud Azure DevOps | Integrating SonarCloud In Azure
- Veracode – SourceClear SCA Analysis
- [AZ-400] Monitor Azure With Grafana
- ServiceNow Integration With Azure DevOps
- Veracode Source Code Analysis
- Rugged DevOps & DevSecOps
Next Task For You
Begin your journey toward Mastering Azure Cloud and landing high-paying jobs. Just click on the register now button on the below image to register for a Free Class on Mastering Azure Cloud: How to Build In-Demand Skills and Land High-Paying Jobs. This class will help you understand better, so you can choose the right career path and get a higher paying job.


I have read this blog, it is very nice and useful. I learned many new things which i didn’t heard about ever before.
Hi Dettifoss,
We are glad that you liked our blog!
Please stay tuned for more blogs
Thanks & Regards
Rahul Dangayach
Team K21 Academy
Hi Nice job on a very detailed blog ! is there corresponding steps for the YAML pipeline as well that you are able to share especially the part about updating the created change request i.e. how to get the value from the environment check?
How to add approval’s mail id or assign for approval?
How to define roll back plan,verfiication plan,risk?
what is desired change request?
how to change desired change request auto or manually?
Nice article, it’s helpful..:)
Hi Thiyagi,
We are Glad you liked the post, stay tuned for more informative blogs.
Regards,
Rahul Dangayach
Team K21 Academy
Thank you for sharing another interesting blog post. I found the information to be very helpful, and I appreciate the opportunity to share my thoughts on the topic. I would like to commend you on your efforts, and I look forward to reading your next blog post.