

![]()
I am going to cover everything you must know about Transfer Azure AD Connect to another Server which is an important topic for the Microsoft Azure Administrator.
In this Blog, we are going to cover:
- Transfer Azure AD Connect to a New Server
- Import and export Azure AD Connect configuration settings
- Export Azure AD Connect settings
- Import Azure AD Connect settings
- Import installation experience
- Migrate settings from an existing server
- Migration process
- Post-installation verification
- FAQ’s
Transfer Azure AD Connect to a New Server

Azure AD Connect is the sync tool used to synchronise Active Directory accounts with the Office 365 environment (AAD Connect).
For whatever reason (for example, an infrastructure upgrade plan), you may need to migrate the server that has the Azure AD Connect tool installed to a new one.
To avoid potential synchronisation issues during server replacement, the Azure AD Connect tool must be migrated using the correct steps.
Import and export Azure AD Connect configuration settings
Azure Active Directory (Azure AD) Connect deployments range from a single forest Express mode installation to complex deployments that use custom synchronisation rules to synchronise across multiple forests. Because of the large number of configuration options and mechanisms, understanding what settings are in effect and being able to quickly deploy a server with an identical configuration is critical. This feature adds the ability to catalogue a synchronisation server’s configuration and import the settings into a new deployment. Snapshots of different synchronisation settings can be compared to easily see the differences between two servers or the same server over time. Transfer azure AD connect
When the configuration in the Azure AD Connect wizard is changed, a new time-stamped JSON settings file is automatically exported to %ProgramData%AADConnect. The settings file name is of the form Applied-Synchronization Policy-*.JSON, with a time stamp at the end.
To download the complete AZ-104 Azure Admin Sample Questions guide click here.
Export Azure AD Connect settings
To see a summary of your configuration settings, launch the Azure AD Connect tool and select the View or Export Current Configuration task. A quick summary of your settings is displayed, along with the option to export your server’s full configuration.
The settings are exported to %ProgramData%AADConnect by default. You can also choose to save the settings to a secure location to ensure their availability in the event of a disaster. To ensure logical consistency, settings are exported using the JSON file format and should not be hand-created or edited. Importing a manually created or edited file is not supported and may result in unexpected results.
Import Azure AD Connect settings
To import previously exported settings, follow these steps:
- Create a new server and install Azure AD Connect.
- Following the Welcome page, click the Customize button.
- Select Import synchronisation settings. Look for the previously exported JSON settings file.
- Select Install.


Import installation experience
The import installation experience is purposefully kept simple, with minimal user input, to allow for easy replication of an existing server.
The following are the only changes that can be made during the installation process. All other changes can be made after the Azure AD Connect wizard has been installed:
- Azure Active Directory credentials: The Azure Global Administrator account name used to configure the original server is suggested by default. If you want to synchronise data to a new directory, you must change it.
- User sign-in: By default, the sign-on options configured for your original server are selected, and you will be prompted for credentials or other information required during configuration. To avoid changing the behaviour of the active server, it may be necessary in rare cases to set up a server with different options. Otherwise, click Next to keep the current settings.Transfer azure AD connect
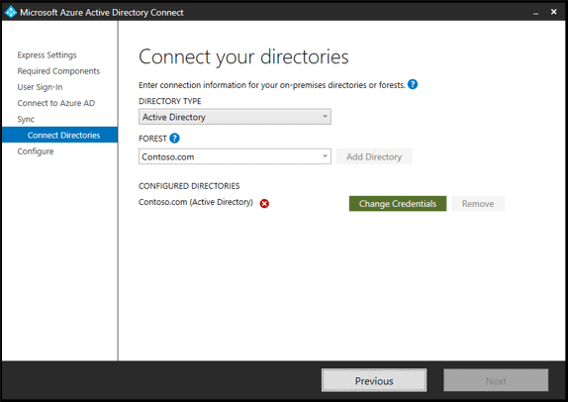
- On-premises directory credentials: You must provide credentials to create a synchronisation account or supply a pre-created custom synchronisation account for each on-premises directory included in your synchronisation settings. With the exception that you cannot add or remove directories, this procedure is identical to the clean install experience.
- Configuration options: As with a clean install, you can configure the initial settings for whether automatic synchronisation begins or Staging mode is enabled. The main distinction is that Staging mode is enabled by default to allow comparison of configuration and synchronisation results prior to actively exporting the results to Azure.
Migrate settings from an existing server
If an existing server does not support settings management, you have the option of upgrading it in place or migrating the settings to a new staging server.
Running a PowerShell script that extracts the existing settings for use in a new installation is required for migration. Use this method to catalogue your existing server’s settings and then apply them to a newly installed staging server. When the settings for the original server are compared to the settings for a newly created server, the differences between the servers are quickly visible. Always adhere to your organization’s certification process to ensure that no additional configuration is required.
Migration process
To migrate the settings:
- Start AzureADConnect.msi on the new staging server and exit at the Azure AD Connect Welcome page.
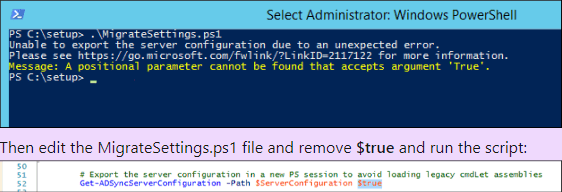
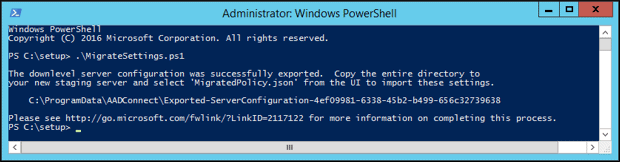
- MigrateSettings.ps1 from the Microsoft Azure AD ConnectTools directory to an existing server location. C:setup is an example, where setup is a directory created on the existing server.

Note: If you see a message: “A positional parameter cannot be found that accepts argument True.”, as below:

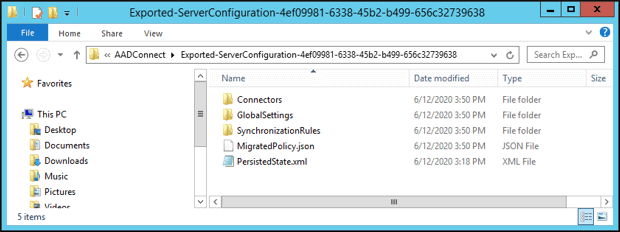
- Run the script and save the entire down-level server configuration directory as shown. This directory should be copied to the new staging server. The entire Exported-Server Configuration-* folder must be copied to the new server.


- Start Azure AD Connect by double-clicking the desktop icon. Accept the Microsoft Software License Terms, then click Customize on the next page.
- Check the Import synchronisation settings option. Navigate to the copied-over Exported-ServerConfiguration-* folder by selecting Browse. To import the migrated settings, navigate to MigratedPolicy.json.


Post-installation verification
Comparing the imported settings file to the exported settings file of the newly deployed server is an important step in understanding any differences between the intended and resulting deployments. Using your preferred side-by-side text comparison application results in an instant visualisation that quickly highlights any desired or unintended changes. Transfer Azure AD connect
While many previously manual configuration steps have been removed, you should still adhere to your organization’s certification process to ensure no additional configuration is required. This configuration may occur if you use advanced settings, which are not currently captured in the settings management release.
The following are known limitations:
- Synchronization rules: To avoid conflicts with Microsoft’s standard rules, the precedence for a custom rule must be in the reserved range of 0 to 99. If you place a custom rule outside the reserved range, it may be shifted around as standard rules are added to the configuration. A similar problem will arise if your configuration includes modified standard rules. It is not recommended to change a standard rule, and rule placement is likely to be incorrect.
- Device writeback: These options are saved. They are not currently used in the configuration. If you enabled device writeback on your original server, you must manually configure the feature on the newly deployed server.
- Synchronized object types: Although the Synchronization Service Manager can be used to limit the list of synchronised object types (such as users, contacts, and groups), this feature is not currently supported via synchronisation settings. You must manually reapply the advanced configuration after completing the installation.
- Custom run profiles: Although the Synchronization Service Manager allows you to change the default set of run profiles, this feature is not currently supported via synchronisation settings. You must manually reapply the advanced configuration after completing the installation.
- Configuring the provisioning hierarchy: Synchronization settings do not support this advanced feature of the Synchronization Service Manager. After you finish the initial deployment, you must manually reconfigure it.
- Active Directory Federation Services (AD FS) and PingFederate authentication: The sign-on methods associated with these authentication features are automatically pre-selected. All other configuration parameters must be supplied interactively.
- A disabled custom synchronisation rule is imported with the status enabled: A disabled custom synchronisation rule is imported with the status enabled. Make sure to turn it off on the new server as well.
FAQ’s
Q1. Can you have 2 Azure AD Connect servers?
Ans. Except for a staging server, having multiple Azure AD Connect sync servers connected to the same Azure AD tenant is not supported. Even if these servers are configured to synchronise with a mutually exclusive set of objects, it is not supported. Transfer azure AD connect
Q2. How do I export Azure AD Connect config?
Ans. To see a summary of your configuration settings, launch the Azure AD Connect tool and select the View or Export Current Configuration task. A quick summary of your settings is displayed, along with the option to export your server’s full configuration.
Q3. How do I export Active Directory from Azure?
Ans. Log in with a user admin or global admin account to the Azure AD portal. Select the box next to the users you want to export in Azure Active Directory Users. In the top-right corner of the page, click Download users. Click Start in the window that appears to export the list of users as a CSV file.
Q4. Can Azure AD Connect be installed on the domain controller?
Ans. Azure AD Connect should ideally be installed on a separate domain-joined server, but it can also be installed on your domain controller (Windows Server 2016 or later with Desktop Experience is required for Azure AD Connect V2)
Q5. How do I export sync rules ad connect?
Ans. Open the Synchronization Rules Editor on your active server to copy custom synchronisation rules. Choose a custom rule. Select Export.
Q6. How many instances of Azure AD Connect are needed?
Ans. One Azure AD Connect sync server installation is required for each Azure AD directory.
Q7. Can you have multiple ad connect?
Ans. Except for a staging server, connecting multiple Azure AD Connect sync servers to the same Azure AD tenant is not supported. Even if these servers are configured to synchronise with a mutually exclusive set of objects, it is unsupported.
Q8. What is Metaverse in Azure AD connect?
Ans.The metaverse is a storage area that contains aggregated identity information from multiple connected data sources, allowing for a unified global and integrated view of all combined objects.
References/Related
- [AZ-104] Microsoft Azure Administrator Certification Exam: Everything You Need To Know
- Microsoft Azure AD Connect
- Virtual Networks In Microsoft Azure: VNet Peering, ExpressRoute, VPN Gateway
- Azure ExpressRoute Vs Azure VPN Gateway
- Microsoft Azure VNet Peering (Microsoft Official)
- [AZ-104] Roles And Responsibilities Of A Microsoft Azure Administrator
- [AZ-104] Region, Availability Zone, Availability Sets and Fault Domain,Update Domain In Microsoft Azure
Next Task For You
Begin your journey toward Mastering Azure Cloud and landing high-paying jobs. Just click on the register now button on the below image to register for a Free Class on Mastering Azure Cloud: How to Build In-Demand Skills and Land High-Paying Jobs. This class will help you understand better, so you can choose the right career path and get a higher paying job.


![AWS DevOps [DOP-C02] Professional Step By Step Activity Guides (Hands-On Labs)](https://k21academy.com/wp-content/uploads/2023/02/DOP-C02-1.png)