![]()
Microsoft Azure is a predominant public cloud environment in use by businesses today and is a great place to store backups and replicate virtual machines. You can protect your data by taking backups at regular intervals. The following sections provide a detailed illustration of how to do it using the Azure Portal.
In this blog post, we are going to cover Step-by-Step on how to configure Azure Backup and Restore the files of a Windows Azure Virtual Machine.
What is Azure Backup?
In the simplest of explanations, Azure Backup is a service that allows you to back up your data to the Microsoft Azure Cloud. This includes both on-premises VMs and Azure VMs. Azure Backup is a service that can supplement existing backup solutions or replace existing solutions altogether.

Azure Storage for Backup
Azure Backup leverages Azure Recovery Services vaults for storing your backed-up data. These vaults are essentially storage entities within Azure that hold information for disaster recovery, including backups of your resources.
Here’s a breakdown of Azure backup storage:
-
Centralized Storage: Recovery Services vaults provide a central location to store backups of various Azure resources, including VMs, databases, and file shares. This simplifies managing and monitoring your backups.
-
Scalable Storage: Azure Backup scales automatically based on your storage needs. You only pay for the storage you consume, making it cost-effective.
-
Storage Options: Recovery Services vaults offer different storage replication options to ensure your data’s availability:
-
Locally Redundant Storage (LRS): Replicates your data three times within the same datacenter for protection against local hardware failures. This is a cost-efficient option.
-
Geo-Redundant Storage (GRS): (default and recommended) replicates your data to a secondary datacenter in a different region, ensuring high availability even during regional outages.
-
-
Long-Term Retention: Recovery Services vaults allow you to retain backups for up to 10 years, facilitating disaster recovery from older points in time.
Create a Backup of a VM
Create a simple scheduled daily backup to a Recovery Services Vault.
1. Sign in to the Azure portal.
2. In the menu on the left, select Virtual machines.
3. From the list, select a VM to back up.
4. On the VM blade, in the Operations section, click Backup. The Enable backup blade opens.
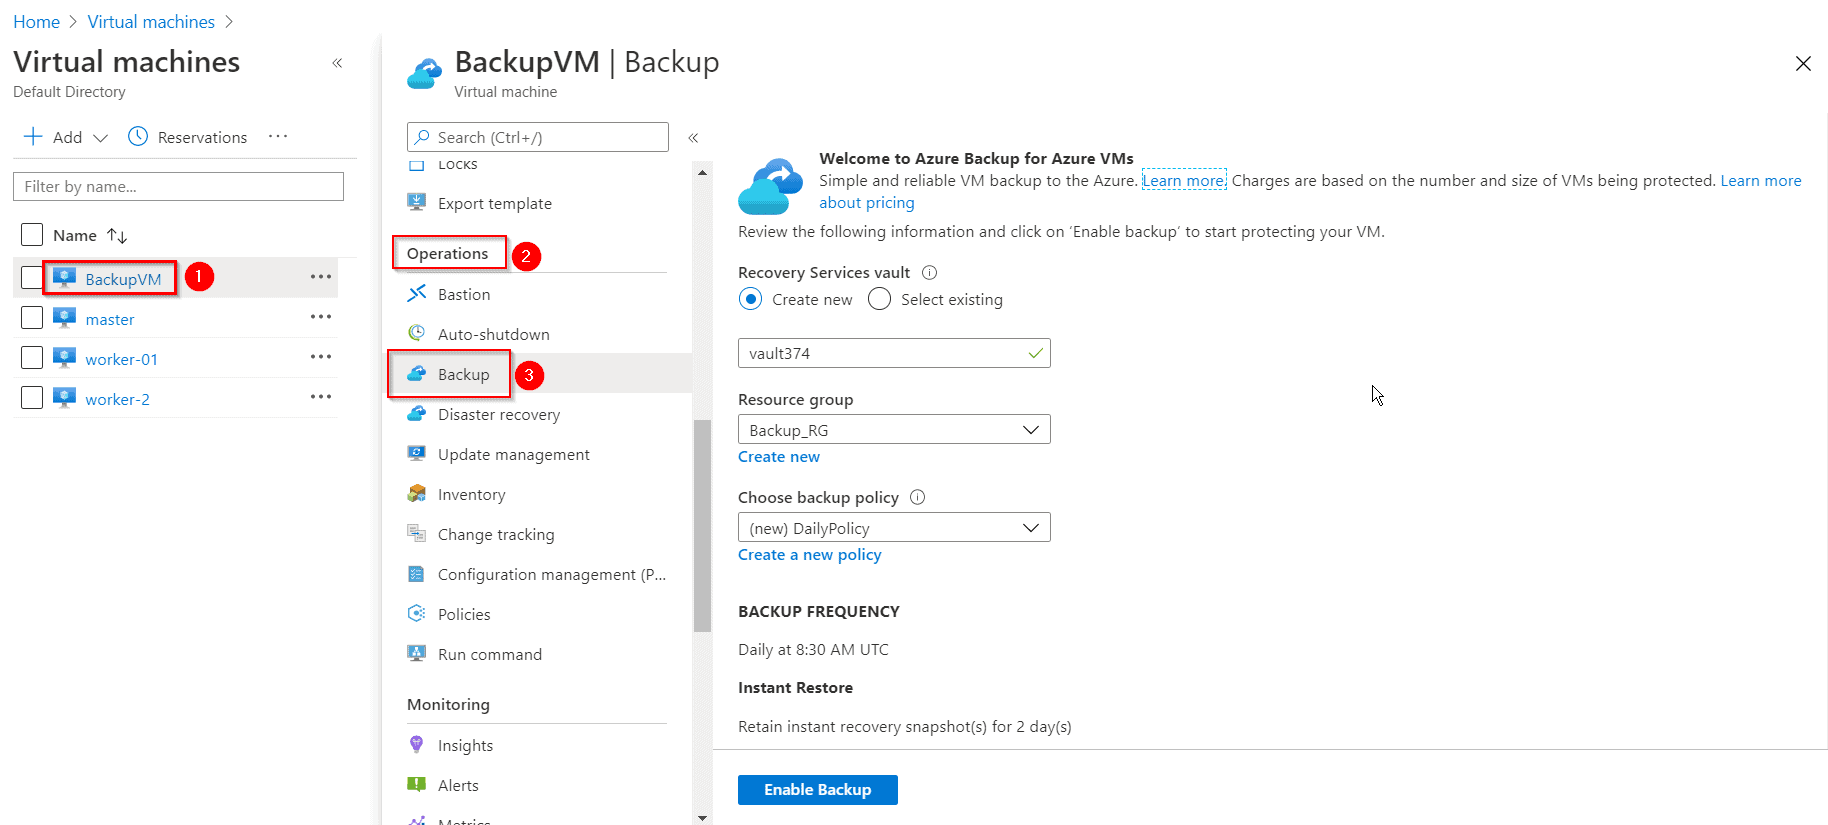
5. In Recovery Services vault, click Create new and provide the name for the new vault. A new vault is created in the same resource group and location as the virtual machine.
A Recovery Services vault is a storage entity in Azure that houses data. You can use Recovery Services vaults to hold backup data for various Azure services such as IaaS VMs (Linux or Windows) and Azure SQL databases. Recovery Services vaults support System Center DPM, Windows Server, Azure Backup Server, and more.
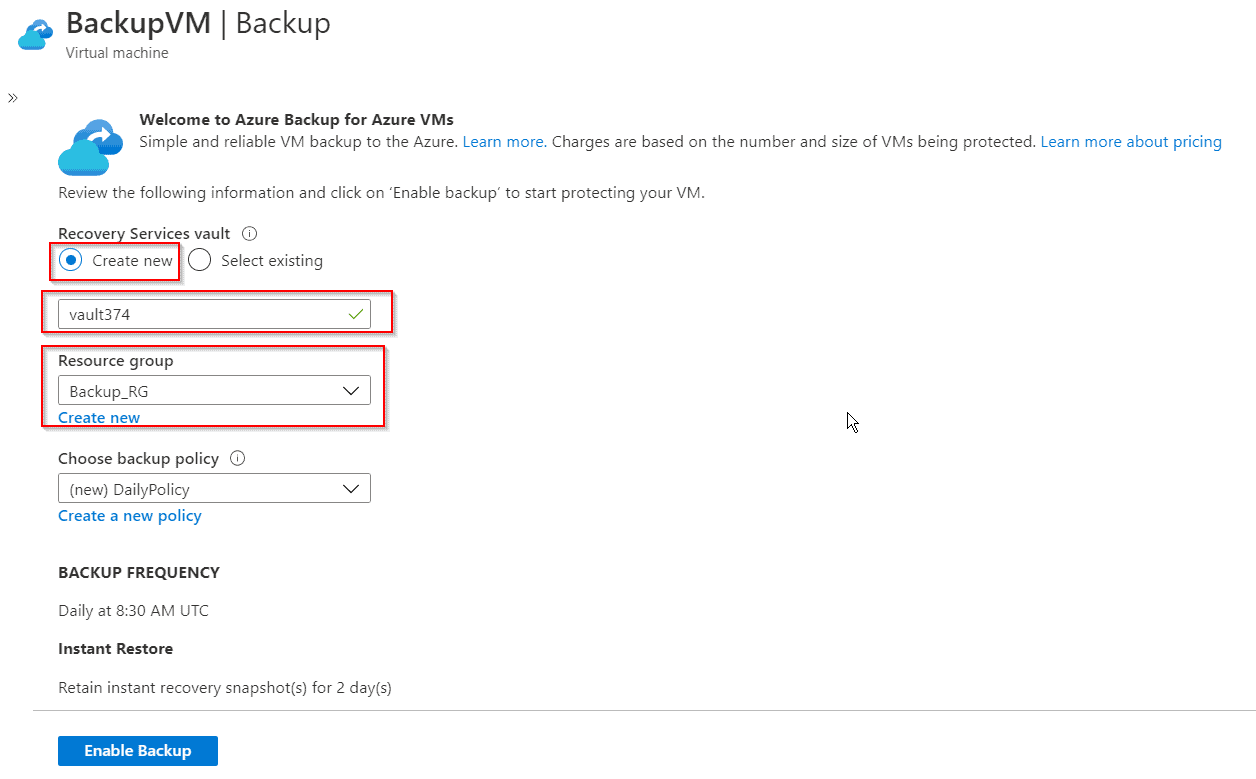
6. Under Choose backup policy, keep the default (New) DailyPolicy or Create New (if you want to change your policy), and then click Enable Backup.
Azure Backup provides backup for virtual machines by using custom-defined backup policies in a Recovery Services vault. Customers can edit a policy, associate more virtual machines to a policy, and delete unnecessary policies to meet their compliance requirements.
7. To create an initial recovery point, on the Backup blade click Backup now.
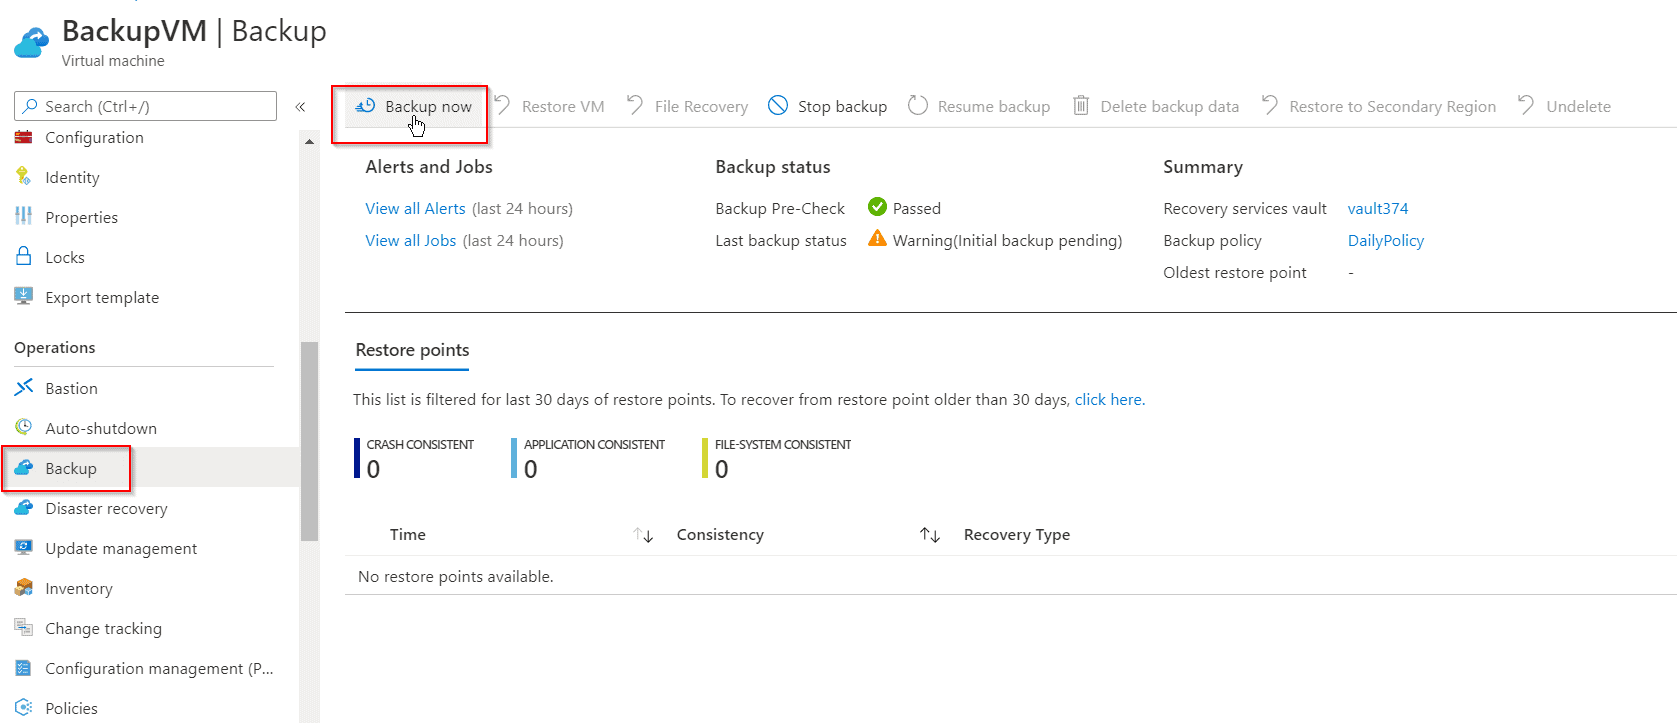
8. On the Backup Now blade, click the calendar icon, use the calendar control to choose how long the restore point is retained, and click OK.
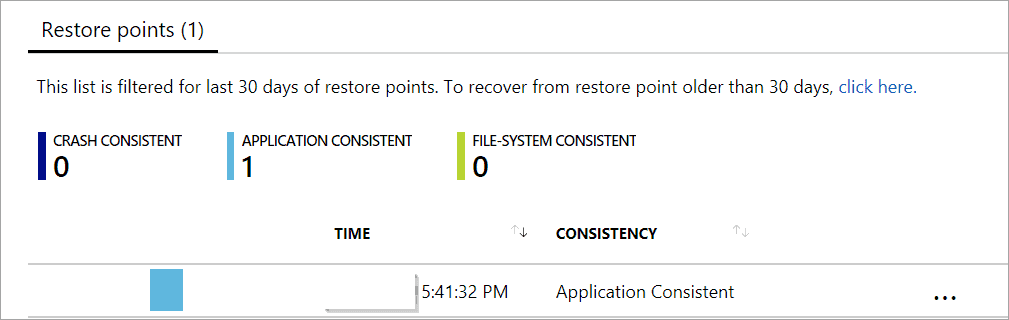
9. In the Backup blade for your VM, you’ll see the number of restore points that are complete.
The first backup takes about 20 minutes. Proceed to the next section of this blog after your backup is finished.
Recover VM file’s from your Backup Vault:
If you accidentally delete or make changes to a file, you can use File Recovery to recover the file from your backup vault. File Recovery uses a script that runs on the VM, to mount the recovery point as a local drive. These drives remain mounted for 12 hours so that you can copy files from the recovery point and restore them to the VM.
In this section, we show how to recover the image file that is used in the default web page for IIS as an example.
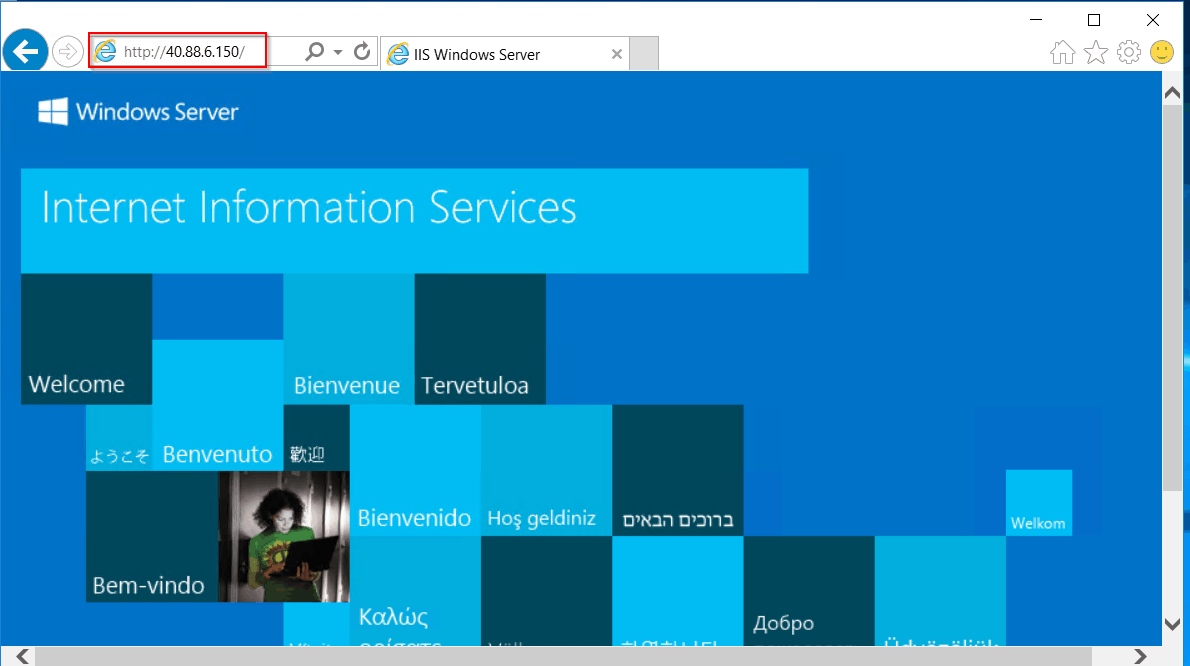
1. Open a browser and connect to the IP address of the VM to show the default IIS page.
Note: For this example, you need to install the Webserver (IIS) on your VM. (We have already installed the one)
2. Connect to the VM.
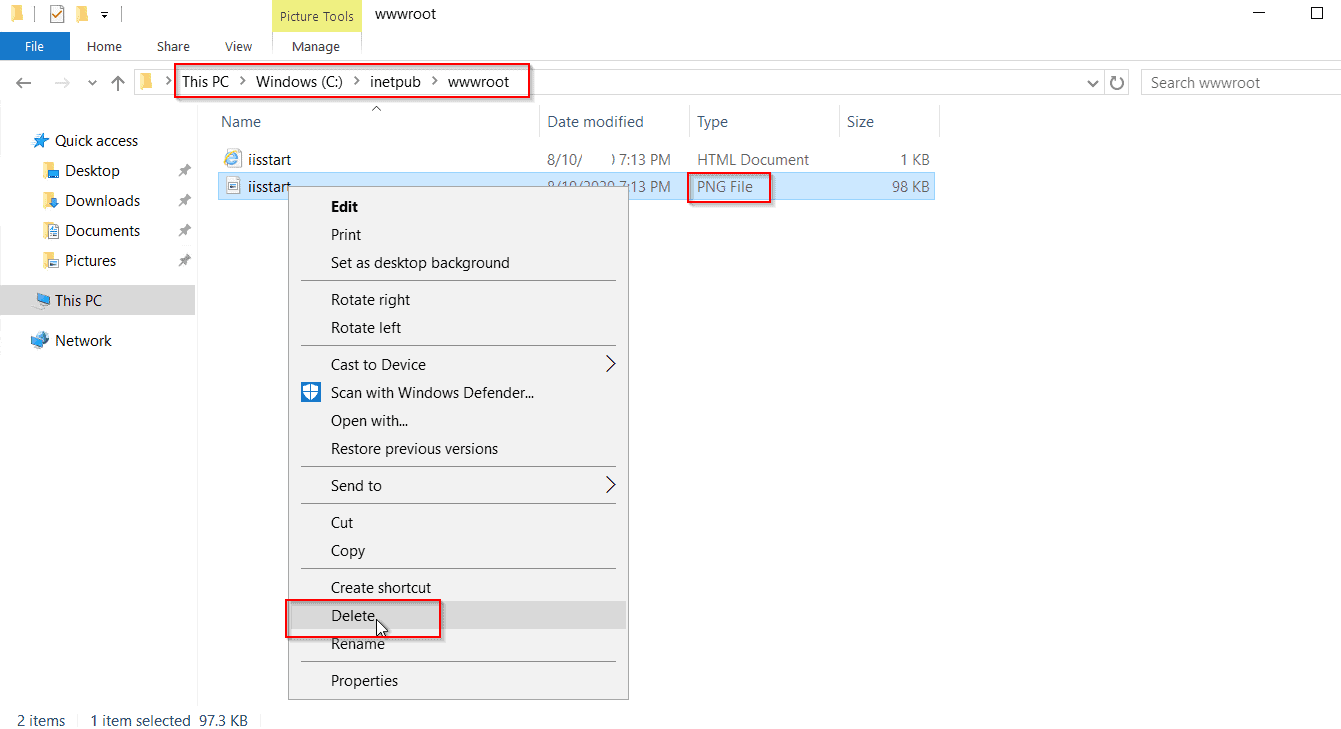
3. On the VM, open File Explorer and navigate to \inetpub\wwwroot and delete the file iisstart.png.
4. On your local computer, refresh the tab in which the IIS page was open before to see that the image on the default IIS page is gone.
5. On your local computer, open a new tab and go to the Azure portal.
6. In the menu on the left, select Virtual machines and select the VM from the list.
7. On the VM blade, in the Operations section, click Backup. The Backup blade opens.
8. In the menu at the top of the blade, select File Recovery. The File Recovery blade opens.

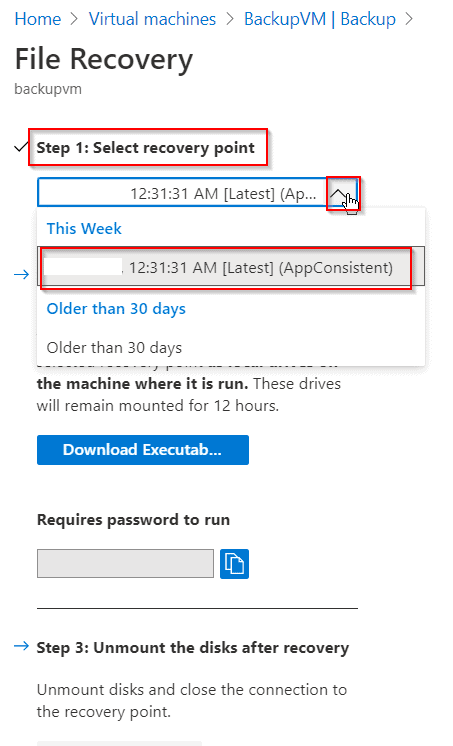
9. In Step 1: Select recovery point, select a recovery point from the drop-down.
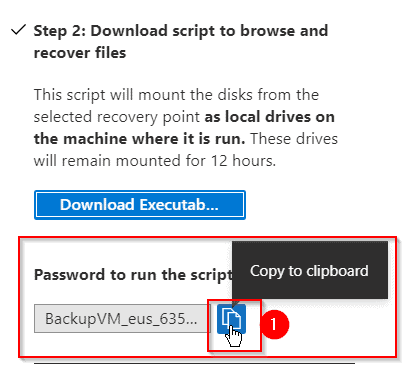
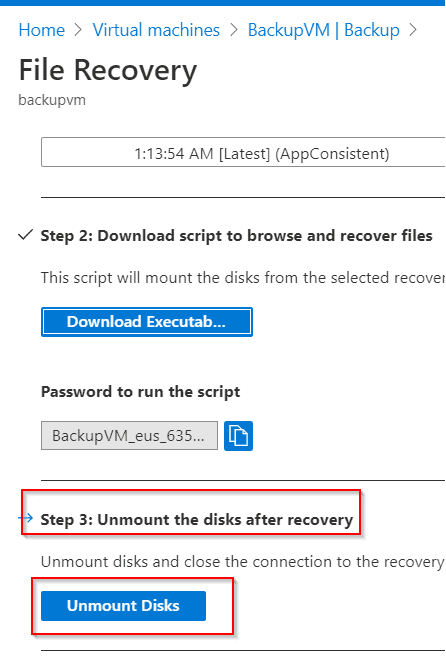
10. In Step 2: Download script to browse and recover files, click the Download Executable button.
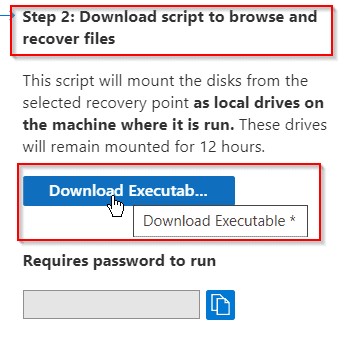
NOTE: Copy the password for the file and save it somewhere safe.
11. On your local computer, open File Explorer and navigate to your Downloads folder and copy the downloaded .exe file. The filename is prefixed by your VM name.
12. On your VM (using the RDP connection), paste the .exe file to the Desktop of your VM.
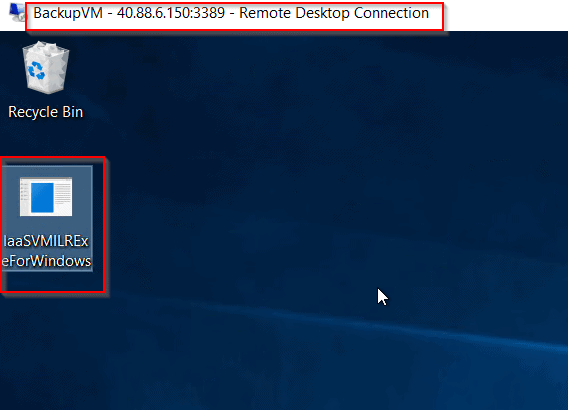
13. Navigate to the desktop of your VM and double-click on the .exe. A command prompt will start. The program mounts the recovery point as a file share that you can access. When it is finished creating the share, type q to close the command prompt.
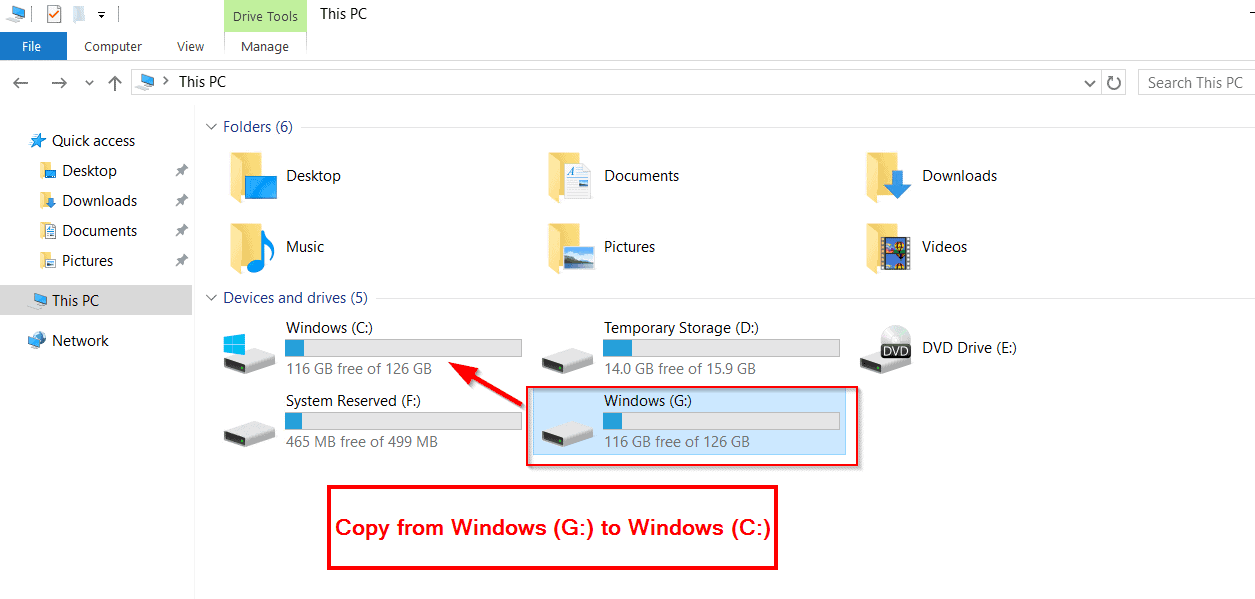
14. On your VM, open File Explorer and navigate to the drive letter that was used for the file share (which is a copy of your initial disk before backup).
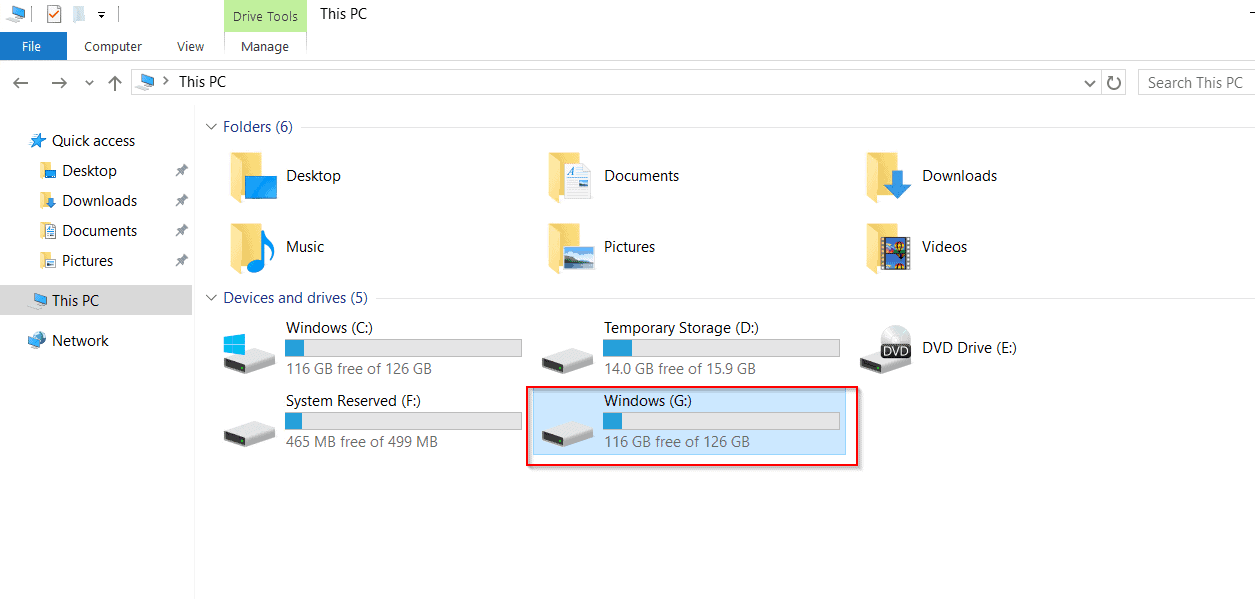
15. Navigate to \inetpub\wwwroot and copy iisstart.png from the file share and paste it into \inetpub\wwwroot. In this example, copy G:\inetpub\wwwroot\iisstart.png and paste it into c:\inetpub\wwwroot to recover the file.
16. On your local computer, open the browser tab where you are connected to the IP address of the VM showing the IIS default page. Press CTRL + F5 to refresh the browser page. You should now see that the image has been restored.

17. On your local computer, go back to the browser tab for the Azure portal and in the File Recovery section, Step 3: Unmount the disks after recovery click the Unmount Disks button. If you forget to do this step, the connection to the mount point is automatically closed after 12 hours. After those 12 hours, you need to download a new script to create a new mount point.
Now, we have finally created a Backup of the VM and restored the file of that VM. In this post, we have backup the file of an Azure Virtual machine but we can Back up files, folders, system state of on-prem databases or machines too by using Microsoft Azure Recovery Services (MARS) agent.
FAQ’s
Is Azure backup an example of PaaS?
Yes, Azure Backup itself is a service that runs on Azure's infrastructure, and you don't need to manage the underlying hardware or software. You simply configure backup policies and use the service to protect your data across various workloads on Azure, including IaaS virtual machines, databases and storage services
What is backup strategy in Azure?
An Azure backup strategy refers to a plan outlining how you'll create and store backups of your critical data in Azure. It ensures you have a recovery option in case of disasters, data corruption, or accidental deletion. Here are some key aspects of an Azure backup strategy:
- Services
- Backup Policies
- Data Lifecycle management
What is the name of the Azure backup service?
The Azure Backup service offers a range of services to back up and protect various types of data and workloads within the Microsoft Azure cloud environment. These services include:
- Backing up on-premises resources like files, folders, and system state using the Microsoft Azure Recovery Services (MARS) agent.
- Protecting on-premises virtual machines (VMs) with agents like DPM or Azure Backup Server (MABS).
- Backing up Azure VMs, including entire Windows/Linux VMs or specific files, folders, and system state using the MARS agent.
- Safeguarding Azure Managed Disks, Azure Files shares, SQL Server databases in Azure VMs, SAP HANA databases in Azure VMs, Azure Database for PostgreSQL servers, Azure Blobs, and Azure Kubernetes service.
Related/Reference
- [AZ-104] Microsoft Azure Administrator Certification Exam: Everything You Need To Know
- Microsoft Azure Cloud Cost-Saving Tips And Tricks
- Create Azure Custom Roles
- [AZ-104] Create And Connect An Ubuntu Virtual Machine In Azure
Next Task For You
Begin your journey toward Mastering Azure Cloud and landing high-paying jobs. Just click on the register now button on the below image to register for a Free Class on Mastering Azure Cloud: How to Build In-Demand Skills and Land High-Paying Jobs. This class will help you understand better, so you can choose the right career path and get a higher paying job.


My current data is very important to me and I didn’t know how to backup and restore after read this blog my problem is resolved you explained every thing very well and I really liked this blog post thanks for share with us.
Hi Shahmeer,
We are glad you liked our blog and this blog helped you in your task.
Please stay tuned for more informative blogs like this.
Thanks and Regards
Rahul Dangayach
Team K21Academy