![]()
Docker is a containerization platform for developing, shipping, and running applications inside containers. We can deploy many containers simultaneously on a given host. Containers are very fast and boot up quickly because they don’t need the extra load of a hypervisor in comparison to the virtual machines because they run directly within the host machine’s kernel. In this blog, we will talk about Docker Container Lifecycle Management.
In this blog, we will be covering the following topics:
- Docker Container Lifecycle Management
- Common Commands in Docker Container Lifecycle Management
- Difference between docker run, docker create and docker stop
- Difference between docker pause and docker stop
- Difference between docker rm and docker kill
- Port Mapping in Docker
- FAQs
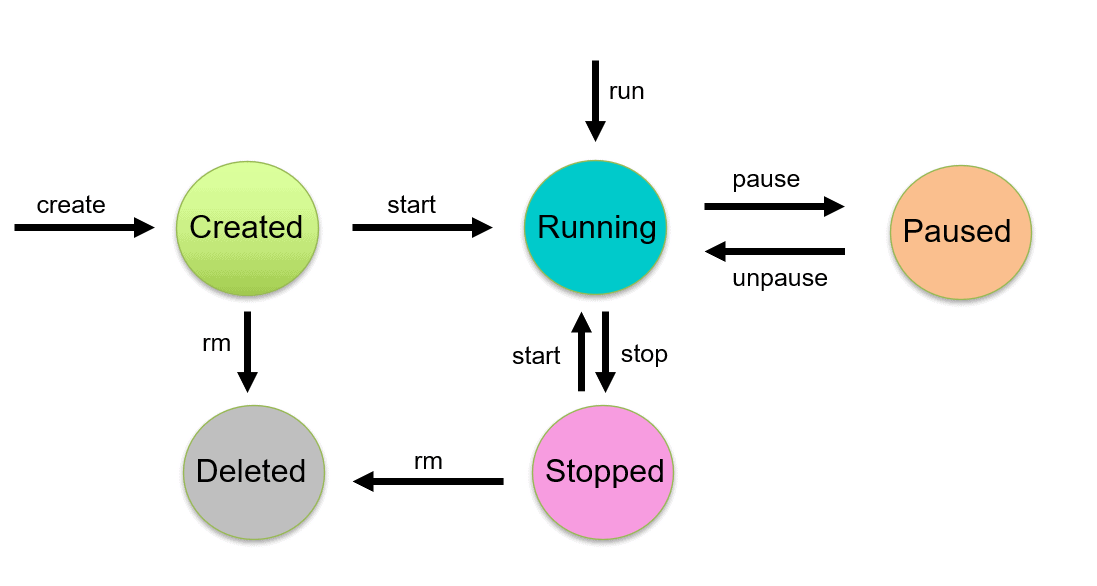
Docker Container Lifecycle Management
There are different stages when we create a Docker container which is known as Docker Container Lifecycle. Some of the states are:
- Created: A container that has been created but not started
- Running: A container running with all its processes
- Paused: A container whose processes have been paused
- Stopped: A container whose processes have been stopped
- Deleted: A container in a dead state
Commands in Docker Container Lifecycle Management
Managing the states of the Docker containers is called Docker Container Lifecycle Management. We have to assure that the containers are up and running, or destroyed if they are of no use anymore. For managing the Docker Lifecycle we have some common commands which are explained below.
Check out: Docker & Certified Kubernetes Administrator (CKA). A Kubernetes certification makes your resume look good and stand out from the competition. As companies rely more and more on Kubernetes, your expertise will be an immediate asset.
Create Containers
Using the docker create command will create a new Docker container with the specified docker image.
$ docker create --name <container name> <image name>

Start Container
To start a stopped container, we can use the docker start command.
$ docker start <container name>

Run Container
The docker run command will do the work of both “docker create” and “docker start” command. This command will create a new container and run the image in the newly created container.
$ docker run -it --name <container name> <image name>

Check Out: Docker Tutorial for Beginners.
Pause Container
If we want to pause the processes running inside the container, we can use the “docker pause” command.
$ docker pause <container name>

To unpause the container, use “docker unpause” command.
$ docker unpause <container name>

Stop Container
Stopping a running Container means to stop all the processes running in that Container. Stopping does not mean killing or ending the process.
$ docker stop <container name>

A stopped container can be made into the start state, which means all the processes inside the container will again start. When we do the docker stop command, the main process inside the container receives a SIGTERM signal. If you got confused about the term SIGTERM, then need not worry we will cover these signals later in the blog.
We can stop all the containers using a single command. In our case, 4 containers are running which you can see using the docker ps command.
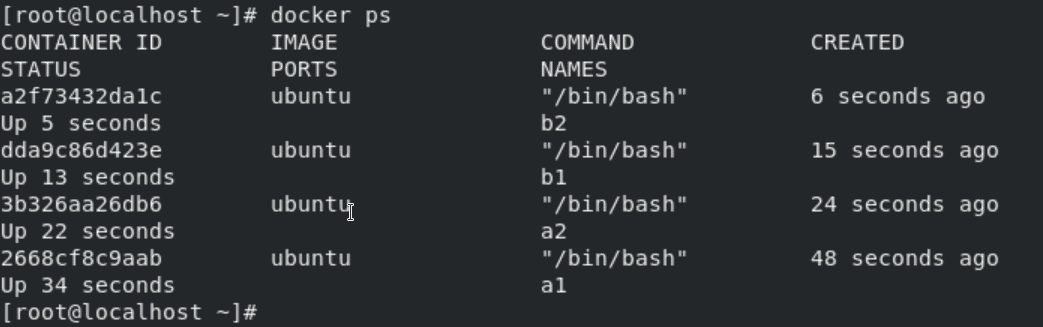
To stop all the running containers we can use the following command:
$ docker stop $(docker container ls –aq)

Check Out: How to Fix Vulnerabilities in Docker Images.
Delete Container
Removing or deleting the container means destroying all the processes running inside the container and then deleting the Container. It’s preferred to destroy the container, only if present in the stopped state instead of forcefully destroying the running container.

As we tried deleting a Container which was in running state, so the docker daemon throws an error. We have to first stop the container and delete it.
$ docker stop <container name>

$ docker rm <container name>

We can delete or remove all containers with a single command only. In our example, 4 containers (not necessarily running) are there which you can see using the docker ps -a command.
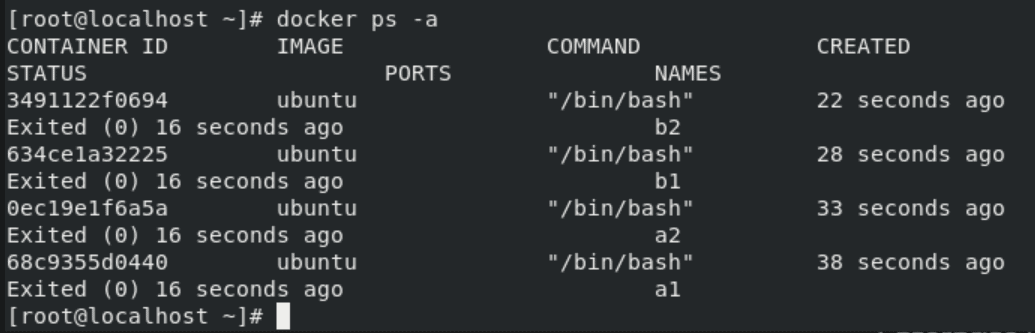 We can see there are 4 containers which are not in the running state. Now we will delete all of them using a single command which is given below:
$ docker rm $(docker ps -aq)

Kill Container
We can kill one or more running containers.
$ docker kill <container name>

Also read: AKS Cluster is a Kubernetes cluster, which is created on the Azure Kubernetes Service (AKS) by Microsoft is one of the leading managed K8s services.
Difference between Docker Create, Docker Start And Docker Run
Docker create command creates a new container from the specified image. However, it will not run the container immediately.
Docker start command is used to start any stopped container. If we used the docker to create a command to create a container, then we can start it with this command.
Docker run command is a combination of creating and start as it creates a new container and starts it immediately. In fact, the docker run command can even pull an image from Docker Hub if it doesn’t find the mentioned image on your system.
Also read: Container (Docker) vs Virtual Machines (VM) to understand what is their difference.
Difference Between Docker Pause And Docker Stop container
The docker pause command suspends all processes in the specified containers. Traditionally, when suspending a process the SIGSTOP signal is used, which is observable by the process being suspended. Also, the memory portion would be there while the container is paused and again the memory is used when the container is resumed.
When we use the docker stop command, the main process inside the container receives SIGTERM signal, and after some time, SIGKILL. Also, it will release the memory used after the container is stopped.
SIGTERM is the signal of termination. The intention is to kill the process, gracefully or not, but to first allow it a chance to clean up.
SIGKILL is the kill signal. The only behaviour is to kill the process, immediately.
SIGSTOP is the pause signal. The only behaviour is to pause the process. The shell uses pausing (and its counterpart, resuming via SIGCONT) to implement job control.
Check out this article on Docker Compose
Docker rm Vs. Docker Kill
docker container rm: Using docker rm, we can remove one or more containers from the host node and for doing container name or ID can be used.
docker container kill: The main process inside each container specified will be sent SIGKILL or any signal specified with option –signal.
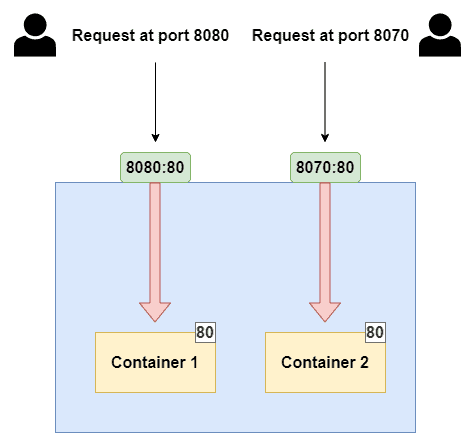
Port Mapping in Docker
In Docker, a container is an isolated environment that runs applications and services, similar to a physical or virtual machine. Just like these machines, containers have their own set of ports. However, by default, these ports are not directly accessible from outside the container. This is where port mapping, also known as port forwarding, comes into play. Port mapping allows you to expose the ports within a Docker container, making the services running inside the container accessible to the host system or to other containers within the Docker environment.
Key Concepts in Port Mapping:
Port: Ports are numeric identifiers used to differentiate between different network services running on the same host. Ports are categorized into two groups: well-known ports (ranging from 0 to 1023) and dynamic or private ports (ranging from 1024 to 49151). Well-known ports are reserved for commonly used services like HTTP (port 80) and HTTPS (port 443).
Host Port vs. Container Port:
- Host Port: This is a port on the host system, which is the machine where Docker is running. The host port is used to access the service or application running inside the Docker container from the host machine or from external systems.
- Container Port: This is the port on which the service or application inside the Docker container is listening. It may be a specific port required by the application, for example, a web server listening on port 80.
Dynamic Mapping: If you omit the host_port, Docker will automatically assign an available host port. This is useful when you want to avoid port conflicts on the host system.
Difference between the -p and -P options in Docker:
-p (or –publish):
The -p (or –publish) option is used to explicitly specify port mappings when running a Docker container. It allows you to map a specific port on the host system to a specific port inside the container. The syntax for using -p is -p <host_port>:<container_port>.
For Example:
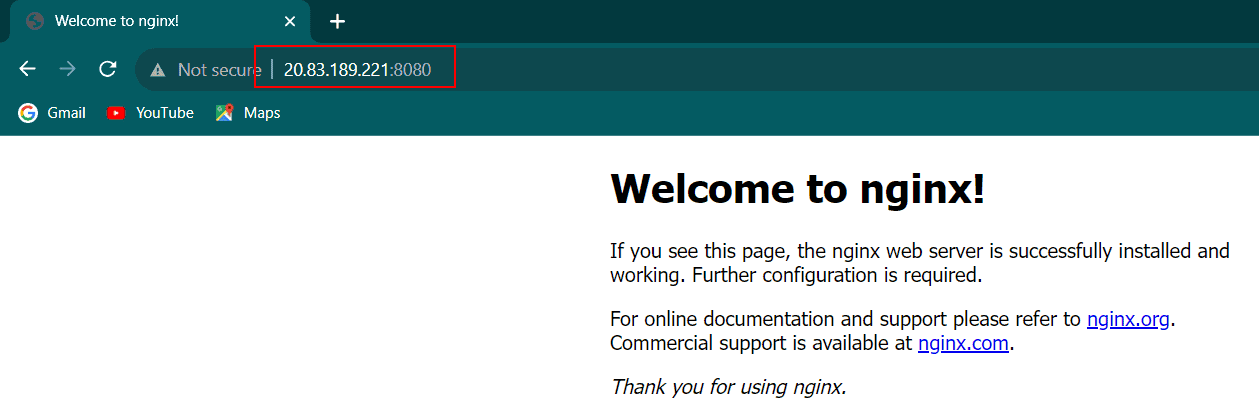
1. Deploy an nginx container by exposing its port to 8080.
$ docker run --name web1 -dit -p 8080:80 nginx

2. List the container
$ docker ps

3. Now we can access the app running inside the container from browser using the Public ip of the host machine and the port like below-
http://<PublicIP>:8080
-P (or –publish-all):
The -P (or –publish-all) option is used to automatically publish all exposed ports defined in the Docker image to random ports on the host system. When you use -P, Docker assigns random available ports on the host for each exposed port in the container.
For example:
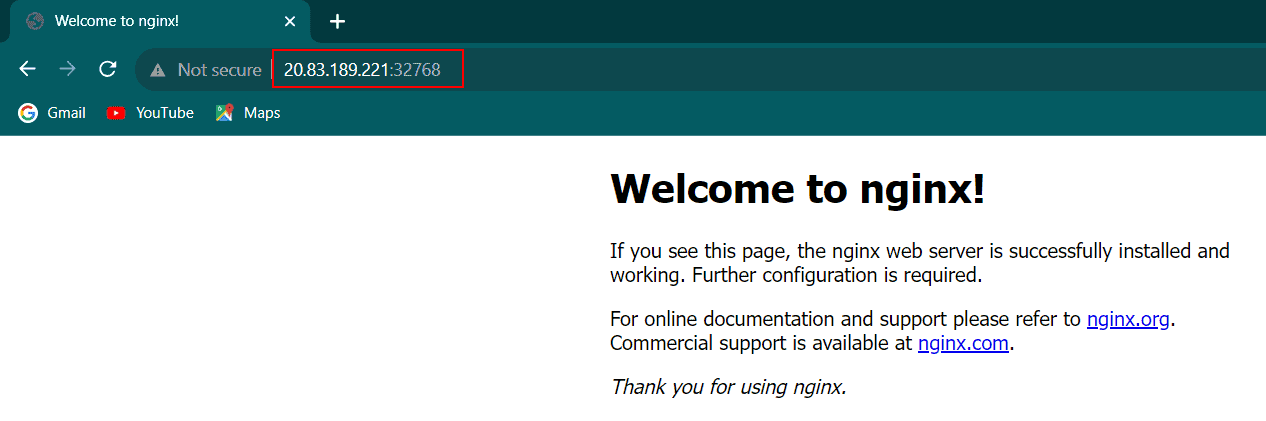
1. Deploy an nginx container by exposing its port to any random port using ‘-P’
$ docker run --name web2 -dit -P nginx
$ docker ps

It has been exposed on a random port, i.e., 32768. Now, we can access it using this port.
 Common Use Cases for Port Mapping:
 Common Use Cases for Port Mapping:
- Exposing Web Services: Port mapping is frequently employed to expose web services running inside containers. This includes web servers like Nginx or Apache, or web applications. Port mapping allows users to access these services via a web browser.
- Database Access: Port mapping can be used to connect containers to database servers. This enables applications running in containers to interact with database services running outside of the containers.
- Load Balancing: Port mapping plays a role in load balancing strategies, where multiple containers providing the same service are mapped to the same host port. This ensures even distribution of incoming requests.
Read this blog to know about what is Kubernetes Pod which is an important component of Kubernetes.
Frequently Asked Questions
What is the lifecycle of a Docker container?
The lifecycle of a Docker container involves creation, running, stopping, and removal. Containers are created from Docker images, run as isolated instances, can be stopped or paused, and can be removed when no longer needed.
Do Docker containers run forever?
Docker containers do not run forever by default. They run until the main process inside the container completes or until explicitly stopped. You can use options like -d to run containers in the background, keeping them running as long as needed.
How do you create a docker container from an image?
To create a Docker container from an image, use the docker run command followed by the image name. For example: docker run image_name. This command starts a new container based on the specified image.
How do you list all the running containers?
To list all the running containers, you can use the docker ps command. This command displays a list of running containers along with their details such as names, IDs, and status.
How to delete a stopped container?
You can delete a stopped container using the docker rm command, where is the ID or name of the stopped container. This command removes the container from your system.
Related Post/References
- Docker vs Virtual Machine | Physical vs Virtual Servers
- Docker Storage: Volume, bind mount, tmpfs and NFS
- Containers for Beginners: What, Why and Types
- Docker Architecture | Docker Engine Components | Container Lifecycle
- Docker Images: A Complete Guide for Beginners
- Kubernetes vs Docker – Understand the Difference
- CKA Certification Exam (Certified Kubernetes Administrator)
- Certified Kubernetes Administrator (CKA): Step-by-Step Activity Guide (Hands-on Lab)
- Visit the Official documentation of docker run, docker create, docker pause, docker stop all containers and docker rm.
Join FREE Class
Discover the Power of Kubernetes, Docker & DevOps – Join Our Free Masterclass. Unlock the secrets of Kubernetes, Docker, and DevOps in our exclusive, no-cost masterclass. Take the first step towards building highly sought-after skills and securing lucrative job opportunities. Click on the below image to Register Our FREE Masterclass Now!


Leave a Reply